Import photos
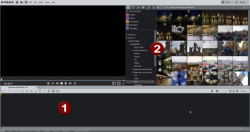
When a new program is created, the program interface appears in storyboard mode and the arranger (1) is empty.
-
Open a folder containing photos by using the navigation button in the Photo Explorer (2).
You will then see all of the photos – as well as all other importable files – contained in that folder.
-
Tick to select a media file for import.
You will see at a glance how many files have already been selected for import.

NOTE Select multiple photos by holding down the Ctrl key when clicking.
-
Click on the arrow to import the photos into the project.
In this manner, you can select and load photos one after the other. Naturally, you can also add photos by dragging and dropping them into your project.
-
Press the space bar or use the transport console below the preview window to play your slideshow.

During playback, each photo is shown one after the other in the program monitor.
Replace or insert photos
To import photos into an existing project, there are two useful features which can be used to replace photos in a slideshow or to insert photos without creating gaps or overlapping the photos already in the slideshow.
|
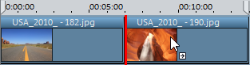
Replace existing photos: Hold down the Ctrl key when dragging photos onto the Timeline and place the new photo on top of an existing photo to replace it. |
|
|
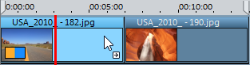
Insert photos: Hold down the Ctrl key when dragging photos onto the Timeline and place the new photo between two existing photos to insert it. The photos following the inserted photo will be shifted backwards without creating gaps or overlaps. |
|
NOTE Take note of the tooltip that is displayed and whether the photo is highlighted.
Sorting photos
Arrange the photos in the order you want. In a good slideshow, the pictures tell a story that has a beginning, middle and end and includes lots of dramatic tension that builds up to an exciting climax.
Here's how to sort photos:
-
Stay in storyboard mode and adjust the view to better organize your project.

-
Use the slider to enlarge the view so that you can see as many photos as possible.
-
Magnify the view
-
-
Drag each photo from the photo bar and drop it on the position you want.