Storyboard mode 
Storyboard mode is used to view the layout of slideshows. This view offers an easy, streamlined interface to simplify the editing process. All photos are displayed in linear sequence with preview images. Use this mode to arrange your media files in order and then add and edit effects.

|
1 |
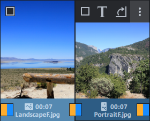
Photo/video track All photos and videos are displayed with thumbnails in order in this track. By looking at the pictogram next to playback duration and the dark bar, you can tell at a glance which photos are in portrait
|
|
2 |
Audio track This displays the fourth track (audio track by default) of your project. In certain cases, other objects, such as titles or overlay effects may display instead of the audio. This may occur when you either have older projects open where the sound effects are on a different track, or you have manually placed the sound effects on a different track in timeline mode. |
 or landscape format
  .
.
In Storyboard mode, you can adjust the display time, edit transitions and perform a number of other tasks.

Transitions (fades) |
Click on the icon between the photos to set a transition. A menu will open from which you can select different transitions. |

Display time |
Click on the time to adjust the display duration for the selected photo or for all photos. |
If you select an object, further buttons are displayed:
|
Select object |
Tick to select an object to work with. |

Add captions and texts |
The title editor will open. Enter text, e.g. for subtitles or opening and closing credits. Texts can be displayed in all kinds of fonts and colors. To make your credits scroll down the screen, you can select different movements, effects, and designs from the template menu. |

Effects |
You can select the effects for editing sounds and images in the "Effects" menu or by clicking this button. You can use the "Image editing (external)" feature to open the photo in the separate image editing program. After editing the image, it is transferred directly to the Photostory deluxe Storyboard. |

Rotate |
If a photo is on its side or upside down, click on the Rotate button. The photo will rotate 90 degrees. |

 Maximizing the overview will give you the best view when working with a large number of photos.