Burn project
Here you can burn your Photostories to DVD, Blu-ray Disc or AVCHD including a selection menu. All Photostories loaded into the project will be included. If you want to remove some of the Photostories you've loaded, switch to the "Photostory" screen again and delete the unwanted Photostories from the project there.
Click the Burn button.

|
1 |
Views: Here you can switch between the "Preview" and "Edit" views. |
|
2 |
Preview: This shows you what your disc will look like when you put it into a player. |
|
3 |
Remote Control for testing the menu function. |
|
4 |
Categories: Here you can open various types of menu templates. |
|
5 |
Menu Templates: A selection of designs you can use for your menu. In "Edit" view you can combine various elements for different templates to create your own design. |
|
6 |
Burn: Here you can open the disc selection dialog. |
Preview and editing
Photostory deluxe provides two different views for designing and previewing the disc menu.

The preview mode is mainly intended to behave like a DVD player or Blu-ray player for checking the disc menu under realistic conditions.
Only templates may only be used; more detailed editing of the disc menu is not possible at this time.

During editing, you may adjust many features of the disc menu. There are many templates available for this that may be changed flexibly once loaded.
Remote control
The virtual remote control is an important helper when it comes to checking how the disc will perform later. This remote control works just like a normal remote control and can be used to navigate through the disc just like you would on a normal player. The DVD menu navigation can now be initiated with the arrow keys or the "OK" button. Activated buttons are highlighted.

|
The number keys select the corresponding entry on the menu page. All menu entries are marked with a corresponding number. Within a chapter menu, playback is started from the particular chapter. In the movie menu, the corresponding chapter menu (if available) is changed or Photostory playback is started.
Navigation buttons: These buttons can be used to navigate through the menu of the disc to be burned. The entries can be changed and confirmed by clicking "OK". The remote control works just like the remote control for your home DVD player.
Skip/move forward/back: This allows you to skip to the next or previous scene while playing back your movie. In the menu, you can skip forward or back from one menu page to another.
Play: Starts the first entry in the menu. In case chapter menus are available (see menu modes), the chapter menu will be displayed first. |
Pressing the Play button again starts playback.
Stop: Pressing stop halts playback.
Disc switches to the first page of the movie menu.
Sub switches into the chapter menu (if available) of the currently selected Photostory.
Menu
Photostory deluxe can add selection menus to your movies. The menu is also burned to disc and appears when inserted into your player. Just like with a purchased DVD or Blu-ray Disc, you may easily select your movies with the help of preview pictures, or access particular chapters within a movie.
Menu templates
At the bottom of the screen, you'll see an array of preset menu templates. On the left-hand side you’ll find a tree structure from which you can choose the type of menu template.
- Animated: These templates contain background and introductory videos as well as music. The DVD menu tools are displayed in various modes (e.g. selected buttons). These templates are designed for DVDs.
- Static: Here you will find templates that are also designed for DVDs. They consist of normal background pictures and elements
- Unique: These templates adjust to your disc project; the photos you use are integrated directly into the menu.
NOTE For these menus both the "Movie menu" and "Chapter menu" modes have to be activated in "Menu design".
- HD (DVD, Blu-ray, AVCHD): These menus contain razor sharp high-resolution background images that look especially good on HDTVs.
If you've selected one of the menu templates, you can use the horizontal scroll bar to view all the others available. There are lots of options when using the templates:
- If you wish to apply a template to all menu pages, click on "Complete" in the template bar and double-click on the template of your choice. The complete template will then be applied.
- You can also combine the various elements of the individual templates. If, for example, you wish to combine the text format of a template with another background, select "Text" and double click on the template with the desired text. The preview in the middle shows you the results immediately.
You can load the layout (or individual layout elements) for the current menu (movie or chapter) as well as for all menus.

|
Click on this button to load the current selection for the entire disc menu. Clicking on the small arrow next to the button opens a menu containing additional options for applying the current selection to the disc menu or current menu page. |

|
Here you can set the screen format for the disc menus (widescreen or 4:3). |

|
Starts the preview of the menu animation |
Edit disc menu
The preview pictures and the menu title can be moved freely in the program monitor. The menu may be edited very flexibly.
Activate the Edit button to do this.
Hold down the left mouse button and drag text boxes or graphical elements to the desired position. You can adjust the size by dragging out the corners and edges of the frame.

| 1 | PSD import/export: Clicking on this button imports/exports a self-created menu template as PSD file |
| 2 | Undo/Redo: The last edits can be restored. / The Undo step that was undone immediately before can be restored. |
| 3 | Set aspect ratio: To avoid distortion, use this button to set the aspect ratio for the menu elements. |
| 4 | Group: Menu elements are moved or resized simultaneously as a group, including the description text and number. |
| 5 | Fade in TV display area in the program monitor: This option displays the image borders of the television as lines in the program monitor. |
| 6 | Grid: You can precisely align the frame positions with one another using the grid button. Using the small arrow next to the button you can open a dialog to fine tune the grid settings. |
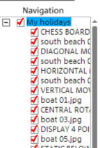
Navigation
|
Removing the red check deactivates the corresponding entry in the chapter menu. The scenes are still played, but you can no longer select them directly from the menu.
|
Disc options
Here you can activate or deactivate certain elements or even complete menus.
NOTE To create varied templates, not all templates include all elements.
Intro video: Press this button to load videos to be used as introductions to your discs. The following formats are supported: "*.avi", "*.mpg", "*.mxv", and "*.vob". The intro is played immediately after the DVD has been inserted into the player. The DVD menu will then appear. A check mark Do not skip ensures that the intro video must be played completely each time the disc is inserted and that it may not be skipped with the remote control or otherwise.
Photostory & photo menu
The disc menu essentially consists of two layers:
Film menu: The upper layer includes the film menu, which is only used if a project contains multiple Photostories.
Chapter menu: This is the lower layer of the disc menu, which takes the photos (in the first track of the timeline mode) into the Photostory as chapter entries.
IMPORTANT A chapter menu cannot contain more than 99 entries. If your Photostory contains more photos, you should either burn the Photostory without the chapter menu or split your slideshow into several parts.
Preview pictures: Shows/hides the preview pictures in the disc menu.
Numbering: The numbers beside the menu entries can be selected directly using the remote control, but they be disrupted from time to time. Use this option to show/hide them.
Frame: A frame borders the preview pictures. If you don't want a frame, it can be easily removed using this option.
Designing a page

|
Background: Here you have three options for creating a static background image for the menu:
|

|
Edit menu templates: In the path settings, open the PSD editor to customize the menu templates. |

|
Apply to all pages: Applies changes made on the current menu page to all other menu pages. |
Add/Remove menu pages
 Adds a new menu page.
 Removes the selected menu page.
Animated selection menus
You can also add audiovisual animations to the disc menus. As required, background videos are played as endless loops while the menu is shown on the screen. You can also set up background music in various formats or any background picture for each menu.
Sound/music: Load an audio file and use it as an animation in the menu background.
Video: Load a video or graphics file and use it as an animation in the menu background. In addition to the options for the background graphic (see above), you can also use a sequence from a loaded slideshow or from a different video file.
Background video options:
-
Create animated menu buttons: The preview images for individual movies in the movie menu are shown as small movie samples. Set the start point and length of the animation using the sequence options faders.
-
Use the audio track of the video: The audio track of the background video is used with the menu.
-
Play menu animation as a loop: The background video (audio and/or video) is played back as a loop.
-
Length of the menu view is set by: Audio/video or whichever medium is longer. You can specify how long the background video should be here. The other medium will be played as a loop.
Designing buttons
Photostory deluxe enables easy editing of all buttons together with their menu entries.
|
|
Pressing this button or double-clicking the menu entries allows menu entries you have created to be edited. The dialog with the properties of the menu entries will open. |
|
|
These buttons open an external program for further editing of the background pictures or selected menu elements. |
|
|
Apply to all objects: Applies the properties of the selected button to all remaining buttons. |
Add/Remove buttons
Adds a new button.
Removes the selected button.
 To test the targets of menu entries, select the desired menu entry and click the button.
Menu entry properties
Double-clicking the preview picture or a menu entry opens an editor for you to adjust the preview picture or menu entry.

In the text input field, you can enter any text to match the chosen menu entry.
Font size: Set the height of the text in points.
Font color: Define the foreground color of the text.
Font: Here you can set which font and which style (bold, italic, etc.) should be used.
Border: Here you can set a colored border for your text. You can choose the color from the color field. The size of the border is set in pixels.
Shadow: Here you can set the color and size of the shadow that will appear underneath the text.
3D effect: If you would like to make your text appear three-dimensional, you can set the width, height and color of the 3D effect.
Apply to all: Except for the text, all settings are applied to all entries in the current menu.
Use frame from movie: Use the fader to set which frame should be used in the video as a preview picture. The numerical input fields are sorted as follows: Hours:Minutes:Seconds:Frames.
Use different graphic: Here you can also load your own bitmaps to be used as menu pictures.
NOTE Some menu templates may not provide menu images. That means changing the menu image won't have any noticeable effect.
You can enter which action should be carried out once the Photostory has finished playing. The following options are available:
Stop playback: This option depends on the DVD player being used. Most DVD players show the DVD player's own menu (or background picture) after playback.
Jump to movie menu/chapter menu: Jumps back to the previously shown menu.
TIP If one of these two options is not available, check which menu mode is set.
Jump to next movie: The next Photostory will be played without any additional action.
Play Photostory as an endless loop: You can burn every Photostory onto a miniDVD or DVD as a loop as well. This means that the Photostory will be played as a endless loop until the next menu entry is accessed using the remote control or playback is stopped. This way, you can transform your TV into an aquarium, a train journey, a fireplace, or anything you want, ready to watch over and over again.
NOTE This option only works with DVDs or miniDVDs.
Memory
If you would like to know how much memory space you require for various encoder settings, you should run some simulations before burning. So you don't waste any blank CDs while testing, you should activate the "Simulate first" option.
Create, for example, a short (ca. five min.) disc project and simulate burning in multiple cycles with various settings. After every simulation you can read out the size of the created file on the hard disk.
From the results, you can extrapolate how much disc space your disc project will require. The memory requirements of a five-minute disc project would have to be multiplied by 20 in order to estimate the space required for a 100-minute movie. You should also add buffer for the selection menu.
Separate project onto multiple discs
Automatic: If the disc project requires more memory than is available on the disc, a dialog will appear before burning asking whether the disc project should be automatically segmented for multiple discs. Confirm this by clicking "Yes". The disc project will then be automatically divided into individual disc projects and burned sequentially onto multiple discs. This is the easiest method as everything is automatic and all you have to do is insert a new blank CD when required.
Manual:
Case 1: If several Photostories do not fit onto a single disc.
In this case, delete as many Photostories as is needed until the remaining Photostories fit onto the disc. You can create a new disc project and load and burn the other Photostories afterwards.
-
Switch back to the "Photostory" interface.
-
All Photostories which shouldn't be burned at this time must be placed into a project of their own. Save them separately to your hard disk ("File > Manage Photostories > Export Photostory file", for example, as "Part 2" and "Part 3").
-
Remove the desired Photostories (e.g. "Part 2" and "Part 3") from the project (menu "File > Manage Photostories > Remove from project").
-
Switch to the "Burn" interface and burn the first Photostory ("Part 1") to disc.
-
Create a new disc project ("New" button), switch to the "Edit" view and load it into the second Photostory ("Part 2").
-
Switch to the "Burn" interface and burn the second Photostory to disc.
-
Repeat the last two steps for each separately saved Photostory.
Case 2: If a long Photostory doesn't fit onto a disc. In this case, the Photostory has to be split into two or more parts that will be burned separately onto disc.
-
Switch back to the "Photostory" view and place the playback marker to the position where you want to divide the Photostory. Select "Separate Photostory" in the Cut menu in the toolbar.
-
All passages behind the playback marker will be removed from the overly long Photostory and made into a separate Photostory. Both Photostories can be controlled through the Photostory tab in the arranger. Save both of them separately to your hard disk ("File > Manage Photostories > Export file" menu option, for example, as "Part 1" and "Part 2").
-
Remove one of the two Photostories (for example, "Part 2") from the disc project ("Manage Photostories -> Remove from project" menu option).
-
Switch to the "Burn" interface and burn the first Photostory ("Part 1") to disc.
-
Create a new disc project ("New" button), switch to the "Photostory" view and load it into the second Photostory ("Part 2").
-
Switch to the "Burn" interface and burn the second Photostory to disc.
Disc selection dialog
 In the "Preview" view you can open the disc selection dialog by clicking the large "Burn" button.
 In the "Edit" view, you can access the same dialog using this button.
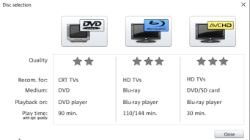
Here you can select what kind of disc you would like to create.
-
DVD is the right format for projects that will be played back on a normal DVD player.
-
Blu-ray and AVCHD are good for playback on high-resolution screens.
Burn dialog for DVD player
Here you can select your burner and the type of disc. If you know something about encoders, you can also adjust the encoder settings if the preset is not sufficient.
When burning a Blu-ray Disc, go to "Data carrier format" and select whether you want to use the MPEG-2 codec or the advanced, but computationally more intensive H.264 codec. If activated, H.264 is set by default, otherwise the MPEG-2 codec.
Proceed as follows to burn a disc:
-
Set up burner and burn speed: If you have multiple burners installed, you can select which device you wish to use in this menu.
-
Encoder settings: Use the "Encoder settings" button to access the selection dialog to specify settings for the MPEG encoder (memory requirements, quality, and duration of the MPEG conversion). "Advanced settings" accesses a dialog featuring additional options. Here you can adjust all the fine settings of the MPEG encoder.
-
Burning disc/starting video encoding: The button "Burn disc" starts the disc burning process. Every time you burn and every time a simulation is carried out, the disc project is encoded. Please note that the MPEG file is not deleted from the hard disk after the burn process has finished. Depending on the length of the project, encoding and burning may take some time. The time remaining can be seen in the dialog.
Create ISO image
The simplest way to create an ISO image is to select "Image Recorder" under "Burner". When starting the "Burning process", you have to specify a name for the image file you wish to create.
Options
Simulate first: If you are not sure about the write speed or memory requirements of the selected disc, you can simulate the write process before burning.
Activate buffer underrun protection: Many disc drives support technology that prevents the dreaded "buffer underrun". Use this option to activate this protective feature and burn your files at higher speeds without risking making a coaster out of your blank disc.
Completely format DVD/CD-RW media: This option reformats the RW media and deletes all existing file material.
Shutdown computer after burning: Activate this option to automatically turn off the computer after encoding and burning has been completed. You could, for instance, start the encoding and burning process in the evening, and then you don't have to wait for the process to finish to switch off your computer.
DVD-compatible write at least 1 GB: Some DVD players have problems reading DVDs which contain less than one GB of data. This option fills the DVD to the one GB limit with "empty data" so that this problem doesn't occur.
Burn standard video DVD onto same disc: You can use this option with a WMV HD disc to burn an additional normal DVD video. This ensures that your discs can also be played back on stand-alone DVD players. See Multi disc.
Activate the burner's defect management option: If a certain section of the disc is defective, this will be recognized by the burner and labeled. No content will be saved there as a result.
Check data after burning disc: The finished disc will be checked for any mistakes after burning.
CD/DVD title: This is the title of the DVD which is displayed as the disc name on the PC. The disc project name is displayed here by default.
Encoder settings
Use the "Encoder settings..." button to access the selection dialog to specify the properties of the MPEG encoder (memory requirements, quality, and duration of the MPEG conversion).
Preset: This features useful presets for the selected disc type. Here are several sample DVD presets:
| Long play DVD video | DVD with extra-long playing time. The bit rate is reduced, which compromises image quality. |
| Long play music DVD | DVD with extra-long playing time for music. The bit rate for the soundtrack remains at the highest quality level. |
| Standard DVD | Normal DVD |
| Widescreen DVD | Normal DVD in 16:9 widescreen format |
NOTE For all settings, you can choose NTSC (USA and Japan) or PAL (Europe).
Bit rate: The bit rate determines the memory requirement of the completed video. The greater the bit rate, the larger the file, and the shorter the maximum playing time of the movie that fits on a disc.
Adjust bit rate: The expected file size of the finished video is estimated, depending on the set bit rate. If the movie does not fit onto the disc, the bit rate is corrected accordingly.
Quality: Specifies the quality of the encoding process. The higher the quality, the better the finished video will look; however, encoding will take considerably longer.
Smart rendering: Smart rendering considerably reduces encoding processing strain for MPEG files. During the production of MPEG files, only those parts of the movie that were changed in the program are re-encoded. Please note: The MPEG files contained in the movie must have the same format, i.e. the bit rates (variable or constant), audio formats, image resolutions and video formats must match.
Anti-interlace filter: This option should only be activated for playback on a TV screen, since it is intended to reduce line flickering.
Calculate effects on your GPU: To accelerate the export, video effects can be calculated on the graphics card. Effects for brightness, gamma, contrast, color, saturation, image size, cropping and position effects as well as various fades and mixes can currently be calculated. Please note that if using external effect plug-ins and elaborate artistic effects, these must be processed on the CPU and for this reason, using the function will not yield any advantage in terms of speed.
NOTE This function is optimized specifically for NVIDIA graphics cards. You can, however, experience acceleration with other types of graphics cards, too.
3D mode: In case your project features 3D material that has been edited with Stereo 3D, a mode may be selected here for burning the material to disc. 3D is switched off by default.
To return to the standard settings, press the Reset button.
The "Advanced" button opens the "Advanced settings" dialog. Here you can adjust all the fine settings of the MPEG encoder. Read more about the "MPEG-1/2 encoder settings" and "MPEG-4 encoder settings" sections.