Photostory Wizard
The Photostory Wizard is ideal for converting photos into moving pictures and applying background music and effects to them.
The Photostory Wizard can be launched in two ways:
The easiest is as follows:
-
After selecting 6 objects in the Photo Explorer, a semicircle will appear below on the right.
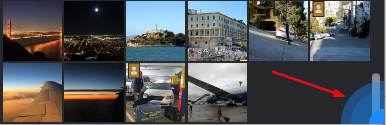
-
When you mouseover the semicircle, two functions appear: "Generate slideshow" and "Open advanced settings".
-
Generate slideshow:
Photostory deluxe generates a slideshow with your selected photos that also includes background music, dissolves, and an intro and outro. The Photostory Wizard uses the "Chillout - relaxed" template as default. The title that fades in at the start of the slideshow corresponds to the name of the folder containing the imported photos on your hard drive.
This slideshow appears in its own tab in the current project. The Photostory Wizard will then automatically close.Or:
Open advanced settings:
Access settings options for customizing your slideshow here.
The second way to open the Photostory Wizard
-
Import all the photos you want to use.
-
Open the Photostory Wizard via "Edit > Wizards" or click "W" on the keyboard.
Create slideshow
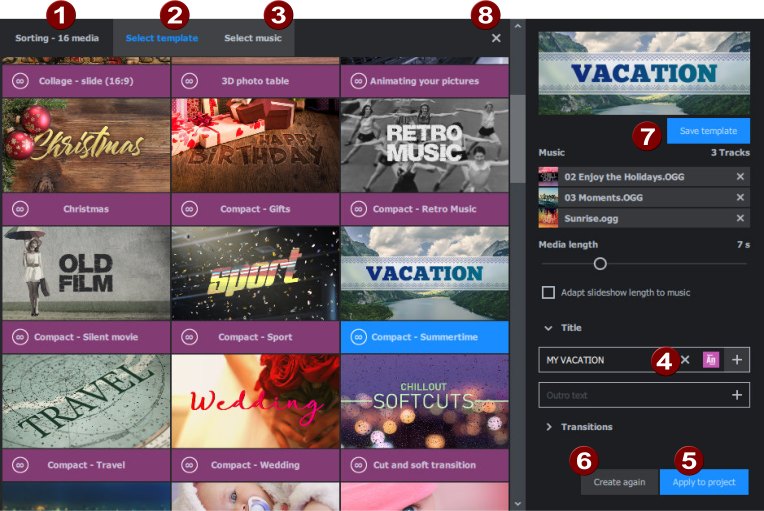
1 Sort
Drag and drop the the photos you've selected to create a sequence.
2 Select template
Choose a template from the selection of templates in the Photostory Wizard, or pick a movie template. The settings options for the template display on the right.
-
Photostory Wizard templates
These templates can be of any length; you can customize transitions, music and effects for them.
-
Editing templates
These are premade editing templates with placeholders to which you add your own selected content; the lengths of the slideshows are defined and cannot be changed. You can see the different lengths for each film template from the circled number on the template.
3 Select music
This range will only appear if you have selected a Photostory Wizard template. You can add other music templates and use them for your slideshow.
4 Adjusting a template
You can customize settings for the template you've chosen.
5 Create slideshow/Apply to project
Click the blue button to generate the finished slideshow. It appears in the new Photostory tab in the current project.
6 Create again
If you're not happy with the result, you adjust the settings and have the program create the slideshow again.
7 Save template
You can save your customized template to use over and over again without having to reselect music, transitions or effects. The captions and media length in the template can be copied over too. Once you have saved a template, it can be selected from the template overview (2).
8 Close the Photostory Wizard
Once you're satisfied with the finished slideshow, click the X icon to close the Photostory Wizard. You can use all the other tools and functions offered by Photostory deluxe to customize your slideshow further.
NOTE If you reopen the Photostory Wizard again at this point, a new slideshow will open in another tab in the current project.