5.1 surround panning and mixing
After you've set up your project for 5.1 surround mixing, the track headers and Mixing Console switch to 5.1 surround mode, and you're ready to start panning.
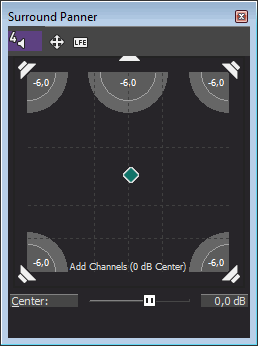
Choose View | Window | Surround Panner to toggle the display of the Surround Panner window. Use the Surround Panner window to pan tracks, busses, and assignable effects chains.
If you have a joystick, you can use it to control surround panning. A force-feedback joystick such as the Microsoft® SideWinder® Force Feedback 2 joystick can add a tactile element to your editing sessions.
NOTE Only the Surround Master bus accepts 5.1 channel inputs. If you assign a track to another bus, the Mixing Console will send a stereo output to the bus, and you can perform surround panning at the bus level.
TIP When you apply effects to a 5.1 surround project, you can use distinct plug-in settings for each channel (separate EQ settings for the front and surround speakers, for example) using effect automation. Add multiple instances of the plug-in to the track effects chain and select the Enable check boxes in the FX Automation Chooser for the channels you want each instance of the plug-in to affect.
IMPORTANT Surround panning is not available for tracks or busses that are routed to a hardware output.
Muting or soloing channels
Muting a channel ensures that no audio will be played through that channel. For example, you could mute the center channel if you want to produce a stereo image at the center listening position, or you might want to solo the center channel when you're working with dialogue.
-
Double-click the surround panner
 on the track or bus you want to pan. The Surround Panner window is displayed.
 -
Click the speaker icons to mute or include channels.
TIP Hold Ctrl while clicking a speaker icon to solo the channel.
Adjusting volume and send levels
Adjusting track volume
You can adjust track volume using the Vol fader in the track header the same way you do in stereo projects.
The fader in the track header can function as a trim control that adjusts the overall volume of the track, or it can adjust track volume automation settings.
The trim level is added to the volume automation settings so your envelope is preserved, but with a boost or cut applied. For example, setting the trim control to -3 dB has the same effect as decreasing every envelope point by 3 dB.
Deselect the Automation Settings button  in the track header if you want to adjust trim levels, or select the button if you want to adjust volume automation.
Adjusting assignable effects send or bus send levels
You can adjust send levels for busses or assignable effects chains using the multipurpose fader in the track header the same way you do in stereo projects. Click the fader label and choose an assignable effects chain or bus from the menu. The fader in the track header can function as a trim control that adjusts the overall send level of the track, or it can adjust send level automation settings.
Deselect the Automation Settings button  in the track header if you want to adjust trim levels, or select the button if you want to adjust volume automation.
Adjusting channel levels
Use the Surround Master bus control in the Master Bus window to adjust the individual levels of the 5.1 channels. The faders in the Surround Master bus control can function as trim controls that adjust the overall level of each channel, or you can automate the master volume of the Surround Master bus (individual channel levels cannot be automated).
Deselect the Automation Settings button  in the track header if you want to adjust trim levels, or select the button if you want to adjust volume automation.
Adjusting the center channel volume
Adjusting the volume of the center channel can help emphasize dialogue or balance the mix. You can adjust the center channel volume trim level or automation settings.
The trim level is added to surround panning keyframes so your keyframe settings are preserved, but with a boost or cut applied. For example, setting the trim control to -3 dB has the same effect as decreasing the center channel level by 3 dB in every keyframe.
Adjusting the center channel trim level
-
Deselect the Automation Settings button
 on the track or bus you want to adjust.
 -
Double-click the surround panner
 on the track. The Surround Panner window is displayed.
 -
Drag the Center fader to boost or attenuate the volume of the center channel. When the fader is set to 0.0 dB, no gain is applied.
NOTE The Center fader is not displayed if the center channel is muted. Click the centerchannel icon
 to unmute the channel.
Automating the center channel level with keyframes
-
Select the Automation Settings button
 on the track or bus you want to adjust.
 -
Double-click the surround panner
 on the track. The Surround Panner window is displayed.
 -
Select a keyframe to adjust its center channel level or click to position the cursor where you want to create a new keyframe.
-
Drag the Center fader to boost or attenuate the volume of the center channel. When the fader is set to 0.0 dB, no gain is applied. The fader thumb is displayed as a
 in automation mode.
NOTE The Center fader is not displayed if the center channel is muted. Click the centerchannel icon
 to unmute the channel.
Panning a track or bus
You can perform surround panning in two ways:
-
Pan tracks individually using the Surround Panner window.
-
Route tracks to channel strips in the Mixing Console (busses or assignable effect chains) and pan the channel strips using the Surround Panner window. From the View menu, choose Show Bus Tracks to display bus tracks at the bottom of the track view.
When a track is routed to a bus other than the surround master, you can use the Pan slider on the track header to adjust the stereo track's contribution to the surround panner on the bus.
For more information, see Assigning tracks to busses
The surround panner can function as a trim control that adjusts the overall panning of the track, or it can adjust track panning automation settings. Click the Automation Settings button  in the track or bus and select Automation Settings to adjust surround panning keyframes, or deselect the command to adjust trim levels.
The trim level is added to the pan automation settings so your keyframes are preserved, but with a boost or cut applied. For example, setting the trim control to -9% left has the same effect as moving every keyframe 9% to the left.
IMPORTANT Panning controls can adjust automation (dynamic) settings, or they can function as trim (nonautomated) controls. If your automation is not behaving as expected, you may have applied a trim value that is offsetting your automation settings.
When the surround panner is set to adjust trim levels, it is displayed as a  . When it is set to adjust automation levels, it is displayed as a
  .
.
Adjusting panning trim levels
-
Deselect the Automation Settings button
 in the track or bus.
 -
Double-click the surround panner
 on the track or bus to display the Surround Panner window:
-
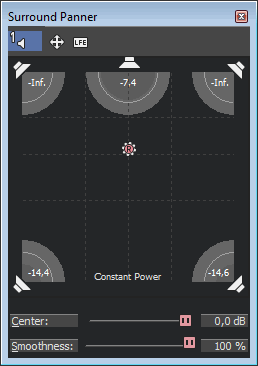
Drag the pan point in the Surround Panner window to position the sound within the sound field. Shading is drawn to indicate the output from each channel.
-
Double-click the pan point to reset it to the front-center listening position.
-
Double-click in the Surround Panner window to move the pan point to the point you click.
-
To constrain the motion of the pan point, click the
 button to toggle through Move freely
  , Move left/right only
  and Move front/back only
  modes.
TIP You can also use the track surround panner in the track header to pan your track. Keyboard and mouse shortcuts can help you position the pan point quickly and accurately. For more information, see Keyboard shortcuts
Automating panning with keyframes
You can automate panning by adding keyframes. Keyframes are similar to envelope points in that they mark specific locations in the track where settings change. However, unlike envelope points, keyframes are displayed below a track:

-
Use bus tracks to add panning keyframes to busses. From the View menu, choose Show Bus Tracks to display bus tracks at the bottom of the track view. For more information, see Audio bus tracks
-
Center-channel gain cannot be automated.
-
Muting and soloing channels cannot be automated.
-
Select the track (or bus track) you want to pan.
-
Select the Automation Settings
 button in the track or bus.
 -
From the Insert menu, choose Audio Envelopes, and then choose Surround Pan Keyframes from the submenu. An additional row appears below the track with a single keyframe positioned at the beginning of the project. This keyframe represents the current panning settings for the track.
TIP To hide panning keyframes without removing them from your project, choose Show Audio Envelopes from the View menu, and then choose Surround Pan Keyframes from the submenu.
-
Click to position the cursor where you want to begin panning the track.
-
Pan your track:
-
Double-click the surround panner
 on the track or bus to display the Surround Panner window:
-
Drag the pan point in the Surround Panner window to position the sound within the sound field. Shading is drawn to indicate the output from each channel, and a keyframe is added below the track.
-
Double-click the pan point to reset it to the front-center listening position.
-
Double-click in the Surround Panner window to move the pan point to the point you click.
-
To constrain the motion of the pan point, click the
 button to toggle through Move freely
  , Move left/right only
  and Move front/back only
  modes.
 -
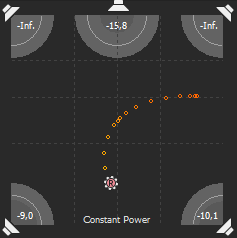
Repeat steps 4 and 5 to add as many panning keyframes as necessary. The Surround Panner window draws the panning path:

-
If you have two or more keyframes, you can drag the Smoothness slider to adjust the interpolation curve between them. Adjusting the curve affects perceived motion of sound within the sound field: a setting of 0 produces linear motion from one keyframe to the next. Increasing the setting produces a curved path.
If you want to adjust temporal interpolation how the pan occurs over time right-click a keyframe and choose a new keyframe type from the shortcut menu.
TIP You can also use the surround panner in the track header to pan your track. Keyboard and mouse shortcuts can help you position the pan point quickly and accurately. For more information, see Keyboard shortcuts
Adjusting panning keyframes
If you automated panning for a track or bus, a keyframe is displayed in the timeline (directly below the track) for each pan setting. You can move, copy, and change fade types from the timeline.
Panning controls can adjust automation (dynamic) settings, or they can function as trim (nonautomated) controls. If your automation is not behaving as expected, you may have applied a trim value that is offsetting your automation settings.
When the surround panner is set to adjust trim levels, it is displayed as a  . When it is set to adjust automation levels, it is displayed as a
  .
.
Editing a keyframe
-
Double-click a keyframe to open the Surround Panner window.
-
Drag the pan point to position the sound within the sound field.
-
Adjust the Smoothness slider as necessary to adjust the curve between keyframes.
TIP You can also edit a keyframe by selecting the keyframe and dragging the pan point in the track or bus surround panner.
Adding keyframes
Double-click in the keyframe bar to add a keyframe to the timeline. The new keyframe will use the same settings and interpolation curve as the previous keyframe.
Deleting keyframes
Right-click a keyframe and choose Delete from the shortcut menu.
Moving keyframes
Drag the keyframe to a new position on the timeline.
Copy keyframes
Hold Ctrl while dragging a keyframe to copy it.
Change the fade curve between keyframes
If you want to adjust temporal interpolation—how the pan occurs over time—right-click a keyframe and choose a new keyframe type from the shortcut menu.
If you want to adjust the perceived motion of sound within the sound field, drag the Smoothness slider to adjust the interpolation curve between keyframes. a Smoothness setting of 0 simulates linear motion from one keyframe to the next. Increasing the setting produces a curved path.
|
Command |
Description |
Looks Like |
|---|---|---|
|
Linear
|
Panning is interpolated in a linear path. |
|
|
Fast
|
Panning is interpolated in a fast logarithmic path. |
|
|
Slow
|
Panning is interpolated in a slow logarithmic path. |
|
|
Smooth
|
Panning is interpolated along a smooth, natural curve. |
|
|
Sharp
|
Panning is interpolated along a sharp curve. |
|
|
Hold
|
No interpolation will take place. The keyframe's settings will be maintained until the next keyframe. |
|
Routing audio to the low-frequency effects (LFE) channel
Perform either of the following actions to send audio to the low-frequency effects (LFE) channel:
-
Click the
 button in the Surround Panner window to switch to LFE mode.
 -
Right-click the surround panner
 on the track or Mixing Console channel strip and choose LFE Only from the shortcut menu.
To return to normal surround panning, click the  button in the Surround Panner window again or right-click the surround panner and choose Surround Pan from the shortcut menu.
TIP Select the Enable low-pass filter on LFE checkbox on the Audio tab of the Project Properties dialog if you want to apply a low-pass filter to each track or bus that is assigned to the LFE channel. Enter a frequency in the Cutoff frequency for low-pass filter box to set the frequency above which audio will be ignored by the LFE channel, and choose a setting from the Low-pass filter quality drop-down list to determine the sharpness of filter's rolloff curve. Best produces the sharpest curve. For more information, see Setting project properties
NOTE Applying a low-pass filter approximates the bass-management system in a 5.1 decoder and ensures that you're sending only low-frequency audio to the LFE channel.
IMPORTANT Before rendering your surround project, check your surround authoring application's documentation to determine its required audio format. Some encoders require a specific low-pass filter cutoff frequency and rolloff, and your encoder may require that no filter be applied before encoding.
Changing the pan mode
Right-click within the Surround Panner window (or right-click a surround panner  on a track or bus), choose Pan Type from the shortcut menu, and then choose a pan type from the submenu. For more information about panning modes, see Audio panning modes
NOTE The selected panning mode is also used for surround panning keyframes.
Using the grid to monitor panning
The grid in the Surround Panner window provides a visual indication of how your panning will sound. The grid spacing changes to match the current panning mode.
The vertical lines represent the points where the left-to-right signal ratio is 6 dB, 0 dB, and -6 dB respectively: at the far-left line, the left channel is 6.0 dB louder than the right channel.
The horizontal lines represent the points where the front-to-rear signal ratio is 6 dB, 0 dB, and -6 dB respectively. As you adjust the Center fader, the lines will move forward or back to compensate for the center-channel gain.
NOTE The grid assumes that you're using a correctly set-up surround system (matched speakers and ideal positioning). Variations in your monitoring system will cause inconsistencies between the graph and perceived output.


