AI Speech to Text
The Speech to Text tool enables you to analyze the audio held in timeline clip events and automatically add subtitles to your project timeline or as text files. You can correct mistakes in the generated text and manipulate the appearance of the subtitles in your project.
The Speech to Text feature also includes text-based editing tools. With these tools, you can use the Speech to Text feature to create a transcript of your project video and then edit the transcript - for example, delete a section of text, cut and paste text, etc.—and VEGAS Pro will automatically edit the events on your timeline to match the edits you made in the transcript. The reverse is also possible. For example, if you cut an event on the timeline, VEGAS Pro will automatically edit the transcript to match. This workflow can greatly speed up your editing process.
1 Open the Speech to Text tool
-
Add an audio or video file that contains someone speaking.
TIP You can also try the feature with music. Depending upon the type of music and how “out front” the vocals are, you may have good luck turning those vocals into text so you can then make, for example, a lyric video for your song.
-
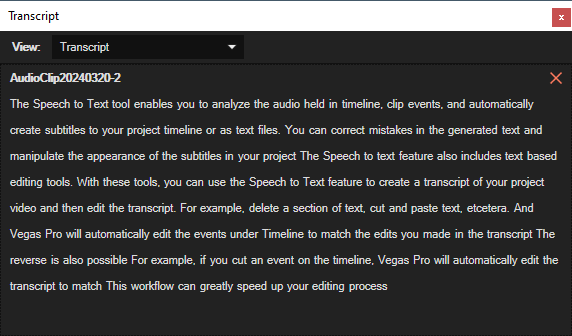
Click the audio event to select it and choose Tools | Speech to Text to open the window.
This window now has three view modes and it opens by default into the Transcript view.
2 Generate text from the audio file
-
In the Speech to Text window, click the Language drop-down list and choose the correct language.
The drop-down list contains all of the currently supported languages. The default language setting is Auto detect. For most files spoken in English and several other languages, you can leave this set to Auto detect and the tool does a nice job of accurately identifying the spoken language. If the tool has trouble identifying the language spoken in your file, click the Language drop-down list and choose the correct language.
-
Once you’ve specified your Language setting, click the Analyze button.
A progress bar indicates the progress and the Preview section shows the text as it’s being generated. When the process completes, the generated text appears in a list in the Preview area.
-
When you find errors, you can easily correct them here similarly to how you would correct text in a word-processing document. With all your corrections complete, you’re ready to move on.
You can now do either or both of two things with your transcript: perform text-based editing and create subtitles.
3 Text-Based Editing (Beta)
You can edit your timeline simply by editing the transcript in Text-based editing view mode. For instance, say you want to edit out the last sentence of the narration from your project. Instead of making the edit on the timeline where you need to listen and make note of exactly where the sentence begins, you can simply delete the text from the Text-based editing window. Time code values before each line of text identify the exact times in your project timeline that generated subtitle events will span.
Choose Text-based editing from the View list.
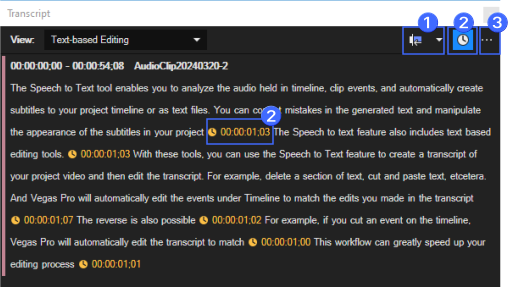
| 1 | Auto-Ripple |
Select this button and choose a mode from the drop-down list to automatically ripple the contents of the timeline following an edit after adjusting an event's length, cutting, copying, pasting, or deleting events.
|
| 2 | Pauses | Click to turn the pause value displays on or off in your transcript. |
| 3 | Additional settings |
|
 For more information, see
 Selecting Text in the Transcript
-
Click on the first word of the desired sentence to highlight it and observe the playback cursor move to the matching audio in the timeline.
-
For a full sentence selection, hold the Shift key and click the last word; this action selects the entire range of text and the associated segment in the timeline.
This method works for text selection anywhere in the transcript, whether at the beginning, middle, or end.
Deleting Text and Corresponding Audio
-
With the desired text selected, press the Delete key on your keyboard.
Observe as the selected text is removed from the transcript and the corresponding audio is deleted from your timeline.
You can quickly go through your text and delete portions you don’t want. If you’ve deleted something and later decide that you want it back, trim the timeline event to bring it back to the timeline. The text automatically updates to reflect the edit you’ve made.
This demonstrates that you can edit the text and also see the changes on the timeline, or edit the timeline and see the changes to the text.
Rearranging Text and Timeline Events
-
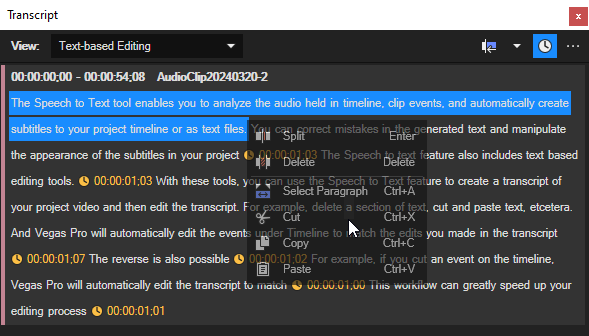
In the Text-based editing window, click to select a word or a range of words you want to rearrange.
-
Right-click on the highlighted text and choose "Cut" from the context menu to remove it from the current position.
-
Move to the new location in the transcript where you want to insert the cut text.
-
Right-click and choose "Paste" from the context menu to insert the text at this new position. The timeline will automatically adjust, moving the associated audio to match the rearranged text in the transcript.
4 Creating subtitles
Once you’re done with all of your edits (using either the timeline or the Text-based editing window), you’re ready to generate subtitles.
-
Choose Subtitles from the View drop-down list.
VEGAS Pro has already broken your transcript up into subtitles of reasonable length. These are listed along with the timecode of when the subtitle appears and disappears. Any edits you made in the transcript and Text-based editing view also appear here in subtitles view.
-
Control the look of your subtitles on the right.
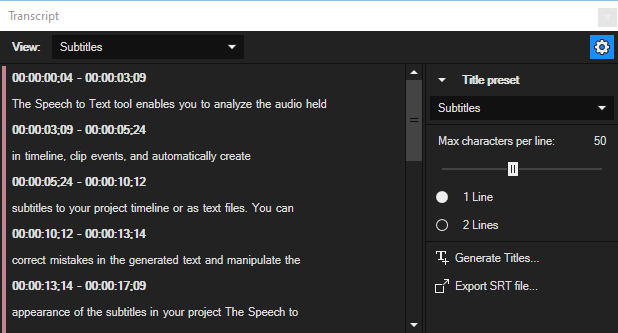
Title preset The Subtitles text preset has been chosen by default, but you can use the drop-down to choose any other preset. If you’ve previously created a custom preset for your subtitles, it will appear in this list. Choose it from the list to apply it to your subtitles. Max characters per line Use the Max characters per line slider to set the length of your subtitle lines. 1 Line / 2 Lines Select the appropriate radio button depending upon whether you want one-line or two-line subtitles. -
With all of these settings in place, click the Generate Titles button.
VEGAS Pro creates Titles & Text events on a new track in your timeline.
If you’ve generated a new subtitle track, the tool creates a new text event for each of the subtitles in your list. These events are standard Titles & Text events, and you can edit them however you need to. For instance, if the text doesn’t line up perfectly with the spoken audio, you can move the text event to line it up properly. Or you can trim either edge of the event to make it last longer or shorter. You can open the generator and make corrections or adjustments to the text. In short, any edit you would normally make to a text event on your timeline you can make here to perfect your subtitles.
Exporting Subtitles
Export your subtitles as an SRT file (SubRip file format), which is a common subtitle file format used for sharing and displaying subtitles across various media players and platforms.