AI Text to Speech
NOTE This feature requires a VEGAS Pro 365, VEGAS Pro Edit or VEGAS Pro Post 365 subscription. To use this feature, you must first log into your VEGAS Hub account (see the VEGAS Hub section for more details).
The Text-to-Speech feature in VEGAS Pro allows you to convert text in videos into speech and add it as an audio file. It provides an efficient way to transform large amounts of text into speech without the need to hire professional voice actors. With this feature, you can utilize AI technology to generate computer-generated voices in various languages and voice options. Additionally, it offers the convenience of translating your narrations into different languages using natural-sounding native voices. Moreover, the cloud-based functionality enables you to seamlessly access new voices and features without requiring a new software build.
Converting text to speech
-
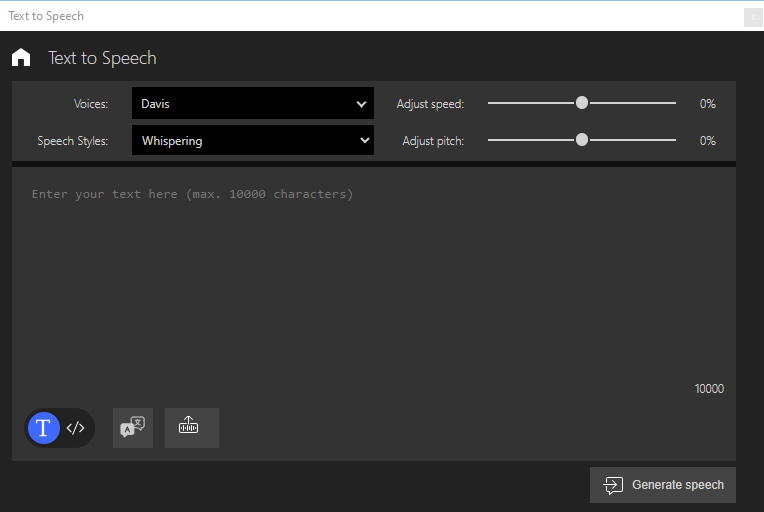
Choose Tools | Text to Speech.
-
In the Text to Speech dialog box, enter the text you want to turn into audio into the text field.
-
Adjust style
Change Voice Click on the drop-down list Voices and select the desired voice. Adjust Speed Use the slider to decrease or increase the speech speed. Change Speech Style For selected voices, you can choose from different voice styles. Adjust Pitch
Use the slider to decrease or increase the pitch. -
Click on GENERATE SPEECH. The text will be converted and played back.
Now you can save the generated speech as an audio file and import it into your project.

Saving Audio File to Project
-
Click on Add to Project Media. The generated audio file will be saved as a .wav file in your project.
You can access the folder through the Project Mediawindow.
Inserting Audio File into the Project
-
Click on Insert on Timeline. The audio file will be inserted as a new audio event on a new audio track labeled Synthesized Audio at the current cursor position in your timeline and automatically saved in the project.
Translating Text
-
Enter text in the text field.
-
Click on the
 (Translate Text) button.
 -
In the displayed dialog box, select the languages:
-
Text Language: Language of the entered text
-
Translate to: Target language
-
-
Click on the Translate button. The text in the text field will be replaced with a translation in the specified language.
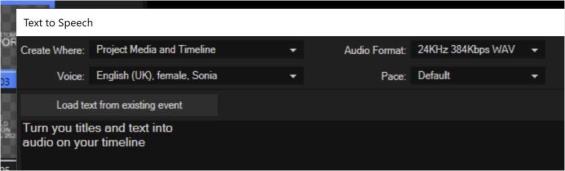
Load text from Titles & Text events into Text to Speech
You can load the text from any Titles & Text event on your timeline into the Text To Speech tool in order to generate and audio file for that text.
-
Click the event that holds your Titles &Text generated media to select it.
-
In the Text to Speech dialog box, click the Load text from existing event button. This loads the text from the Titles & Text event into the Text to Speech text input field.
-
Preview the audio and make any changes you need.
Using SSML input mode
SSML (Speech Synthesis Markup Language) is a markup language designed specifically for controlling the output of text-to-speech (TTS) systems. It allows for detailed instructions to format and style the spoken language, such as emphasizing certain words, controlling pause length, or changing speech speed.
SSML provides a set of tags that can be embedded within the text to indicate how it should be pronounced or delivered. These tags provide control over various aspects of speech synthesis, including prosody, pronunciation, volume, and more.
 For more information, see https://learn.microsoft.com/en-us/azure/cognitive-services/speech-service/speech-synthesis-markup
SSML Example
<speak version="1.0" xmlns="http://www.w3.org/2001/10/synthesis" xml:lang="string">
  <voice name="en-US-ChristopherNeural" effect="eq_car" role="YoungAdultMale" >
     Welcome <break strength="medium" /> to text to speech.
  <p>
  <prosody rate="slow">This is a sentence that will be spoken slowly.</prosody>  <prosody rate="fast">This is a sentence that will be spoken quickly.</prosody>
  </p>
  <p>
  <break time="1s"/>A pause of 1 second is inserted here.<break time="1s"/>
  </p>
    </voice>
    <voice name="en-US-JennyMultilingualNeural" style="assistant">
        <lang xml:lang="en-US">
           Enjoy using the feature!
        </lang>
        <lang xml:lang="de-DE">
                    Viel Spaß beim Benutzen des Features!
        </lang>
    </voice>
</speak>