Using Vegas Pro Connect to review projects on your iPad
Who says you can't take it with you? Choose File | Prepare for Vegas Pro Connect to prepare the current project to be synchronized with your iPad.
A prepared project is a representation of your project at the specific point when you prepared it. VEGAS Pro renders a file that contains your current edits and adds it to a list of projects that you can choose to synchronize when Vegas Pro Connect is connected. After you sync, you can view your project on your device and add markers that will be synchronized with your VEGAS Pro project the next time you connect.
Preparing projects for Vegas Pro Connect
When you prepare a project, VEGAS Pro renders a file that can be played on your iPad, creates a thumbnail image, and prepares metadata — such as markers — to be displayed on your device.
Each time you make changes to a project, you'll need to prepare it so Vegas Pro Connect can determine whether the project needs to be synchronized.
-
Choose File | Prepare for Vegas Pro Connect.
The Vegas Pro Connect Files Location box displays the path to the folder that will be used for the files that will be synchronized with your iPad.
-
Select the Prepare metadata only checkbox if you want to prepare only metadata. This method allows you to update markers quickly without rendering or transferring the media file.
-
Select a radio button to choose the portion of your project that you want to prepare.
-
Select the Prepare entire project radio button if you want to save the full project timeline.
-
Select the Prepare loop region only radio button if you want to save only the portion of the project that is contained within the loop region. Loop Playback does not need to be selected for this option to work.
-
The Prepare loop region only radio button is available only if you've created a time selection in the timeline.
TIP When Prepare loop region only is selected, VEGAS Pro will render only the frames contained within the loop region. If you change your selection and prepare the project again, the Review Projects section of Vegas Pro Connect will contain a separate entry for each selection range.
-
Select the Prepare previous loop region radio button and choose a setting from the drop-down list to save a portion of the project that you've previously prepared. Loop Playback does not need to be selected for this option to work.
-
-
Click OK to start rendering your project and add it to the Review Projects queue on your iPad.
Transferring projects to your iPad
-
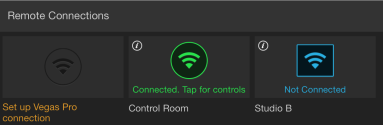
On your iPad, tap the connection you want to use. After you connect, your queued project will be transferred to your device and displayed in the Review Projects list.
-
The Review Projects list at the bottom of Vegas Pro Connect displays a list of projects that are available for mobile review.
-
If a file has not been synchronized with your iPad, Tap to sync file is displayed, Tap the file's thumbnail image to synchronize it.
-
If a file has been synchronized, a check mark
 is displayed in the file's thumbnail image.
 -
If a file has been updated since it was synchronized, a resync icon
 is displayed in the file's thumbnail image. Tap Tap to resync to transfer the latest version to your iPad.
 -
Tap Remove File
 to remove a file from your iPad.
 -
Tap a synchronized project's thumbnail image to start playback.
-
Reviewing projects on your iPad
Tap a synchronized project's thumbnail image to start playback.
Tap the buttons in Vegas Pro Connect to undo/redo edits, control playback, or add markers to the VEGAS Pro timeline.
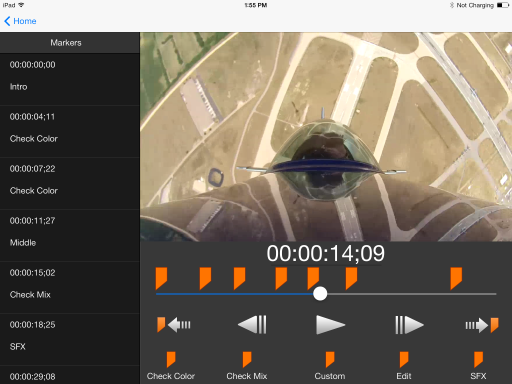
The Markers list displays all markers in your project. Markers that were added in Vegas Pro Connect include a Delete button that you can tap to remove the marker.
Markers that were added in VEGAS Pro cannot be deleted in Vegas Pro Connect.
|
Item |
Description |
|---|---|
|
Timecode |
Displays the timecode value at the cursor position. |
|
Trackbar |
Represents the length of your project. Drag the handle to move the cursor forward or backward in your project. |
|
Previous Marker |
Tap Previous Marker |
|
Previous Frame |
Tap Previous Frame |
|
Play |
Tap Play |
|
Next Frame |
Tap Next Frame |
|
Next Marker |
Tap Next Marker |
|
Markers |
Tap a marker type to add a marker at the current cursor position. Custom: Adds a marker and prompts you to type a custom label. Check Color: Adds a marker labeled "Check Color." Check Mix: Adds a marker labeled "Check Mix." SFX: Adds a marker labeled "SFX." Edit: Adds a marker labeled "Edit." NOTE Markers that you add in Vegas Pro Connect will be displayed in blue |
 to move the cursor to the previous marker.
 to move the cursor to the previous frame.
 to start playback from the cursor position.
 to move the cursor to the next frame.
 to move the cursor to the next marker.
 until you sync your project. When
  ), you can tap
 Managing prepared clips
Choose File | Manage Vegas Pro Connect Clips to display the Manage Vegas Pro Connect Clips dialog.
This dialog displays each of the clips that you've prepared for Vegas Pro Connect. You can see the clip's thumbnail image, the portion of the project that was prepared, and the last time the clip was prepared.
Click Delete All Clips or Delete Selected Clips to remove previously prepared Vegas Pro Connect clips from your computer.