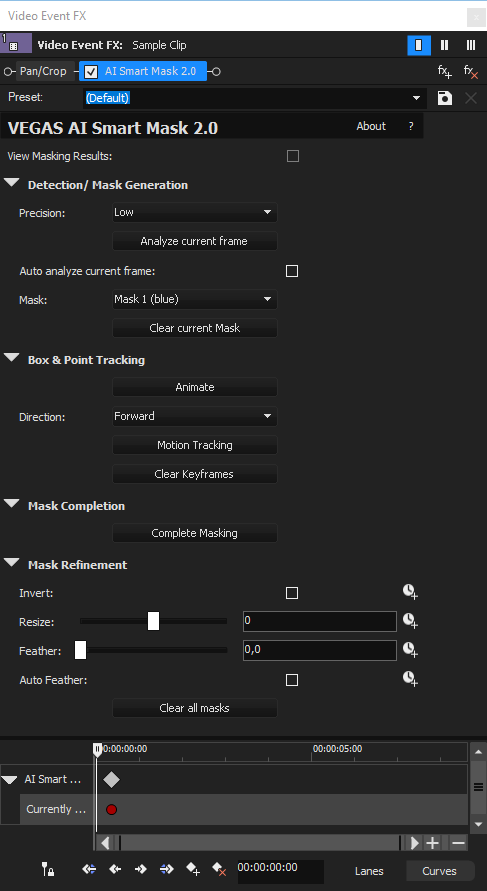
AI Smart Mask 2.0
*new since VEGAS Pro 21 Update 3*
This feature uses AI to identify objects in your video and accurately mask them. You can create up to eight separate masks and apply tracking to them so that the masks follow along with objects in the video even if they’re moving. This can help you replace backgrounds without having shot in front of a green screen and has many other potential use cases.
1 Detection
-
Add a video to your timeline that has one or more distinct objects that you’d like to mask.
As you’re experimenting with this feature, it’s a good idea to use a very short section of video since the AI calculations you need to do later can take a good deal of time, even on a fast computer. If you’re using a long video, trim the timeline clip event to just 10 seconds or so to limit the time required as you learn this tool.
-
Click the Video FX tab and select AI Smart Mask 2.0 from the list of plug-ins.
-
Drag the Default preset onto the timeline clip event that holds the video you want to mask.
-
Click the beginning of the event to place the cursor at that point.
-
Select a Precision from the dropdown list.
For the highest quality, leave the Precision setting at High, but for faster processing you can choose Low.
-
Click the Analyze current frame button to identify maskable objects in the analyzed frame.
Note that if you want the plug-in to analyze whatever frame you click on, select the Auto analyze current frame checkbox. Be aware though that this can slow you down as you’ll have to wait for new analysis every time you switch the active frame.
2 Mask Generation and Adjustment
-
Use the Mask drop-down list in the plug-in window to select which of the eight available masks you want to work with.
-
In the Video Preview window, click an object in your video that you want to mask.
Colored shading covers the material included in the mask, and a colored bounding box surrounds the masked object.
-
Use the toolbar in the Video Preview window to create and refine masks:

-
To move the bounding box, drag it from any edge.
You can drag it to more adequately cover your target object, or to target a different object altogether.
-
To adjust the mask, drag any corner point of the bounding box.
As you make the box larger or smaller, you affect exactly what gets masked.
-
To resize the box vertically or horizontally without affecting the other dimension, hold the Shift key as you drag any edge of the box.
Keep adjusting the size and position to achieve the best mask.
-
Include material
In some cases, parts of the object you want to mask may not be included in the mask even though they are within the bounding box:
-
Click the Add or Reposition Points button.
-
Now, click the object you want to add to the mask. This gives the plug-in more information to use in creating the mask.
-
Drag the point if you need to improve the results further. You can also add additional points to refine things even more.
-
-
Exclude material
If there is an object included in the mask that you don’t want to mask:
-
Click the Add and Reposition Negative Points button.
-
Then click on the object you want to remove from the mask.
-
You can drag these negative points to new locations for optimal results and add more negative points as needed.
-
-
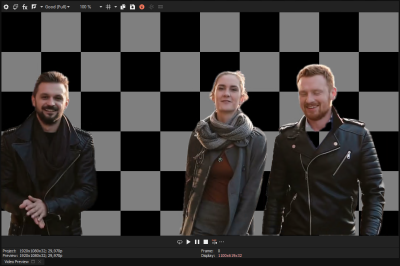
TIP Back at the top of the plug-in window, select the View Masking Results checkbox. Now you can see the mask's effects on your video. Toggle this checkbox on and off to make adjustments and evaluate your results.
|
FIGURE Masks |
FIGURE Activated View Masking Results checkbox |
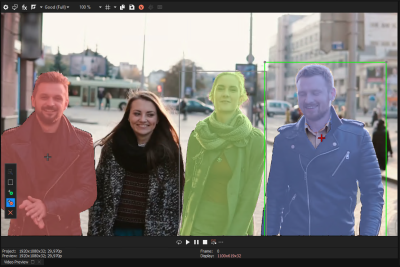
In many cases, you won’t need to adjust the bounding box at all to get the results you’re after. You'll notice that an object doesn’t necessarily need to be fully within the bounding box to be included in the mask. Likewise, part of the object may fall outside of the bounding box, yet still be included. In general, it’s best to make the bounding box as large as possible while still limiting the masking to just your target object, especially if the object is moving fast or erratically. The larger you make the box, the better chance you have that the object will stay within the box throughout all of its movements.
Multi-Object Masking
While technically you can add points outside of the bounding box to add a different object to the mask, this will likely not give you the best results. It’s usually more effective—and less work—to use separate masks to mask distinct objects.
If you have more than one object in your frame that you want to mask:
-
Click the Mask drop-down list in the plug-in window and choose another mask from the list.
-
Now repeat all the instructions above to create the new mask.
Remove points
-
Click the Remove Points button.
-
Click the point you want to remove.
Remove a mask
-
Select the mask from the Mask drop-down list in the plug-in window.
-
Click the Clear current mask button.
3 Animate the mask
Once you’ve established the mask you want, you’ll most likely want to animate the mask to follow any motion of the object in your video. You can use the AI Smart Mask’s motion tracking tools to accomplish this automatically or create the tracking manually.
Automated tracking
The first step to animating with the automatic tools requires tracking the object’s movement.
-
Set the Direction drop-down list to the direction you want to track.
Assuming you used the first frame of the event to create your mask as we previously talked about, leave this set to Forward.
-
Click the Motion Tracking button.
This analyzes all of the frames in your video and adjusts the mask accordingly. You won’t see this happen, but when it’s finished, you’ll notice new keyframes in the keyframe controller area.
-
Use the cursor in the keyframe controller area to scrub through the timeline.
In the Video Preview window you see the mask bounding box move along with the object. Scrub through the timeline and check your bounding box at several sample points—the keyframes that have been created are good frames to check for starters—to make sure the box has accurately tracked the object.
-
Adjust if necessary.
If you find a frame where the object seems to have drifted outside of the box, use the techniques discussed above to resize and reposition the box to more accurately contain the object. You could check the entire video one frame at a time, but it’s often not necessary to do that. Spot checks at several frames throughout the video could very well be enough to ensure the results you want.
-
Click the Complete Masking button.
The AI will go through each frame of video in your event, analyze it, and create your mask.
NOTE Again, be aware that this can take a good deal of time—even on fast computers—since the AI needs to analyze each individual frame and create a mask for it.
-
Review the results.
When it’s done, you’ll see a keyframe in virtually every frame of the keyframe controller area. Play your project, and you’ll see that your mask now follows the object. To see the results, remember to select the View Masking Results checkbox.
Manual Mask Animation
You don’t always have to let the plug-in complete the masking for you. Sometimes, the results will be nearly what you need, but just a bit off here and there.
-
In the keyframe controller area, position the cursor on a frame that needs adjusting, even if it sits between two keyframes.
-
Adjust the mask bounding box so that it covers your object. This inserts a new keyframe at that point.
-
Click the end of the timeline and again adjust the box if you need to. Do this for as many frames as you feel is needed.
If you’d rather do the process completely manually, click the Clear Keyframes button.
-
Click the Animate button. You can now manually add as many keyframes as you need.
-
Click the Complete Masks button to finish the process.
Mask Refinement
You can use the controls in the Mask Refinement section to further control the masking results.
| Invert |
If you want to remove the object that you masked instead of everything else, select the Invert checkbox. |
| Resize |
To spread your mask a bit wider or choke it a bit narrower, adjust the Resize slider for the amount you want. |
| Feather |
If the edges of your mask seem harsh, adjust the Feather slider to soften them. |
| Auto Feather |
Select the Auto Feather button to have the tool choose the feathering for you. |
Each of these Mask Refinement parameters are automatable, so you can fine tune things over the course of your video.
To animate any of these:
-
Click the parameter’s Animate button.
-
Move to different frames in the keyframe controller area and adjust the parameter. This creates a new keyframe and interpolates the frames between keyframes as in other OFX plug-ins.
Recreate the masks
Click the Clear Masks button. This removes all of the masks, but preserves the keyframes you’ve already set.
Keyframe Controller Area
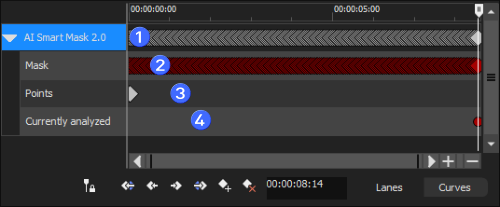
FIGURE AI Smart Mask 2.0 - Keyframe Controller Area
| 1 |
The top lane holds master keyframes. If one or more keyframes appears in the lanes below, a master keyframe appears here. |
| 2 |
The Mask lane, indicates which frames have a mask that has already been generated. If you’ve clicked the Complete Masks button, each frame of your video now has a mask and thus each frame contains a red keyframe in this lane (as well as a corresponding master keyframe in the lane above). |
| 3 |
The Points lane shows keyframes at every frame for which a bounding box and/or points have been set or modified. |
| 4 |
The Currently analyzed frame lane, uses a red dot to indicate which frame is currently analyzed. This indicates that this frame will receive updated mask data as you modify bounding box and point data. Only one frame can be analyzed at one time. |
Post-Mask Adjustment
When finalizing your mask, you might discover the alignment deviates slightly across certain frames. Here's how to correct any drift and ensure a consistent mask throughout your video.
-
Identify drifting frames.
Keep an eye on the Video Preview window as you scrub through the keyframe timeline until you see a problem area where the mask drifts off the object.
-
Select problematic keyframes.
Click above the red keyframes in the Mask keyframe track and drag through the timeline until you’ve selected all the problem keyframes.
Use the mouse wheel to zoom in if you need a more detailed view of the keyframe track.
-
Delete unwanted keyframes.
Press the Delete key to delete all the keyframes within the selection area.
-
Adjust and create new keyframes.
Still in the Mask keyframe track, click one of the frames that needs correcting.
In the Video Preview window, adjust the bounding box so it includes the entire object again.
A new keyframe is automatically created in the Points track.
-
Repeat corrections.
Do this for every frame that no longer has a Mask keyframe.
-
Reapply masks.
If you’ve deleted a large range of keyframes, you may not need to create corrections at each frame.
When you’re done, click the Complete Masks button.
The plug-in creates a new mask for each frame that does not already have one, so this processing won’t take as long as processing the entire video as long as you’ve deleted just a range of the Mask keyframes.