Media Share
*new since VEGAS Pro 21 Update 3*
The Media Share feature in VEGAS Pro simplifies the process of quickly gathering media from your collaborators, regardless of their location. It consolidates the Quick Upload and File Drop operations of previous versions of the VEGAS Hub Explorer into one central location. This functionality not only makes it easier to transfer files to the project editor but also enables efficient management and access to media. By utilizing the VEGAS Hub storage space, you can share your media collection, enable viewing, or quickly download files for use in your projects.
-
Collaborative Editing:
Share media files with team members for collective editing or review.
-
Client Review:
Allow clients to view and download media files for approval or feedback.
-
Gathering Media:
Invite contributors to upload media files directly into your project.
Manage your Media Share Collection
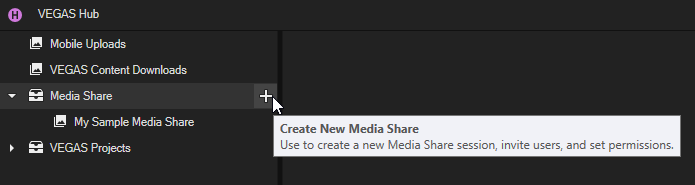
Create a Media Share Collection
-
Click the Hub Explorer tab to bring that window forward.
-
In the list at the left, click the Create New Media Share button at the Media Share collection set.
-
In the Create New Media Share dialog box, enter a name for your Media Share and click OK.
Your new Media Share collection appears in the list.
Configure your Media Share Collection
Open the Manage Media Share dialog
-
Point to the name of your Media Share collection in the Hub Explorer window.
-
Click the Manage Media Share button
 to open the Media Share dialog.
 If you are not yet logged into your VEGAS Hub account, you’ll be prompted to do so before you can continue.
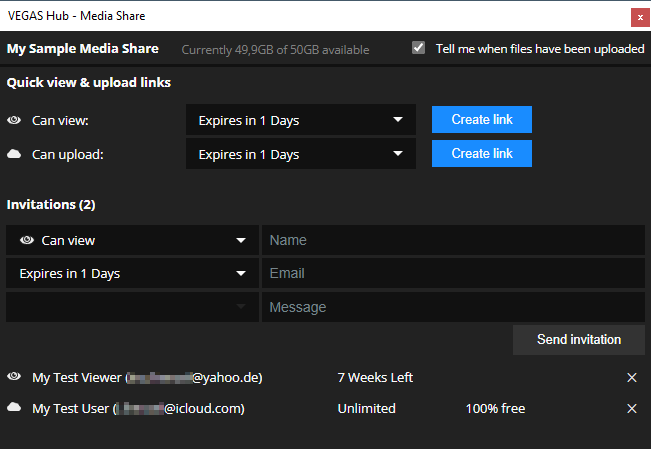
Add participants
Three methods are available to add participates. These participates may be set to only download and view the collection or they may be set to upload media.
1 Create and copy a link
-
In the Quick view & upload links section, select whether your attendee will be able to view and download only or upload as well.
-
In the drop-down list, set the expiration period for how long the link will be valid.
-
Click the Create link button.
-
Click the Copy icon to copy the link to the clipboard and share it with your participants.
2 Create a link and scan a QR code
-
In the Quick view & upload links section, select whether your attendee will be able to view and download only or upload as well.
-
In the drop-down list, set the expiration period for how long the link will be valid.
-
Click the Create link button.
-
Click the QR Code icon to display a QR code that can be scanned with a mobile device.
3 Send an invitation
-
In the Invitations section, click the New Invitation button.
-
In the upper drop-down list, select whether your attendee will be able to view and download only or upload as well.
-
In the lower drop-down list, set the expiration period for how long the link will be valid.
-
Enter name and mail address of the participant you want to invite to your Media Share session.
NOTE It’s important to note that the users you invite do not have to have access to their own VEGAS Hub account. In fact, they don’t even need to be users of VEGAS Pro at all. All they need is an internet connection and a connected device that holds their files. That device can be a computer, a tablet, a mobile device, and so on. And that device can be running on any operating system, so you can collect files from collaborators on a Mac just as easily as on a Windows machine or an Android mobile device. All that matters is that the device is connected and has access to the files they want to upload.
-
Click the Send Invitation button.
VEGAS Pro automatically sends an email message to the address you entered. That email message includes a link to your Media Share. Once the collaborator follows that link, they will have the opportunity to view or upload files.
You can add as many collaborators to the Media Share event as you want to.
Enable Notifications
If you want to receive an automatically generated email when files have been uploaded to your Media Share:
Select the Tell me when files have been uploaded checkbox.
Remove a participant
Click the cross button  in the Media Share dialog.
Delete a Media Share Collection
-
Point to the name of your Media Share Collection in the Hub Explorer window.
-
Click the More
 button | Remove.
Manage Files
Upload Files
The Upload Files function (formerly Quick Upload) enables you to upload files from your computer or other device to your VEGAS Hub Media Share collections. This makes it possible to quickly upload files to your Hub storage for a cloud back up of your media, or so that you can then download them to another computer so you can use them in your VEGAS projects.
In the Hub Explorer window, point to your Media Share collection and then click the Upload File to Cloud  button. The Upload Files dialog box opens.

Upload files from your computer
-
Switch to Windows Explorer and navigate to a file that contains the media you want to upload.
-
Drag a file from your Windows Explorer folder onto the Drop Files target area. Notice that the file has been added to the Upload queue.
-
Click inside the file target area.
-
In the Open dialog, browse to the folder that holds your media, select the media file, and click Open. This file has also been added to the Upload queue.
-
When you’ve added all the files you want to upload from your computer, click the Upload Files button.
Upload files from your mobile devices
-
Open the camera app on your mobile device and point the camera at the QR code in the Upload Files dialog box.
-
Follow the instructions on your mobile device to go to the URL supplied by the QR code.
This opens your device’s Internet browser and points to a page that enables you to add files to your upload queue just as you did on your computer.
-
Tap the Drag Files area and navigate to the location on your device that holds the media you want to upload.
-
Tap the media to add it to the Upload queue.
-
When you’re finished, tap the Upload Files button.
Once your files are uploaded to your VEGAS Hub, you will see the files in your Hub Explorer window inside VEGAS Pro.
Download and Sync Files for Use
Once you or your collaborators have uploaded files through the Media Share system, those files are automatically added to your Media Share collection.
Click the  Refresh Collection View button in the toolbar of the Hub Explorer window to see all of the files that have been uploaded to the Media Share.

Before you can add them to your VEGAS Pro project, you’ll need to synchronize your hub collection files and bring them down locally.
The uploaded files have ![]() cloud icons before their names. As usual, this indicates that the files are stored only in your VEGAS Hub storage.
cloud icons before their names. As usual, this indicates that the files are stored only in your VEGAS Hub storage.
Right-click the file in the Hub Explorer window and choose Sync from the context menu.
After a few moments, the file download completes and the blue checkmark icon ![]() shows that the file now resides both locally and on your VEGAS Hub storage.
shows that the file now resides both locally and on your VEGAS Hub storage.
Delete files
To delete a file from either your local collection or your VEGAS Hub storage:
Right-click the thumbnail and choose the appropriate Remove option from the context menu.
NOTE Keep in mind that this removes the actual file itself from your hard drive, not just the reference in the Media Share collection, so be careful with this option.