Using the Master Bus Window
The Master Bus window provides you with a streamlined view of your project's master output.
Choose View | Window | Master Bus to toggle the display of the window.
Master Bus toolbar
|
Item |
Description |
|
|---|---|---|
|
|
Audio Properties |
Opens the Audio tab in the Project Properties dialog. |
|
|
Downmix Output |
Downmixes your audio from 5.1 surround to stereo or from stereo to mono so you can ensure your mix will sound the way you intended it--even if your audience's hardware has fewer channels than the original mix. The button represents the current playback mode:
|
|
|
Dim Output |
Attenuates the volume of all busses that are routed to hardware outputs by 20 dB so you can check your mix at a lower level (or answer the phone or hear the pizza-delivery truck). Click again to restore volume and tune out your cantankerous assistant. |
|
|
Open Mixing Console |
Click to open the Mixing Console, which provides an integrated view of all tracks and busses in your project using the appearance of a traditional hardware-based mixer. You can use the Mixing Console to add and control audio tracks, assignable effects chains, busses, and input busses. |

 For more information, see


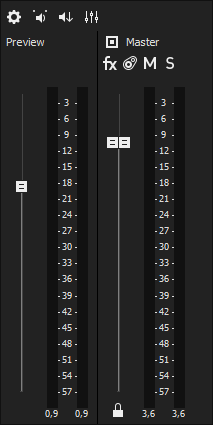
Preview control
Controls the loudness of media played through the Project Media, Trimmer, or Explorer window.
TIP Right-click in the Master Bus window and choose Show Preview Fader to toggle the display of the preview control.
Master Bus control
Use the bus control to adjust levels and panning, add effects, and mute or solo the bus.
|
Item |
Description |
|
|---|---|---|
|
|
Displays the Plug-In Chooser if there are no plug-ins assigned, or displays the Bus FX window if the bus has an effects chain. TIP Right-click the button and choose Post Volume from the shortcut menu if you want to apply the effects chain after the bus volume. This has the same effect as right-clicking the bus output fader and choosing Pre FX from the shortcut menu. |
|
|
|
The controls in the bus control list can function as trim controls or automation controls for bus volume, panning, and muting. Click the button and verify Show Automation Controls is not selected if you want the bus control to function as a trim control. Adjusting a trim control affects the entire track. Click the button and choose Show Automation Controls to adjust automation settings. |
|
|
|
Mute |
Excludes the bus from playback. When Show Automation Controls is selected, the button is displayed as a |
|
|
Solo |
Plays only the bus during playback. |
|
Output Fader |
Drag to adjust the volume of the bus. Double-click the center of the thumb to reset the fader to 0.0 dB. If the right and left channels of the Master bus are set differently, you can double-click either thumb to force the other channel to match it. When Show Automation Controls is selected, the thumb is displayed as a TIP Right-click the thumb and choose Pre FX or Post FX from the shortcut menu to specify whether the bus level is applied before or after the bus effects chain. |
|
|
Meter |
Displays the playback level at the output of the bus. This is the level that will be sent to the selected audio device. Right-click the meter and choose a setting from the shortcut menu to change the resolution. |
|

|
Lock/Unlock Fader Channels |
Click to lock (gang) the faders so the left and right channels will always move together. Click again to unlock the faders. NOTE Hold Shift while dragging a fader to temporarily override the current state of the button: if the button is turned off, you can hold Shift to drag the faders in locked mode; if the button is selected, hold Shift to drag the faders independently. |


 , and you can use the button to edit mute automation on the bus's bus track.
 , and you can use the fader to edit volume automation on the bus's bus track.