Rendering your project
-
From the File menu, choose Render As to display the Render As dialog.
-
Use the Folder text box to choose where you want to save your file:
-
The Folder box displays the path to the folder where your file will be saved. Click the down arrow
 to choose a recently used folder, or click the Browse button to specify a new folder.
TIP Click the Project Location button to quickly choose the folder where the VEGAS Pro project is stored.
-
Type a name in the Name box, or click the Browse button and select a file in the browse window to replace an existing file.
-
-
Use the Formats selection box to choose the type of file you want to create.
The Formats selection box displays the file types and formats you can use to render your file. When you select a format the Templates selection box updates to display available templates for that format. Click a template to select it and use that format for rendering, or select a template and click the Customize Template button to modify the template's settings.
For more information, see Custom rendering templates
-
You can type in the Search render templates box to find templates. For example, if you wanted to render a video for an Internet video, you could type "Internet" in the box to display only templates that include the term "Internet" in the template name or description.
-
If you have templates that you use often, you can create favorites. Click the gray star
 next to a template name to mark that template as a favorite. You can then select Show favorites only from the Filters drop-down menu to display only your favorites
  in the Render As dialog.
 -
Use the Filters drop-down to choose templates that match your project settings (frame size, pixel aspect ratio, and frame rate). If you want to display only templates that match your project settings, select the Match project settings check box.
-
To create a 5.1 surround audio stream for your DVD, render your audio using the Dolby Digital AC-3 Studio plug-in with the 5.1 Surround DVD or 5.1 Surround DVD, AGC on template.
-
If you're rendering to .wav, .w64, .avi, or .mxf format, you can select the Enable multichannel mapping checkbox to render a file with multiple audio channels.
For more information, see Rendering Multichannel Audio Files
-
Select or clear the check boxes in the Render Options section as needed. Some options may not be available if they do not apply to your project. For instance, the Render loop region only checkbox is availabe only if you’ve created a time selection in the timeline.
-
Select the Render loop region only checkbox if you want to save only the portion of the project that is contained within the loop region. Loop Playback does not need to be selected for this option to work.
-
Select the Stretch video to fill output frame size (do not letterbox) checkbox when you are rendering to an output format with a slightly different aspect ratio than your project settings. This will prevent black bars from appearing on the top and bottom or the sides of the output.
-
Select the Use project output rotation setting checkbox if you're rendering a rotated project and want to use the Output rotation setting from the Project Properties dialog for your rendered file.
When the checkbox is cleared, the media is rotated according to its Media Properties setting, but the project itself is unrotated—you can use this setting to proof your project on an unrotated display.
For more information, see Creating rotated projects
-
If the selected file type supports it, you can select the Save project markers in media file checkbox to include markers, regions, and command markers in the rendered media file.
For more information, see Inserting markersInserting regionsand Inserting command markers
-
Select the Save project as path reference in rendered file checkbox if you want to save the path to your VEGAS Pro project in the rendered file. Saving the project path allows you to easily return to the source project if you use your rendered file in another project.
NOTE-
The project information in the rendered file is a reference to a project file only. If you modify the project file after rendering, the project data will no longer match the rendered file. To edit a project using a path reference, the project file and all media must be available on your computer.
-
The checkbox will be unavailable if you haven't saved your project or if you're rendering using a third-party file-format plug-in.
-
For more information, see Project references in rendered files
-
-
Select the Save loudness log file next to media file checkbox if you want VEGAS Pro to analyze the loudness of your file and create a log file that summarizes its loudness values.
The loudness log is created using the same folder and base name as your sound file with _loud.txt appended to the name.
The log will record the file name, format, loudness metering mode, and loudness values throughout the file.
IMPORTANTLoudness logging is performed after the plug-in chain, but before any codec is applied to your rendered file. Because audio compression may affect audio levels, choose Tools | Generate Loudness Log to analyze a rendered file after saving to a compressed format.
When the Master bus mode drop-down list on the Audio tab of the Project Properties dialog is set to 5.1 Surround, surround processing is applied when measuring loudness (a gain of ~1.5 dB is applied to the left and right surround channels). When the Master bus mode drop-down list is set to Stereo, all channels contribute equally to the loudness measurement. For more information about loudness values, please see Loudness meters
-
Select the enable multichannel mapping if you want to render a single audio file with multiple audio channels.
For more information, see Rendering Multichannel Audio Files
-
-
Click the Render button. A dialog is displayed to show rendering progress. See below for more information.
TIPRender progress is displayed in the Windows task bar. If the render time is greater than a minute, a sound is played when rendering is complete.
To change the sound, open the Windows Settings | Personalization | Themes and click on Sounds. In the tree view below, expand the VEGAS Pro22 entry. When you select the Render Complete event, you can preview the current sound, assign a new sound, or turn off the Render Complete sound.
-
When rendering is complete, click the Open button to play the file with its associated player, or click Open Folder to open the folder where you saved the file.
You'll need to choose a rendering template that inserts pulldown fields to create a standard DV file if your project properties are set to 24p or if you selected the Allow pulldown removal when opening 24p DV checkbox on the General tab of the Preferences dialog. Use the NTSC DV 24p (inserting 2-3-3-2 pulldown) template if you intend to bring the file back into the timeline as source material.
If you cleared the Allow pulldown removal when opening 24p DV checkbox before adding your media and your project properties are not set to 24p, your 24p video is read as 29.97 fps interlaced video (60i), so you can choose whichever NTSC DV or PAL DV template suits your project requirements.
Smart rendering
When you render video to any of the following formats, unedited video frames are passed through without recompression (smart rendering):
-
DV AVI
-
DV MXF
-
IMX MXF (IMX 24p MXF is not supported for no-recompress rendering)
-
XAVC Intra MXF
-
HD MXF
-
MPEG-2 (for files such as those from HDV and DVD camcorders)
-
Panasonic P2
For more information, see Working with P2 Video
-
XDCAM EX supports smart rendering across the following formats:
-
SP 18.3 Mbps CBR 1280x720p to/from XDCAM EX and HDV HD-1
-
SP 25 Mbps CBR 1440x1080i to/from XDCAM EX, XDCAM HD, and HDV HD-2
-
HQ 35 Mbps VBR 1440x1080 to/from XDCAM EX and XDCAM HD
-
HQ 35 Mbps VBR 1280x720p to/from XDCAM EX
-
HQ 35 Mbps VBR 1920x1080 to/from XDCAM EX
NOTE In order to perform smart rendering, the width, height, frame rate, field order, profile, level, and bit rate of the source media, project settings, and rendering template must match. Frames that have effects, compositing, or transitions applied will be rendered.
You can clear the Enable no-recompress rendering checkbox on the File I/O tab of the Preferences dialog to turn the feature off.
Render Progress Dialog
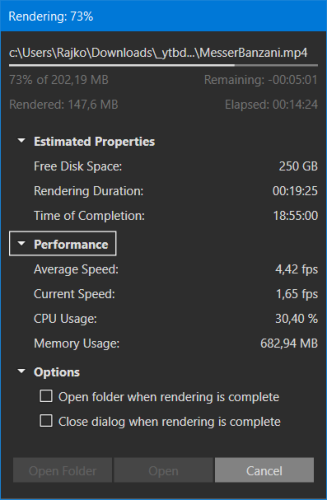
After starting the render process the following dialog is shown:

Beneath the file name and progress bar you see a couple of useful information about the render progress:
-
The estimated file size of your video and how much of it (in size and percentage) is already rendered.
-
The elapsed time since the render process was started and the estimated remaining time.
Click the arrow symbol in the Estimated Properties, Performance and Options section to reveal additional information and options. Estimated Properties shows the remaining free disc space, estimated total rendering duration and the time the render process will be finished. Performance shows the momentary and average render speed in frames per second and the memory and CPU usage.
In the Options section, you can choose to open the folder of the rendered video and/or close the render progress dialog after rendering is complete.
Apple ProRes
Apple ProRes is an industry standard intermediate codec that does its best to preserve detail in your footage across multiple generations of edits. VEGAS Pro supports both import and export for ProRes files. The files output on export have been officially certified as compliant by Apple.

To Render to ProRes:
-
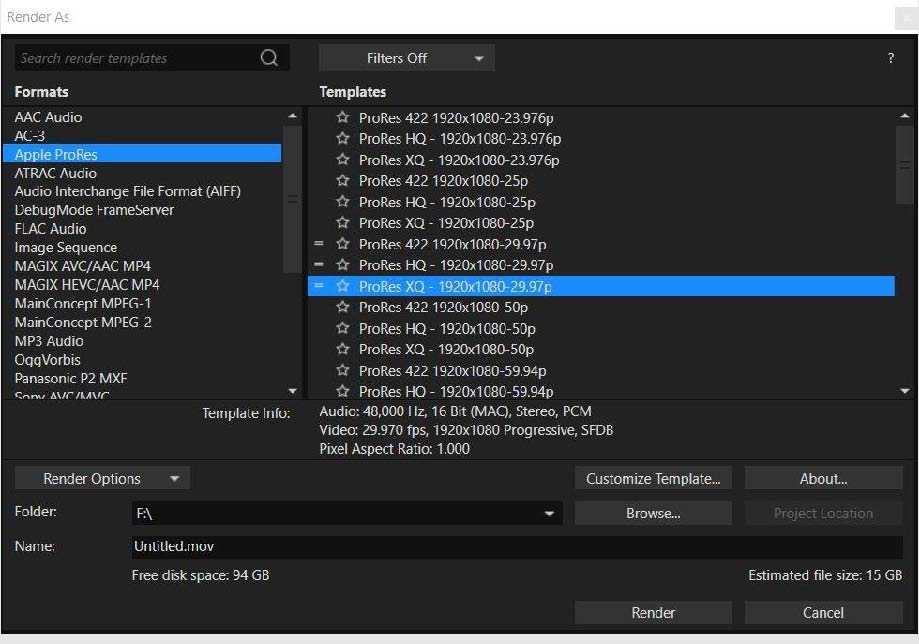
Choose File | Render As. In the Render As dialog box.
-
Select Apple ProRes from the Formats list.
-
Select a render preset from the Templates list.
TIP Templates whose properties match those of your project contain an Equal sign(=)to the left of their names.
To create a custom template, select the template that most closely matches the one you want to create and click the Customize Template button.
 .
. -
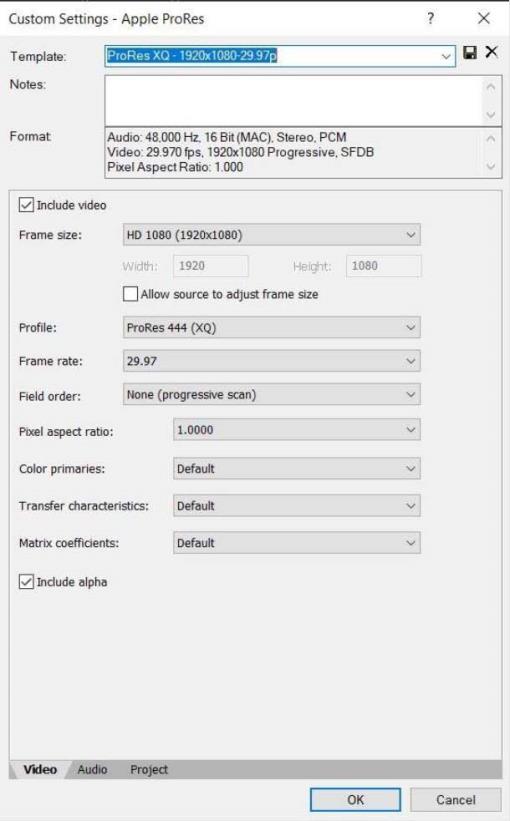
In the Custom Settings -Apple ProRes dialog box, set the parameters that you want.

-
Enter a name for your custom template into the Template field and click the Save Template button. Enter any notes you want in the Notes field.
-
Specify your desired values in the remaining fields:
Frame Size The resolution you want to render to. ProRes supports custom resolutions as well as standardized resolutions Profile The ProRes encode mode being used:
ProRes 422 (Proxy) the most highly compressed ProRes encoding option, intended for proxy usage with a data rate of approximately 45 mbps for 1080p video at 29.97fps ProRes 422 (LT) a compressed form of ProRes 422, but better quality than the proxy version with a data rate of approximately 102 mbps for 1080p video at 29.97fps ProRes 422 uses 4:2:2 YUV compression with a data rate of approximately 147 mbps for 1080p at 29.97fps ProRes 422 (HQ) uses 4:2:2 YUV compression, but it has a much higher data rate of approximately 220mbps for 1080p at 29.97fps ProRes 4444 uses 4:4:4 YUV compression and supports 12-bit color and 16 bits for the alpha channel with a data rate ofapproximately 330mbps for 1080p 30fps ProRes 4444 (XQ) utilizes 4:4:4 YUV compression and supports 12-bit color and 16 bits for the alpha channelwith adata rate ofapproximately 500mbps for 1080p 30fps Frame Rate The number of frames per second that your rendered file uses Field Order If shooting interlaced footage that you do not want to render de-interlaced, you can specify the field order to render here. Remember to also set your project settings to the same field order Pixel Aspect Ratio A ratio that defines the width of the rendered pixels. For most HD and 4K formats, 1.0 is the proper aspect ratio -
Click the Audio and Project tabs in turn to specify any changes you want to make on those tabs. When you’re done with your customizations, click the OK button.
NOTE If you’re rendering 4444 and 4444 XQ files, the higher bitrates required by those files may cause a delay between the render registering 100% finished and the render dialog closing as VEGAS Pro finishes writing the file.
-
Specify a save location in the Folder field, give your new file a name, and click the Render button.