Tempo Detection
*new since VEGAS Pro 22*
The Tempo Detection tool analyzes a piece of music (or the music in a video file) to determine the tempo and automatically adjusts your project properties to match the detected tempo. This feature is particularly useful for editing projects in time with the music, as it allows you to set your timeline ruler to measures and beats and use the grid for seamless cuts and edits.
-
Editing music videos to the beat of the music
-
Synchronizing video cuts to musical beats
-
Creating rhythm-based visual effects
Using Tempo Detection
-
Add the music file to your project timeline.
Alternatively, you can add it to your Project Media list without adding it to your timeline if you only need to establish the tempo without placing the file in your timeline.
-
Click the Project Media tab.
-
Right-click the music file in the Project Media list.
-
Select Tempo Detection from the context menu.
The Tempo Detection dialog box opens and displays the detected tempo.
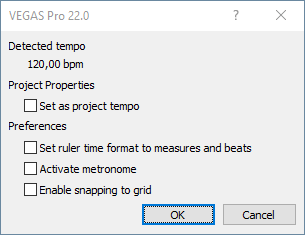
Dialog Element Explanation Detected tempo Displays the detected tempo of the music piece in BPM (Beats per Minute). Set as project tempo Sets the project tempo to the detected tempo. Set ruler time format to measures and beats Changes the ruler format to measures and beats. Activate metronome Activates the metronome to count the beats during playback. Enable snapping to grid Enables grid snapping to facilitate precise editing at measures and beats. -
Click OK.
Verify Project Properties
-
Go to File | Properties.
-
In the Properties dialog box, click the Ruler tab.
-
Verify that the project tempo matches the detected tempo.
-
Click Cancel to close the dialog box.
Notice the timeline ruler now lists measures and beats instead of frames.
Adjust Timeline Ruler and Grid
-
Trim the end of the timeline clip event to align with grid markers, which act as snap points.
-
To adjust grid detail, go to Options | Grid Spacing and choose the desired beat resolution.
By default, the grid shows up only at the first beat of each measure.
For example, if you want a grid line at every beat of each measure, choose Quarter Notes from the cascading menu.
Aligning the First Beat with the Timeline Ruler
EXAMPLE Say you want the music to start at beat 1.1 of the timeline ruler. That’s at the very beginning of your timeline, and if the music in your event doesn’t start at the very beginning of the event, your music won’t line up with the ruler.
-
Ensure the first beat of your music file lines up with beat 1 in the ruler bar.
-
Trim the start of your event so it starts exactly at the first beat of the music.
-
If trimming is not an option (for instance, maybe the music actually starts a beat or two before the actual first beat of the music—known as a musical pick-up), click to place the cursor directly on the waveform at the first beat.
NOTE If necessary, disable Quantize to Frames to place your cursor accurately on the waveform. Remember to re-enable it afterward to avoid issues.
-
Right-click the Timeline Ruler and select Set Time at Cursor.
-
Type the beat position (e.g., 1.1 in this example) into the text field and press Enter.
-
Verify that your ruler shows the correct measure and beat at the cursor location (e.g., measure 1, beat 1) and displays negative time before that location. This ensures your ruler lines up with your beats, allowing you to edit with confidence that you are editing to important beats in the music.