Creating selections and positioning the cursor
Selecting data and positioning the cursor are the first steps in a variety of editing tasks. You can move selected events, copy them to the clipboard, delete, edit, and more.
There are different methods of selecting events depending on the type of selections you want to make and the active editing tool.
You can also choose Edit | Select and choose a command from the submenu for access to additional selection methods.
Selecting a single event
With the Normal 

Selecting a range of events
*new since VEGAS Pro 22*
-
Point your mouse to an empty area of the timeline.
-
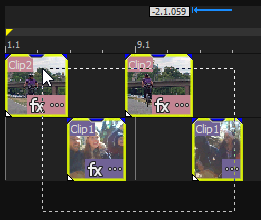
With the left mouse button, drag to create a selection rectangle around the events you want to select.

FIGURE Event Selection with left mouse button
Adjusting the Selection Box
You can change selection states while making your selection, just as you can when you use the Selection Edit tool specifically.
-
Modify Selection Width:
-
Make a selection with the left button, but don’t release the button just yet.
-
With the left mouse button still down (so you’re still in selection mode), click the right mouse button.
This constrains the selection box so that you can only adjust the width of the box. Use this mode if you want to ensure that you select events within a specific range horizontally on all tracks in your project (even if you can’t currently see them).
-
-
Modify Selection Height:
-
With the left button still down, click the right button again. Now you can only adjust the height of the selection box. Use this mode if you want to select everything on each track within the height of your selection box (again, regardless of whether you can see what’s on the tracks or not).
-
-
Free-form Mode:
-
Click the right button again to toggle back to free-form mode where you can define both the width and height of the selection box.
-
Reverting to Old Behavior
If you’ve gotten used to the old behavior of the left button and you miss being able to use it to make time selections, follow these steps:
-
Choose Options | Preferences.
-
In the Preferences dialog box, click the Editing tab.
-
Select the Use the Right mouse button to switch to the Selection Edit Tool checkbox.
This swaps the mouse button used for all the behaviors described above.
-
Click OK. Now use the right button to switch to the Selection Edit tool.
Selecting a time range
*new since VEGAS Pro 22*
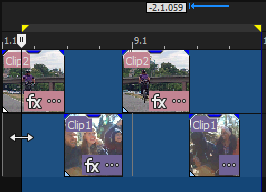
Drag through the timeline with the right mouse button. Now you create a time selection.

FIGURE Time Selection with right mouse button
Unless an event is locked, a selected time range affects all events—or portions of events—that occur within the range.
TIP To quickly select the full duration of the project, double-click the marker bar.
Editing the selection length
The current selection start, end, and length are displayed in the edit boxes below the timeline:


Double-click the boxes to edit them. You can enter timeline values, such as 00:00:25.381, or you can enter relative values by entering +/- and a number. For example, if the time ruler is displayed in frames, you could type +10 to add ten frames to the selection start, end, or length.
You can drag the ends of the time selection bar to adjust the selection length, or drag the middle of the bar to move the selection without changing its duration.
Selecting multiple adjacent events
Use this procedure to select multiple events that are located next to each other.
-
Hold the Shift key and click the first and last event that you want to select. The events, including those between the selected events, are highlighted.
NOTE To select all of the events in the project, choose Select from the Edit menu, and then choose Select All from the submenu.
-
When you have finished selecting events, release the Shift key.
Selecting multiple nonadjacent events
Use this procedure to select multiple events that are not located next to each other.
-
Hold the Ctrl key and click the events you want to select. The events are highlighted.
NOTE To deselect an event, simply click it again.
-
When you have finished selecting the events, release the Ctrl key.
Selecting all events
From the Edit menu, choose Select, and then choose Select All from the submenu (or press Ctrl+A) to select all tracks and events in your project.
Selecting all events to the end of a track
Right-click an event and choose Select Events to End from the shortcut menu. The event and all subsequent events on the same track are selected.
TIP You can also use this command with events selected on multiple tracks.
Selecting all events after the cursor position
Choose Select All After Cursor from the Menu Edit | Select or from a track's context menu to select all events under and after the current cursor position. You will be asked if you would like to select the event across All Tracks or only on the Selected Tracks.
Selecting all events that refer to a specific media file
-
Right-click a file in the Project Media window and choose Select Timeline Events from the shortcut menu. The cursor moves to the first event that uses the media, the timeline scrolls to the cursor, and all events that use the selected media file in the active take are selected.
For more information, see Using takes as alternate versions of events
-
Hold Ctrl or Shift while choosing Select Timeline Events from the shortcut menu to add the events to the current selection.
-
When multiple events are selected, press Ctrl to move the edge of the previous or next selected event.
-
When multiple events are selected, press Ctrl+Shift to create a time selection from the previous or next selected event.
Selecting the start or end of an event for keyboard edge trimming
From the Edit menu, choose Select, and then choose Select Event Start or Select Event End from the submenu (or press [ or ]) to select the start or end of an event and enter keyboard edge-trimming mode. 
TIP When multiple events are selected, press Ctrl+[ or Ctrl+] to move the edge of the previous or next selected event.
Positioning the cursor
To set the cursor position, click in the timeline or time ruler. The cursor moves to the position you click, and the cursor position is displayed below the timeline.

