Color Corrector (Secondary)
The Color Corrector (Secondary) plug-in helps you perform fine color correction by adjusting a single color independently of the other colors in your video.
TIP Stack multiple instances of the plug-in for advanced color control.
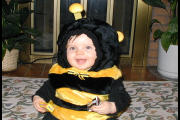
To demonstrate how you can use the plug-in, we'll adjust the color of this bumblebee's stripes:
Choose the color you want to adjust
The plug-in works by allowing you to adjust a selected color. If you don't select a color, the plug-in will affect all colors in your video.
-
Position your cursor on the frame you want to adjust in the Vegas timeline.
TIP Working with the Scopes window open will help you monitor your progress.
-
Click the Effects Area button to activate the eyedropper
 .
.TIP Drag to create a rectangular selection to select a range of color.
-
Click a portion of the image in the Vegas Video Preview window to sample a color. The luminance, saturation, and hue controls in the plug-in are updated to reflect the sampled color.
If you want to see the portion of the image you sampled, select the Show Mask check box. The selected area is displayed in white.
If you want to reverse the portions of the image that will be affected or not affected by the plug-in, select the Invert mask check box.
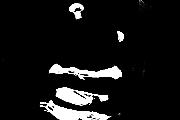
Original picture
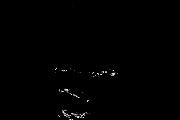
Show Mask selected after sampling the middle yellow stripe
Limit the luminance values to be adjusted
You can see in the previous example that sampling a color with the eyedropper did not select the full range of yellow that we want to adjust. Selecting the Limit Luminance checkbox and choosing a luminance range will help extend or restrict the selection.
-
After you select a color with the Effect area eyedropper
, click the arrow  to expand the Limit Luminance controls.
 -
Select the Enable check box.
-
Drag the Low and High sliders to set the range of luminance values for the selected color that you want to affect.
-
Drag the Smooth slider to adjust how smoothly the filter blends pixels outside the selected range. Choose 0 to perform no blending, or drag the slider to the right to blend.
Original mask after sampling color with eyedropper
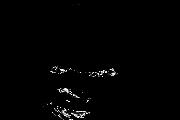
Mask after setting the Low slider to 0 and the High slider to 255
Limit the saturation levels to be adjusted
In the previous example, adjusting the luminance range increased the range of yellow that was selected, but the full range of yellow that we want to adjust is still not selected.
Selecting the Limit Saturation checkbox and choosing a saturation range will help extend or restrict the selection.
-
After you select a color with the Effect area eyedropper
, click the arrow to expand the Limit Saturation controls. -
Select the Enable check box.
-
Drag the Low and High sliders to set the range of saturation levels for the selected color that you want to affect.
-
Drag the Smooth slider to adjust how smoothly the filter blends pixels outside the selected range. Choose 0 to perform no blending, or drag the slider to the right to blend.
Mask after sampling yellow and adjusting luminance
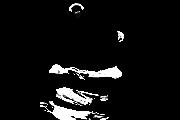
Mask after setting the Low slider to 38.7, High slider to 162, and Smooth slider to 12.5
Limit the hue to be adjusted
Selecting the Limit Hue checkbox and choosing a center hue and width can also help extend or restrict the selection.
-
After you select a color with the Effect area eyedropper
, click the arrow to expand the Limit Hue controls. -
Select the Enable check box.
-
Drag the Center and Width sliders to set the range of colors that you want to affect.
TIP If you want to adjust all colors except the selected color, add 180 degrees to the Center value and set the Width high enough that all colors except the selected color are within the range. If you set the Saturation to 0, you can create a black-and-white scene where only a single color remains.
-
Drag the Smooth slider to adjust how smoothly the filter blends pixels outside the selected range. Choose 0 to perform no blending, or drag the slider to the right to blend.
Mask after adjusting luminance and saturation. Center slider is 141 and Width is 10.
Mask after setting the Center slider to 269.6 and Width slider to 270.9. Better selection of stripes and antennae.
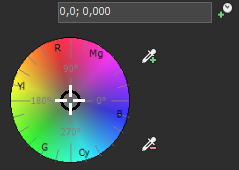
Adjust the selection's color
-
Choose the color you want to add to the selection:
-
Drag the point in the center of the color wheel to pick a hue and saturation.
-
Enter appropriate values in the format (angle, magnitude) into the edit box to define a hue and saturation.
-
Use the complementary color eyedropper tool
 and sample a color on your screen to add the sampled color's complement to the selection.
 -
Use the adjustment color eyedropper tool
 and sample a color on your screen to choose the color you want to add to the selection.
Original picture
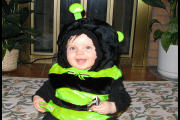
Image after setting the Angle to 258.8 and Magnitude to 0.75
-
-
Drag the Rotate Hue slider to change the color of the selection.
Original picture
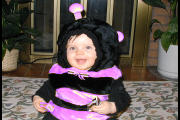
Image after setting the Rotate Hue slider to 260
-
Drag the Saturation slider to adjust the selection's overall saturation.
Original picture
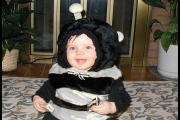
Image after setting the Saturation slider to 0
-
Drag the Gamma slider to adjust the overall brightness of the video. 1 is the default setting; higher settings produce a brighter image, and lower settings produce a darker image.
Original picture

Image after setting the Gamma slider to 0.5
-
Drag the Gain slider to add a gain to all luminance values in the video. All luminance values are multiplied by the Gain setting.
Original picture
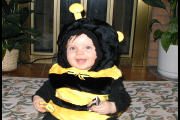
Image after setting the Gain slider to 1.3
-
Drag the Offset slider to offset all luminance values in the video. The Offset setting is added to all luminance values.
Original picture

Image after setting the Offset slider to 30
-
Drag the Alpha slider to adjust the transparency of the selection.
Original picture
Image after setting the Alpha slider to 0 (Color bars are on track below bumblebee)