Lens Correction
Straighten out distorted photos or video footage that come from wide angle cameras like action cams with this plug-in. By setting three factors that characterize the specific distortion of a lens system you can compensate the typical curvature of straight lines at the edge of the picture.

The plug-in comes with a comprehensive list of cameras to set the distortion factors automatically, but in case you don't find your camera on the list it is also possible to set the factors manually.
Automatic
-
Apply the Lens Correction FX as a media or event effect.
-
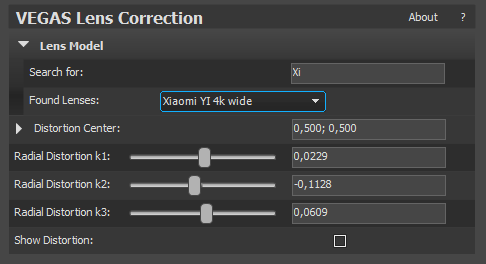
Expand the Lens Model section.
-
Type your camera name or parts of the name into the field Search for.
-
Select your camera model from the Found Lenses drop-down menu.
-
The three factors Radial Distortion k1, k2 ,k3 are set according to the database and the picture is straighten out
NOTE By default the plug-in assumes the center of the distortion is also the center of the picture. When the picture was cropped before applying the correction the center can be off-set. If so, move the Distortion Center to compensate this.
User defined
If you don't find your lens system in the database, you have to set the distortion factors by hand
-
Apply the Lens Correction FX as a media or event effect.
-
Click the Show Distortion check-box. A grid appears in the preview monitor over the picture that reflects the actual distortion according to the set factors.
-
Align the curved lines that should be straight with the curved lines of the grid by adjusting the k1...k3 factors.
TIP As a starting point, so that you don't have to start from scratch, you can enter the focal length from the EXIF data into the search field and select one of the offered lenses.
-
Deactivate the Show Distortion option to see the results and repeat from step 2, if necessary.
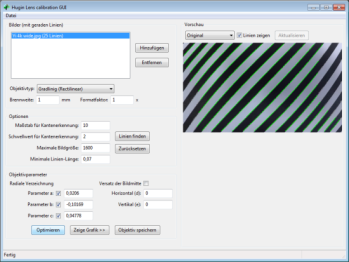
Determining lens distorsion with Hugin's Lens calibration GUI
If you have the camera there with which the images were taken, you can also have the distortion factors of the lenses determined with an additional open source program.
-
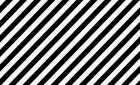
Print out this picture:
-
Make a video of the print-out with the camera, the print-out in the video clip should be head- on and fill the whole frame.
-
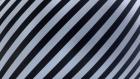
Make a still picture from the video.
-
Download and install the open source software hugin. The software is for stitching of panorama pictures but it also contains a lens calibration utility.
-
Open the Lens calibration GUI software that was installed along with hugin.
-
Insert the picture (Add...).
-
Enter any value for focal length and crop factor.
-
Click the Find lines button. If no sufficient number of lines were found, increase the value for edge detection scale and/or decrease the value for minimum line lenght.
-
Activate the checkboxes for radial distortion a, b and c
-
Click the Optimise button.
-
Select Corrected from the Preview drop-down menu and verify that the lines are straight, if so note the three parameter (a,b,c) for use in the VEGAS Lens Correction plug-in.
-