Creating text and titles
Most video projects include titles and credits. There are several ways to add text to your project: you can use the included plug-ins for static text and scrolling credits, or you can use an external image-editing program to create images with text on them.
Adding text with the Titles & Text plug-in
-
Choose View | Window | Media Generators to display the Media Generators window.
-
In the left pane, select the Titles & Text plug-in. The available presets are displayed in the right pane.
-
Drag a preset to a position on the timeline to create a generated media event.
TIP If you want text to appear as an overlay, add it to a track above the video you want to overlay and use a transparent background.
For more information, see Compositing and masks
-
Use the Titles & Text plug-in controls to edit the appearance of your text.
For more information, see Using the Titles & Text Plug-In
Transfer Text Properties
*new since VEGAS Pro 22*
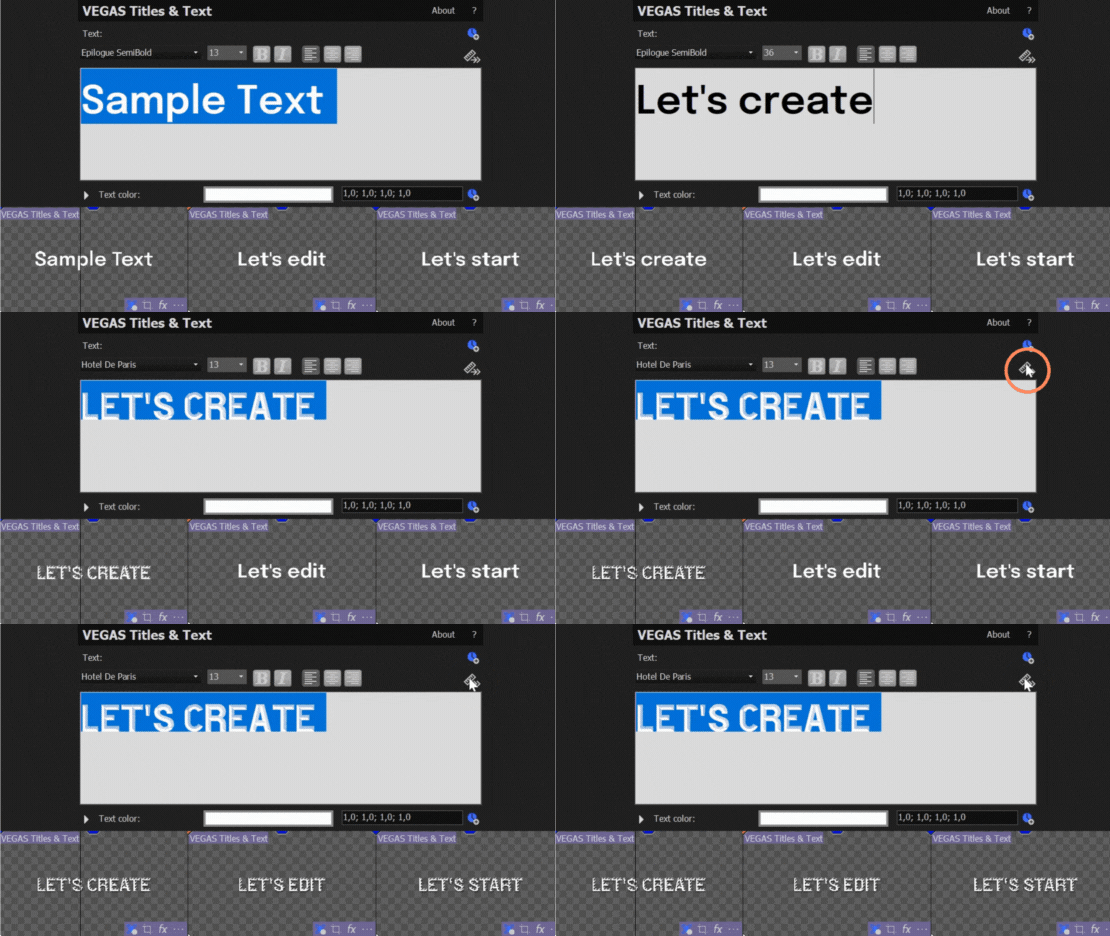
In the Titles & Text Media Generator, you can easily transfer text properties from one event to another. It simplifies the process of achieving consistent text attributes across multiple text events within the same track.
EXAMPLE If you have dozens of lower third text events in your project and decide to use a different color, font, size, and/or other characteristic for all of them, you only need to change the characteristics for one of the events and then can instantly apply the change or changes to all of the rest of them.
-
Click the Media Generators tab to bring that window to the front.
-
Select Titles & Text from the list of generators.
-
Add several text events to the same track in your timeline.
-
Type something different as the text in each one (even if just Text Event 1, Text Event 2, and so on).
-
Customize the properties of each text event.
For example, you can use different colors, fonts, sizes, bold or italic styles, etc.
-
If the "Video Media Generator" window is not open for any of the events, select one of the events on the track.
-
Click the "Generated Media" button for that event to open the "Video Media Generator" window.
-
In this window, you will find the "Transferring Text Properties" function.
-
By clicking this function, all the other "Titles & Text" events on the same track will be instantly updated to match the properties of the control event.

Transferring text properties:
Verifying the changes:
Click on the other events in the track and observe that the text size, font, animation, and other attributes have been updated to match the control event.
NOTE This action does not change the text content of the events.
Reverting the changes
If you’re not happy with the change you made, click the Undo button and all events revert to their original characteristics.
Adding text and titles with the ProType Titler
NOTE The Pro-Type Titler is deprecated and hidden by default.
With the ProType Titler, you can create static text, animated text effects with splined paths, per-character animation, and advanced curves. Add shadows, glows, blurs, and gradients for unique text treatments.
-
Choose View | Window | Media Generators to display the Media Generators window.
-
In the left pane, select the ProType Titler plug-in. The available presets are displayed in the right pane.
-
Drag a preset to a position on the timeline to create a generated media event.
TIP If you want text to appear as an overlay, add it to a track above the video you want to overlay and use a transparent background.
For more information, see see Compositing and masks
-
Use the Pro Type Titler plug-in controls to edit the appearance of your text.
You can use animation in the ProType Titler to create scrolling and crawling credits.
For more information, see Using the ProType Titler.
Creating a title from a graphic
Title images can be created in almost any editing program. The following general procedure explains how to create titles with a transparent background.
TIP You can use track motion to animate titles created from still images. 
-
Start your image-editing application.
-
Create a new image and set the dimensions of the new image to be the same as the frame size for the project.
-
Make the default canvas (background) transparent.
-
Select the Text tool and type the text for your title.
NOTE Size and position your titles carefully to fit within the Title Safe Area, or the titles may extend beyond the edges of your television.
For more information, see Using the Video Preview window
-
Save the file as a PNG, PSD, or TGA file (PNG is recommended). Make sure that you save the alpha channel information, which will be used for transparency.
-
Add the image as an event to the track above the track containing the background.
-
Click the Compositing Mode button
to set the title track to Source Alpha (default).
-
If your title is saved as a TGA image, the alpha channel may not be detected automatically. Use the Media Properties dialog and choose a new setting from the Alpha channel drop-down list.
For more information, see Viewing or changing media file properties
-
If your image does not have an alpha channel, you can apply the Chroma Keyer filter to the image to key out the background.