Auto Ducking
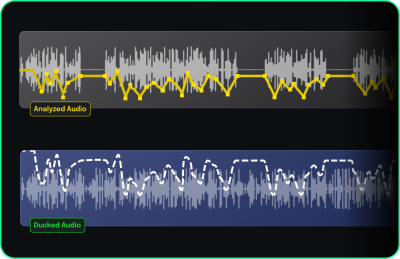
Auto Ducking is a feature in VEGAS Pro that allows you to automatically reduce the volume of one or more audio tracks (referred to as "listener" tracks) based on the presence of audio in other tracks (referred to as "controller" tracks). This feature is particularly useful in scenarios where you need background music to "duck" or lower in volume when narration or dialogue is playing.
This feature creates a control envelope on the controller track, which adjusts the volume of the listener track(s) based on the controller’s audio. You can create simple hard ducks or sophisticated volume changes depending on the parameters you set.
-
Automatically lower the volume of background music when narration or a voiceover starts.
-
Control the volume dynamics between dialogue tracks and background ambiance or effects.
-
Ensure audio clarity by automatically ducking the volume of non-essential audio during key moments of narration.
-
Use Auto Ducking to enhance pulsing sound effects in a mix, making sure they stand out by reducing other sounds when the pulse occurs.
-
In music production, use Auto Ducking to lower the volume of bass instruments or low-frequency sounds when a kick drum plays, ensuring the drum remains clear in the mix.
Ducking Music for Narration
-
Set Up the Audio Tracks
-
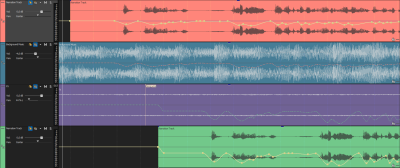
Set up your project with narration on one track and background music on another track so that both audio tracks play simultaneously.
-
Add several different narration events to the narration track and leave some space between each of them.
-
Adjust the music so that there is a bit of space at the beginning where the music plays without the narration having started, and at the end where the music continues to play after the narration stops.
-
-
Enable Auto Ducking
-
Right-click on the Track List and select More | Auto Ducking Controls to open the Auto Ducking dialog.
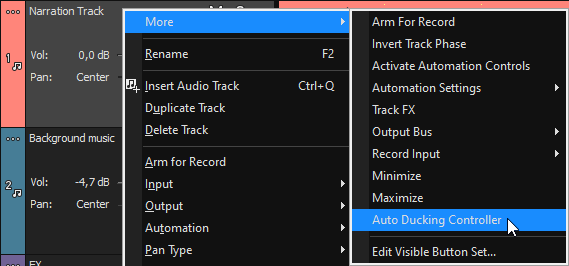
This designates the narration track as the "controller" track.

This will create a new Auto Ducking control envelope that adjusts the volume of the background music track based on the volume of the narration.
TIPTo see the Auto Ducking controls more easily, right-click on the Track List, select More, and enable the Auto Ducking Controls from the Visible Button Set menu.

-
-
Adjust the Auto Ducking Envelope
-
Set the Floor Reduction slider to the level you want to reduce the music volume (e.g., -12 dB).
-
Set the Peak Reduction slider to 0% initially, so it doesn’t affect volume peaks. You can adjust this later if needed.
-
-
Designate the Music Track as a “Listener” Track

-
Click the More
button on the music track and choose Auto Ducking Listener to assign it as the “listener.” Now, the music track’s volume will react to the ducking envelope on the narration track.
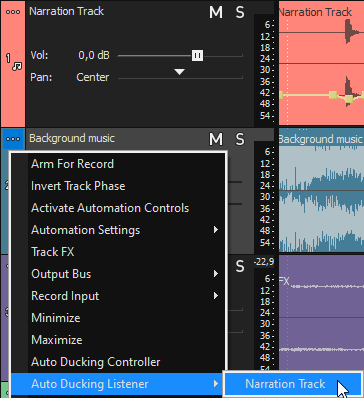
A new dotted-line envelope appears on the music track to visually represent the volume adjustments according to the narration events.
-
-
Test and Fine-Tune the Auto Ducking Effect
-
Play your project to hear the ducking effect in action. You can adjust the parameters of the Auto Ducking envelope to customize the level and sensitivity of the ducking effect.
-
To adjust the Auto Ducking effect for individual events, right-click on an event in the controller track and choose Re-Analyze Auto Ducking. You can then adjust the Floor Reduction or Peak Reduction for that specific event to customize the ducking effect.
-
Envelope Response Time
If the listener envelope updates slower than expected, remember that the envelope refreshes after the mouse is moved off the control. This slight delay ensures that the system is not overloaded during the adjustment phase.
-
In a musical context, if for example, you have a bass guitar, an organ with low notes, and a piano with low notes in your mix, they could all exist in relatively the same frequency space as your kick drum. Thus, the kick drum could get buried in the mushy low-end. In such a case, make the kick drum track an auto ducking control track and assign each of those other tracks as listeners so that they “get out of the way” of each kick drum hit.
-
While this might not make sense in the case where you simply want to duck the music out of the way of the narration, you can use this technique creatively to enhance different types of audio mixes. For instance, say your audio soundtrack has a repeating pulsing sound, like some sort of sci-fi engineroom noise or something. Such a pulsing sound could get “lost in the mix” of other audio in the soundtrack. In a case like that, you could use the pulsing sound as the auto ducking generator and assign other audio tracks as listeners. In this way, you could automate your mix so that every time the pulsing sound happens, other audio quickly ducks down to enable the pulse to more effectively shine through the mix.
Dialog Description
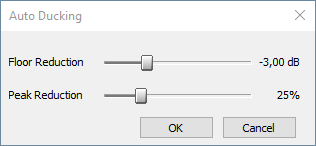
| Dialog Element | Description |
|---|---|
| Floor Reduction Slider | Controls the minimum volume level (in dB) that the audio will duck to. A common setting is around –12dB for narration. |
| Peak Reduction Slider | Determines how much the volume should respond to peaks in the controller track's audio. Higher percentages create more dynamic ducking based on the controller track’s loudness. |
Peak Reduction and Advanced Ducking
While Floor Reduction sets a fixed volume level for ducking, Peak Reduction offers more dynamic control. By setting the Peak Reduction slider, the listener track reacts more to the loudness of individual peaks in the controller track. This can be useful for complex mixes, such as ensuring that kick drums or pulsing sounds stand out in a soundtrack by automatically ducking other tracks in response to these peaks.
