Rendering your project
Rendering creates a final version of your project that you can export and share. The Render dialog lets you select output formats, apply presets, and customize export settings. It features a streamlined layout with tree-based navigation and use case–oriented categories to help you find the right option quickly.
Use rendering when you finish editing and want to publish your project for platforms such as YouTube, social media, or archival storage.
-
Export a finished video for YouTube and other social platforms.
-
Create a high-quality master for archiving or further editing.
-
Deliver audio-only files for podcast or music distribution.
How to render a project
- Save your project before you render.
- Some formats may require additional codecs or plug-ins.
- To access all available formats, enable Show all formats.
-
Go to File menu and click Render.
-
Use the Foldertext box to choose where to save.
-
Click
 Browse to specify a new folder.
 -
Use the drop-down to select a recent folder.
-
Click
 Project Location to jump to the project’s folder.
-
-
In the Name box, enter a file name or select an existing file to overwrite.
-
Use the left-side tree navigation to select a category.
TIP Use Filters and enable Match project settings to display only compatible templates.
 For more information, see Filters and matching
TIP Use Search to quickly filter presets (for example, type “Internet”).
TIP Mark templates as Favorites and select favorites.
-
Select a format to view available Templates. Optionally click Customize Template to adjust resolution, frame rate, bitrate, and audio settings.
For more information, see Custom rendering templates -
Use the Render Options drop-down to select or clear the check boxes as needed.
For more information, see Render options -
Click Render to start exporting.
After you click Render, a progress dialog shows status and details.

-
When rendering is complete, click Open to play the file with its associated player, or click Open Folder to open the target folder.
If your project uses 24p DV and you need a standard DV file, choose a template that inserts pulldown (for example, NTSC DV 24p (inserting 2-3-3-2 pulldown)). If you enabled the preference Allow pulldown removal when opening 24p DV, ensure your template settings match your intended workflow. For background on pulldown, see Glossary.
- For lossless pass-through, see Smart Rendering.
- For format-specific guidance, see Render Apple ProRes Files.
Example: Export a video for YouTube
-
Click File menu > Render.
-
In the Usecase tree, select Youtube.
-
Choose the template Internet HD 1080p 29.97 fps (AVC/H.264)
NOTE or select the matching frame-rate variant such as 25 fps. Hardware-accelerated variants (e.g., Intel QSV, AMD VCE) are also valid.
-
Click Customize Template and confirm:
-
Resolution: 1920 × 1080
-
Frame rate: match your source (29.97 or 25 fps)
-
Bitrate: 12–16 Mbps (VBR or CBR)
-
Audio: AAC, 192 kbps, 48 kHz
-
-
Click OK, set file name and destination, then click Render.
If the template list is long, type Internet HD 1080p in the search field or enable Show all formats.
Dialog overview
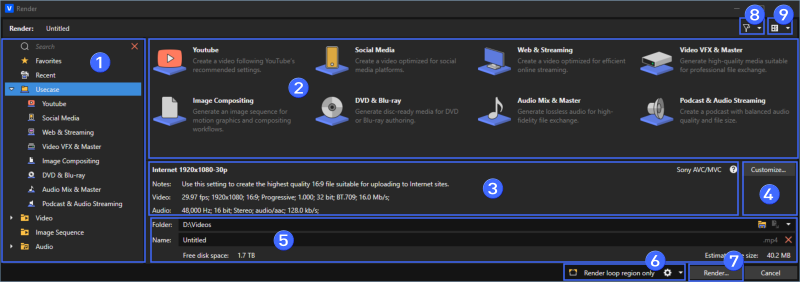
FIGURE New Render dialog with tree navigation and use case categories
| # | UI element | Description |
|---|---|---|
|
1
|
Tree navigation | Browse categories on the left, including Search, Favorites, and Usecase. |
|
2
|
Templates | Shows available templates for the item selected in the tree. |
|
3
|
Template details | Shows a brief summary for the selected template. |
|
4
|
Customize... |
Open Custom Settings to fine-tune encoder parameters or save a custom preset. |
|
5
|
Output File | Set Folder and Name; use Project Location to jump to the project folder. |
|
6
|
Render options & estimate | Open the gear menu and toggle options such as Render loop region only; the Estimated size updates as you change templates and settings (see Rendering your project). |
|
7
|
Render... | Start rendering with the selected template and options. |
|
8
|
Filter | Match project video/audio settings or toggle Show all formats. |
|
9
|
View | Switch between List, Details, or Thumbnails and adjust Sort by. |
Filters and matching
|
Setting |
Description |
|---|---|
| Match project video settings | |
| Resolution | Show templates that match the project resolution. |
| Framerate | Show templates that match the project frame rate. |
| Ratio | Filter by the project’s display aspect ratio. |
| Pixel ratio | Match the project pixel aspect ratio. |
| Field order | Match progressive or interlaced order. |
| Color depth | Filter by the project bit depth. |
| HDR | Show HDR-capable templates only. |
| Color space | Filter by the project color space. |
| Match project audio settings | |
| Sample rate | Show templates with the same sample rate. |
| Channel count | Filter by stereo, 5.1, etc. |
| Bit depth | Match the project’s audio bit depth. |
| Global | |
| Show all formats | Display every available output, including formats that do not match current project settings. |
NOTE Filters affect the template list only. They do not change project properties.
View and sort
| Option | Description |
|---|---|
|
List |
Compact view for scanning many templates quickly. |
|
Details |
Shows extra columns for easier comparison. |
|
Thumbnails |
Visual preview if available for a format family. |
|
Sort by |
Change the ordering (for example, by name). Use together with search and filters to narrow the list. |
Template details
- Details panel — the panel under the template list shows Notes and the key Video/Audio parameters of the selected template (resolution, frame rate, pixel aspect ratio; sample rate, channels, codec).
- Customize... — open the Custom Settings dialog to fine-tune the selected template. For creating, saving, and managing your own presets, see Custom rendering templates.
- Estimated file size — the size updates dynamically based on the selected template, bitrate mode (CBR/VBR, two-pass), audio settings, and loop region.
Render options

|
Option |
Description |
|---|---|
| Render loop region only |
Render only the timeline loop range. This button appears when a loop selection is active.
|
| AI Auto Reframe |
This button automatically appears when the delivery size of your final render does not match the original aspect ratio
|
|
Drop-down: |
|
| Stretch video to fill output frame size (do not letterbox) | Avoid black bars from appearing on the top and bottom or the sides of the output when aspect ratios differ. |
| Use project output rotation setting |
Apply the project’s Output rotation setting to the render. When cleared, media uses its own rotation from Media Properties while the project remains unrotated (useful for proofing on unrotated displays).”
|
| Enable multichannel mapping |
Render a single file containing multiple channels (e.g., 5.1)
|
| Save project markers in media file |
Include markers, regions, and command markers in supported formats.
|
| Save project as path reference in rendered file |
Store a reference to the source project path in the rendered file. Saving the project path allows you to easily return to the source project if you use your rendered file in another project. NOTE
|
| Save loudness log file next to media file |
Analyze the loudness of your file and create a loudness log ( IMPORTANT
Loudness logging is performed after the plug-in chain, but before any codec is applied to your rendered file. Because audio compression may affect audio levels, choose Tools | Generate Loudness Log to analyze a rendered file after saving to a compressed format. When the Master bus mode drop-down list on the Audio tab of the Project Properties dialog is set to 5.1 Surround, surround processing is applied when measuring loudness (a gain of ~1.5 dB is applied to the left and right surround channels). When the Master bus mode drop-down list is set to Stereo, all channels contribute equally to the loudness measurement. |
| Swap video files on render | Safely replace an existing output file after a successful render. The old file is swapped automically to minimize the chance of partial outputs. |
Custom settings (overview)
Use Customize... to fine-tune the selected encoder template. The available controls vary by format. The most common tabs include:
Video
- Frame size, Frame rate, Field order, Pixel aspect ratio
- Profile/Level (codec-specific)
- Rate control: CBR or VBR (optionally Two-pass)
- Streaming: Enable progressive download (for web playback)
Audio
- Sample rate, Bit depth, Channel mode
- Codec-specific settings (for example, AAC bitrate, AC-3 dialog normalization)
System / Project
- Performance/encoder options (format-specific)
- Project overrides such as Full-resolution rendering quality or Color space (when available)
TIP For creating, editing, copying, and deleting custom templates, see Custom rendering templates.
Render progress
|
Item |
Description |
|---|---|
| Estimated file size & progress | Shows the expected output size and the current completion percentage. |
| Elapsed / remaining time | Displays elapsed time and the estimated time left to complete the render. |
| Estimated Properties | Remaining free disk space, estimated total duration, and expected finish time. |
| Performance | Current/average render speed (fps), memory usage, and CPU usage. |
| Options | Open the file’s folder and/or close the dialog when rendering completes. |
| Show Video in Preview Window | Display the render in the preview while processing (may reduce render speed). |
| Shut down computer after render completes | Automatically power down the machine when the render finishes. |
Render progress also appears in the Windows taskbar. If the render exceeds one minute, a sound plays when finished. Configure this sound in Windows Settings > Personalization > Themes > Sounds (event: Render Complete).
Last modified on December 08, 2025