Screen Recording with VEGAS Capture
VEGAS Capture is an integrated application that allows you to record video and audio sources from your computer. You can add multiple sources such as monitors, windows, webcams, or microphones, organize them by category, and configure the recording quality globally or per source.
-
Tutorials and Presentations: Record a single application window with microphone narration.
-
Gameplay Recording: Capture your screen and webcam simultaneously for commentary.
-
Professional Multi-Source: Record multiple monitors and several audio inputs for complex projects.
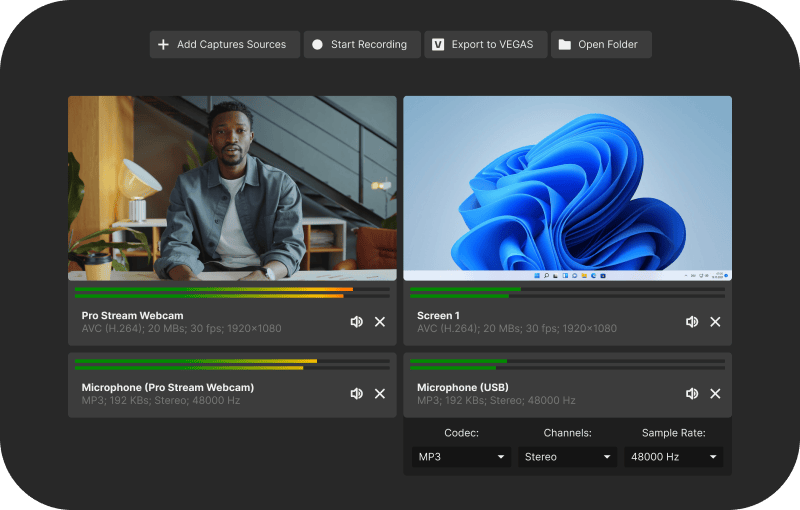
FIGURE Main VEGAS Capture Window
How to Record
- Ensure that your operating system grants screen and audio recording permissions to VEGAS Capture.
- Verify that there is enough free disk space in your designated capture folder.
-
Open VEGAS Capture from the File menu, or click the
 Start Vegas Capture button in the Project Media window toolbar.
FIGURE Start Screen — No Sources Added
-
Click + Add Capture Sources to open the Select Capture Sources dialog.
-
Choose a tab ( Video, Audio, Screen, or Window) and click a tile to add that source.
TIP You can select multiple sources before recording.
-
Manage sources on the dashboard. Each source appears as a card that shows availability and format info.
Click Open device settings to configure the selected source.
- Video: set Resolution, Framerate, and Codec on the card.
- Audio: set Codec, Channels, and Sample Rate on the card.
- Mute a source or click X to remove it from the capture list.
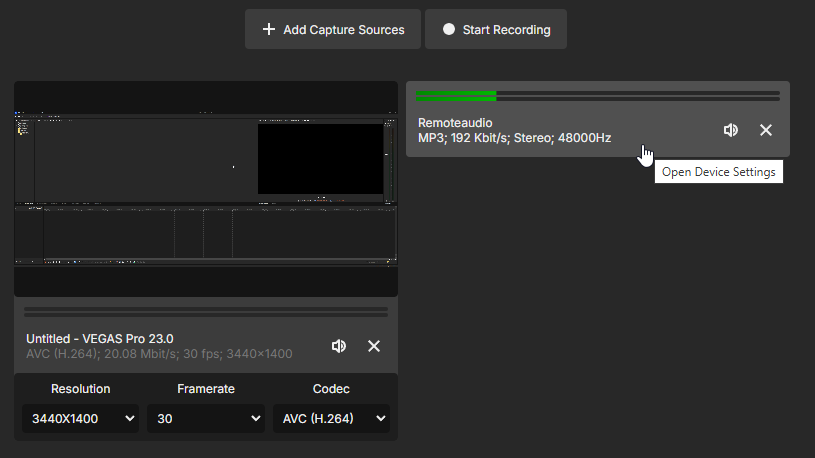
FIGURE Device Settings
-
After you add at least one source, the Start Recording button becomes available.
Click Start Recording to begin.
-
While recording, the button changes to Stop and shows the elapsed time.
Click Stop to finish.

FIGURE Recording in Progress
-
After you stop, two actions become available:
- Export to VEGAS : Sends the captured media to VEGAS Pro and places each source on its own track in the timeline.
- Open Folder: Opens the capture folder that contains your files (video/audio files, peak files, and an
export.json).

FIGURE Post‑Recording Actions
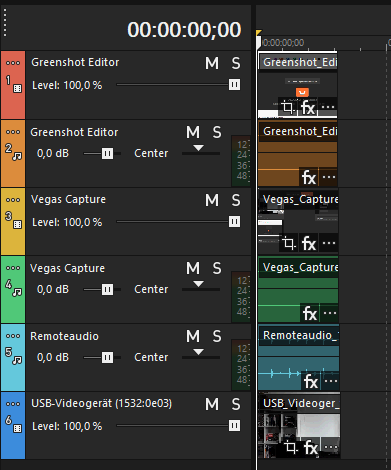
FIGURE Exported to VEGAS — One Track per Source
Warning: If you do not add at least one source, nothing will be recorded.
Settings
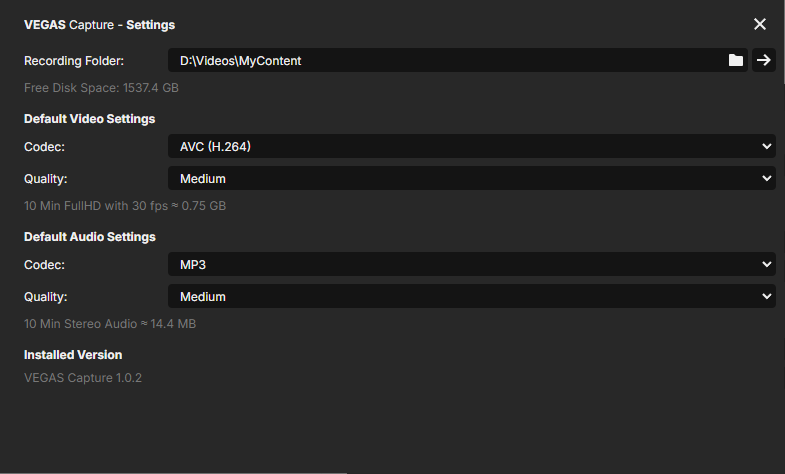
FIGURE Settings Overview
| VEGAS Capture — Settings | ||
|---|---|---|
|
1
|
Recording Folder | Choose where captured media is stored. The dialog shows Free Disk Space for the selected location. |
|
2
|
Default Video Settings | Set Codec and Quality for new video sources. An info line estimates file size (for example, “10 min FullHD at 30 fps ≈ 0.75 GB”). |
|
3
|
Default Audio Settings | Set Codec and Quality for new audio sources. An info line estimates file size (for example, “10 min stereo audio ≈ 14.4 MB”). |
|
4
|
Installed Version | Displays the currently installed VEGAS Capture version. |
Last modified on December 08, 2025