Using the Modern Equalizer
The Modern Equalizer is a parametric audio effect plug-in that lets you shape the frequency content of an audio track in a precise and intuitive way. It provides up to eight adjustable filter bands and supports various filter types. Each band can be individually configured to boost or reduce specific frequency ranges, enhancing clarity, balance, or creative tone shaping.
- Improve overall mix quality and clarity.
- Correct unwanted resonances.
- Reduce low-end rumble in a voice recording by applying a high-pass filter.
- Shape the character of a guitar track by boosting mids and taming harsh highs.
- Create a mid/side EQ configuration to widen stereo drums and center the snare.
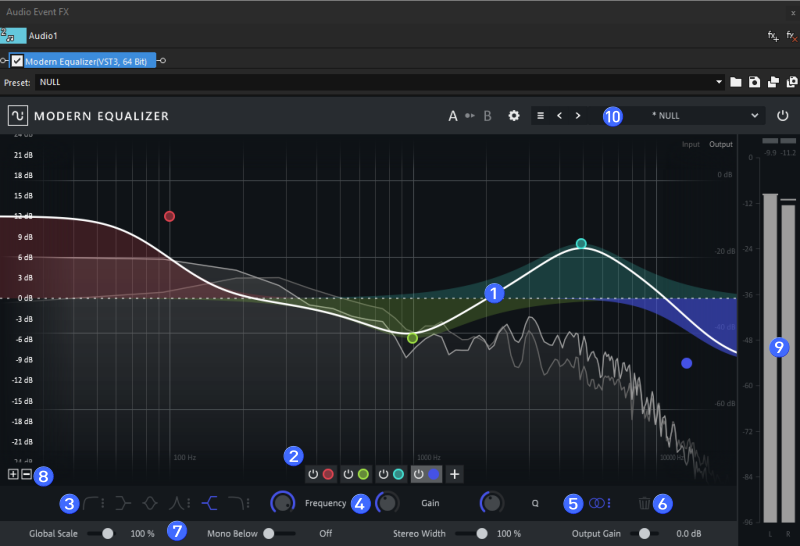
FIGURE Main interface elements
The following table explains key areas of the Modern Equalizer interface:
| # | Element | Description |
|---|---|---|
|
1
|
Filter Graph | Displays frequency spectrum and active filter bands. Colored areas show the effect per band. |
|
2
|
Band Controls | Add, enable/disable, or delete individual bands. |
|
3
|
Filter Type | Select the filter shape for each band (e.g., high pass, peaking). |
|
4
|
Frequency / Gain / Q | Fine-tune each band’s characteristics via graph or knobs. |
|
5
|
Channel Routing | Apply bands to left, right, mid, or side channel. |
|
6
|
Delete Band | Remove the selected band. |
|
7
|
Global Controls | Adjust scale, stereo width, mono filter, and output gain. |
|
8
|
Zoom Control | Zoom in/out of the graph for finer adjustments. |
|
9
|
Peak Meter | Visual feedback of input/output levels. |
|
10
|
Preset and Settings Bar | Select or save EQ presets, open settings menu, or toggle bypass. |
Open the Modern Equalizer
Ensure that an Audio Event is selected in your timeline.
-
Click the Event FX button
 on the audio event in the timeline, or choose Tools | Audio | Audio Event FX.
 -
Apply the Modern Equalizer as an Audio FX to the selected event.
Adjusting filter bands
Adjusting filter bands shapes specific frequency ranges to correct issues, enhance tone, and create space in the mix.
-
To add a filter band, click the + button in the lower band toolbar.
-
Select a band by clicking its colored circle in the graph. The circle turns active.
-
Choose a filter shape for the selected band from the Filter Type controls.
Optionally adjust the slope (6–36 dB/oct) via the dot menu on HP/LP/BP filters. Other filter types use a fixed 12 dB/oct.
See Filter Types below for a quick overview of all shapes.
-
Set the channel target for the selected band (Left, Right, Mid, or Side) in Channel Routing. The band color reflects the routing.
See Channel Routing below for details and typical uses.
-
To change the frequency and gain, drag the circle horizontally or vertically.
-
Use the mouse wheel to adjust the Q factor (bandwidth) of peaking filters.
-
Right-click a band for options such as Cut, Copy, Replace.
-
Double-click a band or press the trash icon to delete it.
You can also add a new filter directly by double-clicking in the graph. The filter type is automatically selected based on the click position.
Double-click a numeric parameter to type an exact value. Press Tab to jump to the next field.
After shaping individual bands, use the global controls to fine-tune the result.
See Global controls
Filter Types
| Icon | Filter Type | Function |
|---|---|---|

|
High Pass | Removes low frequencies below a set threshold |

|
Low Pass | Removes high frequencies above a set threshold |

|
Low Shelving | Boosts or cuts low frequencies with a smooth slope |

|
High Shelving | Boosts or cuts high frequencies with a smooth slope |

|
Band Pass | Isolates a specific frequency range |

|
Peaking | Targets a center frequency with gain adjustment |
Channel Routing
Each filter band can target a stereo component. Use channel routing to fix side-specific problems or shape width and focus without changing the entire image.
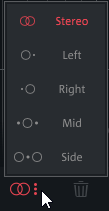
FIGURE Channel routing menu
| Mode | Effect | Typical use |
|---|---|---|
| Stereo | Applies the band to left and right equally. | Default setting for general tone shaping. |
| Left | Affects only the left channel. | Fix a left-only resonance or balance issue. |
| Right | Affects only the right channel. | Correct right-only problems or create asymmetry. |
| Mid | Affects the center (mono) component. | Tighten vocals, bass or snare without widening changes. |
| Side | Affects the stereo sides only. | Add air or width; combine with Mono Below for mono compatibility. |
Preset and Settings Bar
The Preset and Settings Bar provides quick access to A/B comparison, the settings panel, preset management and navigation, and a global bypass.

FIGURE Preset management and settings access
| # | Control | Description |
|---|---|---|
|
1
|
A/B Comparison | Switch between two settings to compare results. |
|
2
|
Settings | Access zoom, rendering, oversampling, tooltip settings, etc. |
|
3
|
User Preset Menu |
Save, Save As, Rename, Delete, Revert changes,
Open user presets folder, Reload user presets.
An asterisk (*) indicates modified settings.
|
|
4
|
Previous/Next | Cycle through available presets. |
|
5
|
Preset Selection | Select a preset from factory or user categories. |
|
6
|
Bypass | Temporarily disable the EQ effect. |
Factory presets cannot be overwritten. Save edits as user presets via Save As….
Compare presets (A/B) and audition quickly
- Store the current state in A, tweak the EQ, then store the new state in B.
- Click A/B to toggle between both states while audio plays.
- Use Previous/Next to audition nearby presets without leaving the bar.
Bypass the effect
- Click Bypass to hear the unprocessed signal.
- Toggle it on/off while adjusting Output Gain to level-match perceived loudness.
Apply and save user presets
- Open the preset menu and choose a factory preset to audition it.
- Adjust bands or global controls as needed.
- To keep your changes, select Save As…, then enter a category and a name.
- Find the preset under USER and select it to apply it later.
Modified presets show an asterisk (*). Use Save to overwrite or Revert changes to discard edits.
User presets
| Menu item | Description |
|---|---|
| Save As… | Creates a new user preset. Enter a category and a name; the preset appears under the USER section. |
| Save | Overwrites the current user preset with the edited settings. |
| Revert changes | Restores the last saved state of the selected preset. Factory presets cannot be overwritten; save them as user presets instead. |
| Rename… | Renames the selected user preset. |
| Delete | Removes the selected user preset. |
| Open user presets folder | Opens the file location of user presets. Categories map to subfolders; preset names map to file names. |
| Reload user presets | Refreshes the preset list after renaming or moving files in the presets folder. |
Modified presets show an asterisk (*) before the name.
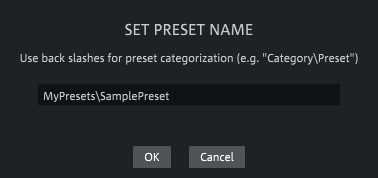
FIGURE Save preset dialog
Global controls
The global controls affect the entire plug-in. Use them to refine the overall result or adjust width/level even without individual bands.

| Control | Description |
|---|---|
| Global Scale | Boosts or reduces the gain of all bands simultaneously. Use it to increase or reduce the overall EQ intensity. Negative values invert the overall EQ effect. |
| Mono Below | Applies a high-pass filter to the side signal to enhance mono compatibility and tighten the low-end stereo image. The filter appears as a green line in the graph. |
| Stereo Width | Controls the amount of side signal to adjust overall width. |
| Output Gain | Compensates for volume differences and helps level-match the processed and unprocessed signal. |
Settings
Use the Settings panel to tune interface behavior and processing quality and optimize responsiveness, readability, or fidelity.
| Setting | Description |
|---|---|
| Show tooltips | Displays inline help when you hover controls. |
| Disable dynamic labels | When enabled, controls always show the current value instead of switching between function label and value on hover. |
| Disable FFT analyzer | Turns off the real-time spectrum display to reduce GPU/CPU load. |
| Disable peak meters | Hides the input/output meters to reduce UI processing. |
| Enable OpenGL rendering | Uses GPU acceleration for drawing; improves UI smoothness on supported hardware. |
| Oversampling | Sets internal processing quality (Off, 2×, 4×, 8×). Higher values reduce aliasing at increased CPU cost. |
| Zoom level | Scales the plug-in interface for improved readability and screen fit. |
| Frame rate limiting | Limits the UI refresh rate to lower CPU/GPU usage during playback and heavy editing. |
Last modified on December 08, 2025