Captioning Windows Media files
Captioning increases the reach of your multimedia productions by making them accessible to a wider audience, and VEGAS Pro makes it easy for you to add captioning.
Adding captioning to a streaming Windows Media Video presentation
-
Arrange your audio and video files on the timeline to create your project.
-
Add a Text command for each line of captioning text:
-
Position the cursor where you want to add a caption.
-
From the Insert menu, choose Command. The Command Properties dialog is displayed.
-
From the Command drop-down list, choose Text.
-
In the Parameter box, enter the captioning text you want to display.
-
Repeat step 2 as necessary.
-
Render your file in Windows Media Video format.
For more information, see Rendering projects (Render As)
NOTE The following step is optional. If you choose not to embed the Windows Media Player in a Web page, be sure to instruct your audience to turn on captioning. In Windows Media Player 7 and 8, choose Now Playing Tools from the View menu and choose Captions from the submenu.
-
Create an HTML page with the Windows Media player embedded in it.
Entering captioning text from a script
The previous method of entering captions is fine for small projects that contain relatively few captions, but what if you're working with a large project that requires many captions? No problem. You can easily create captioning markers from a spreadsheet or other tab-delimited format.
-
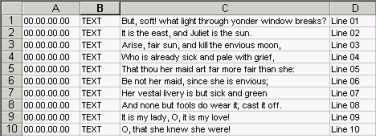
Create a list of each caption you want to insert:
-
Create a four-column, tab-delimited spreadsheet.
-
In the first column, enter 00:00:00:00 as a placeholder. The actual time of each caption will be determined later.
-
In the second column, enter TEXT to specify the command type.
-
In the third column, enter the text that you want to display as a caption.
TIP-
If you have a script, you can copy the information from the script and paste it into your spreadsheet. Each line should be pasted to its own cell.
-
The VEGAS Pro CD includes a template that you can use to create your captions. The file, Vegas Captioning Shell.txt, is saved in the Sample Projects folder on the CD. Open this file in a database program (you can also use a text editor) and add your captions to the third column.
-
-
In the fourth column, enter a label to identify your captions. An entry such as Line 01 will help you sort the captions in the Edit Details window.

-
Select the cells in your spreadsheet and copy them to the clipboard.
-
Switch to the VEGAS Pro window and choose View | Window | Edit Details to display the Edit Details window.
-
From the Show drop-down list, choose Commands.
-
Click the comment column heading to sort the captions in ascending order.
-
Right-click the box in the top-left corner of the Edit Details window and choose Paste from the shortcut menu. The clipboard data is pasted starting at this row.
-
In the timeline, position the cursor where you want to start inserting captions.
-
Select a row in the Edit Details list to select the first caption you want to insert.
-
Click the Play button
 to start playback.
 -
When you're ready to insert your first caption, press Ctrl+K. The first caption is inserted at the cursor position, the Position setting is updated, and the next caption is selected.
-
Press Ctrl+K to insert each subsequent caption.
-
Render your file in Windows Media format.
For more information, see Rendering projects (Render As)
Displaying captioning
You can use one of two methods for displaying the captions when the video is played:
- Instruct your audience to turn on captioning:
In Windows Media Player 8: from the View menu, choose Now Playing Tools, and then choose Captions from the submenu.
In Windows Media Player 9 and 10: from the Play menu, choose Captions and Subtitles, and then choose On if Available from the submenu.
In Windows Media Player 11 and 12: from the Play menu, choose Lyrics, captions, and subtitles, and then choose On if available from the submenu.
-
Create an HTML page with the Windows Media Player embedded in it.