Saturation vs Luminance
*new since VEGAS Pro 20 update 2*
The "Saturation vs. Luminance" curve allows you to define a range of saturation levels in the video and then adjust the luminance level of just that range. You have the flexibility to control luminance levels across the entire video or target specific areas based on their current saturation levels. For example, you can define a saturation range that includes everything below a certain level and increase the luminance for that range to make those areas appear brighter.
Using this curve
- Add a video file to your timeline. Ensure the video contains a mix of areas with both low and high saturation levels.
- Select the video event on the timeline and click the "Color Grading" button to open the "Color Grading" panel.
- Switch to the "HSL Curves" tab.
- From the "Curve Type" drop-down list, select "Saturation vs. Luminance."
The curve background shows a saturation spectrum that starts with fully desaturated at the left and ends with fully saturated on the right. The white horizontal line in the vertical center of the spectrum depicts the curve.
Adjusting Luminance for the Entire Video
-
Double-click the curve to add a control point to it.
-
Drag the control point up. This increases the luminance of the entire video.
-
Drag the point down. This decreases luminance.
-
Click the Reset button to remove the control point and set the curve back to its default.
NOTE When the curve has just one point, it doesn’t matter where you locate that point horizontally—it always adjusts the entire curve which remains flat and thus effects the entire video.
Targeting Specific Saturation Ranges
Adding multiple control points allows you to adjust luminance differently for various points along the curve.
EXAMPLE For instance, to target areas with low saturation and adjust their luminance without affecting highly saturated areas:
- Double-click the curve near the horizontal midpoint to add a control point.
- Double-click towards the left end of the curve to add another point.
- Drag the control point at the end of the curve up and down.
Observe the changes in the Video Preview window as you move the point up and down. Low-saturation areas will experience significant luminance adjustments, while highly saturated areas will be less or not affected at all.
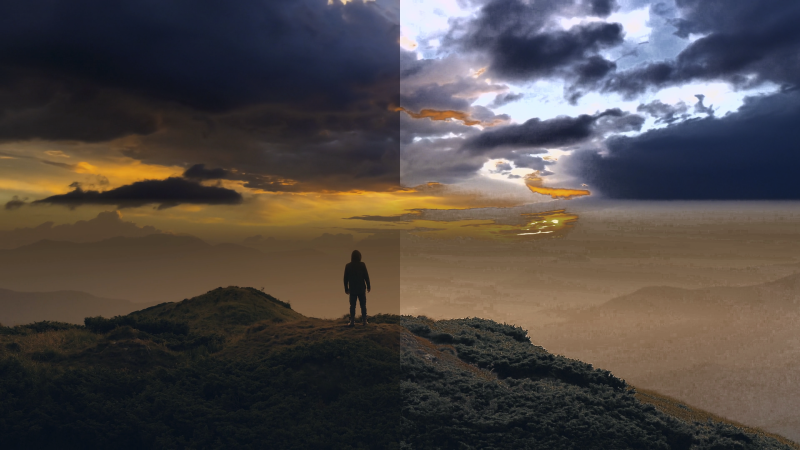
In this case, the colors that were most saturated are affected while colors that were desaturated are not. In this split screen image, the luminance of the low saturation areas like the hazy gray background and the dark mountainside have been considerably brightened, while the highly saturated orange patch of sky above the man’s head hasn’t changed much if at all.
To adjust a specific saturation range:
-
Add three points to the curve. The two points on either side act as anchors that keep the curve flat outside of the range.
-
Drag the middle point up and down. This alters the luminance of only the range between the two end points and enables you to target your luminance adjustment in a very specific manner.