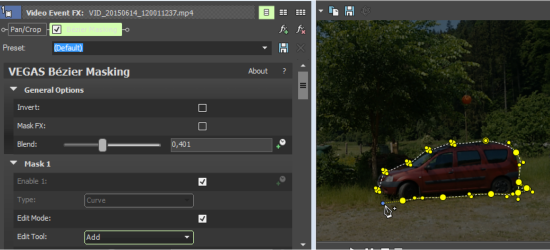
Bézier Masking
Masking is used for two purposes:
- The mask defines an area of the video that is excluded from the video output so that any video on video tracks below will show through.
- The mask defines an area of the video where an effect is applied, leaving the remainder of the video unaltered .
With the Bézier Masking plug-in you can create up to five masks using simple preset shapes (rectangle, ellipsis, diamond), or complex custom shapes controlled with Bézier drawing tools. You can also apply motion-tracking to have the software automatically move the mask in order to follow an object as it moves through the video frame.
Masking an area
You can mask an area of the video frame so events lower on the timeline will show through:
-
Add the Bézier Masking effect to the video event by clicking on the Event FX button
 . The effect parameter window opens and a default rectangular mask is created with controls on the preview display.
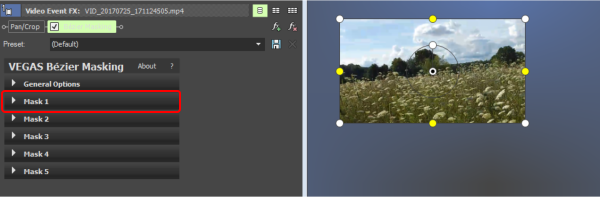
-
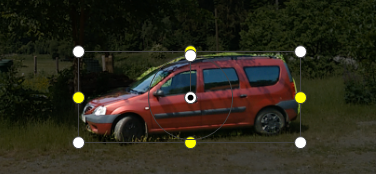
Adjust as desired size, position and rotation of the mask with the controls on the preview display:
- Click and drag anywhere inside the rectangle to move the mask
- Click and drag the white handles at the corner to change the size of the mask. The mask is scaled around its center and the aspect ratio is preserved.
- Click and drag the yellow handles at the sides to change the width or height independently.
-
Click and drag the handle at the circle in the center to change the rotation angle of the mask.
-
The initial mask is part of the Mask 1 section of the Effect parameter panel. Expand the section to further adjust the mask parameters.
-
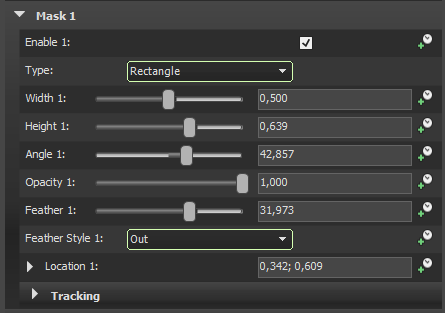
Enable: Activate/de-activate the mask with this check box. When you want more masks on the event, expand the according Mask 2 to Mask 5sections as desired, and enable the additional masks with this option.
- Type: Besides the default Rectangle type you can select here the preset forms Diamond and Oval. When you select Curveuse the Bézier controls to create masks with complex shapes(see below).
- Width/Height/Angle/Location: These values reflect the values of the interactive controls and specific values can be set in these fields..
- Opacity: Change the opacity of the mask. The default value of 1 produces a totally opaque area outside of the mask shape. Lower the value to let the masked areas become gradually visible.
- Feather: Use this parameter to blend the masked and unmasked areas. With Feather Style you can specify whether the blend starts at the border and moves out of the masked area (Out), moves into the masked area (In), or in both directions (Both).
-
General options

The General Options affect all masks:
- Invert: To invert a mask, check the Invert option. With this option selected, everything inside the mask is masked out.
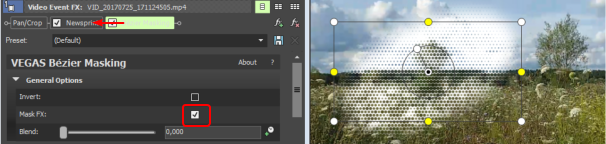
- Mask FX: Use this option to mask the effects of all plug-in(s) in the effect chain that precede the Bézier mask plug-in rather than the video itself. (See below).
- Blend: Adjusts the overall impact of the effect: If the effect is used as a mask, increasing this value will increase the transparency of all masks. If the masks are used to mask an effect, the strength of the effect is adjusted.
Masking an area to limit the application of other effects
You can use the mask to limit an effect so that it is only present inside the masked area:
-
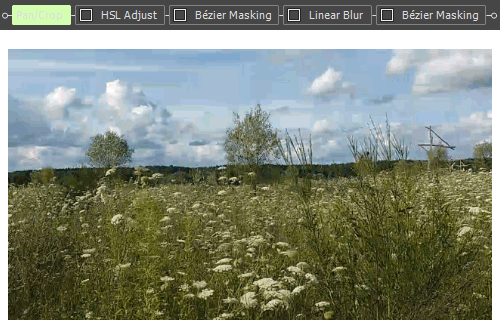
Add one or more effects to the effect chain.
-
Add the Bézier Masking effect as the last effect in the chain.
-
The default rectangular mask is created and made visible on the preview display.
-
Expand the General Options section of the Bézier masking parameter panel and check the Mask FX box.
TIP The Invert checkbox can be used if you want to have the effects apply everywhere except the masked area.
-
The preview display now shows that the effects that precede Bézier masking are only applied to the mask area. Edit your mask as necessary in the Mask 1 section (see above).
NOTE Note that the Bézier Masking OFX masks all of the preceding effects.
This applies also other instances of the Bézier Mask, in other words, if you have more than one mask, everything outside the latest mask is not affected at all.
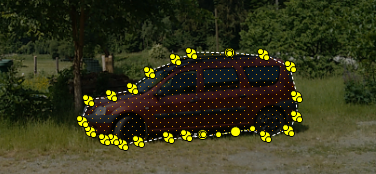
Here a ”wrong color” effect is applied and then masked by the first Bézier masking effect. Then a blur is applied followed by a second Bézier mask. The end result is that only the video inside the second mask is blurred and color adjusted. Outside the second mask the color change from the first mask is also masked.
Defining a custom mask shape
Instead of using the preset mask shapes (rectangle, oval, and diamond) you can also create a custom shape by specifying anchor points along the desired edge and setting the angle of tangents at each anchor. (These are the Bézier curves that give the plug-in its name).
-
Add the Bézier masking effect to the video event. The default rectangular mask is created and made visible on the preview display.
-
Expand the Mask 1 section in the effects parameter window and change Type to Curve. The default mask will disappear and “Edit Mode” is activated allowing a new custom mask to be drawn on the preview display.
-
Expand the General Options section of the Bézier masking parameter panel and adjust the Blend value to allow some of the original image to show through for reference.
-
Click and hold the mouse to create an initial anchor point, drag the mouse to orient its tangent, then release the mouse.
-
Choose a new location for another anchor, click and hold the mouse again to create a second anchor point, drag the mouse to orient its tangent, and then release the mouse. Notice that a dashed curve is drawn to represent the edge of the mask between the two anchor points.
-
When all desired anchors have been created, click the initial anchor to complete the closed curve that defines the mask.
-
The mouse can be used to move anchor points and to reorient tangents.
IMPORTANT You cannot move the initial anchor before closing the curve.
-
While creating the curve or after closing the curve, alternative Edit Tools can be selected from the parameter panel:
- to move curve segments, anchor points and tangents without (accidentally) adding anchor points, choose Normal.
- to delete anchor points, choose Delete.
-
to add anchor points, choose Add.
NOTE To add a new anchor point between two existing ones the curve has to be closed first.
-
to add anchor points with two independent tangents (to make the curve discontinuous to get pointy corners in the shape) choose Split. You can also adjust the handles of an existing point with the Split tool to split the tangents of that anchor.
-
When finished editing the curve, deselect the Edit Mode checkbox to return to the normal preview display. The preview display will update to show the custom mask.
The Interacts on the preview display can now be used to further revise the position, size, or rotation angle of the mask. Rotation & Location Remember to set the Blend Amount back to 1.0 if you want a completely opaque mask.
Motion tracking a mask
Once a mask as been created the mask's position (optionally also its size and rotation) can be set to follow an object in the scene until that object is obscured by other objects in the scene or moves out of view. Use this for instance for blurring a person's face for privacy reasons and let the blur follow the face as it moves through a scene:
-
Add the Bézier masking effect to the video event. The default rectangular mask is created and made visible on the preview display.
-
Adjust the mask to cover the object to follow.
-
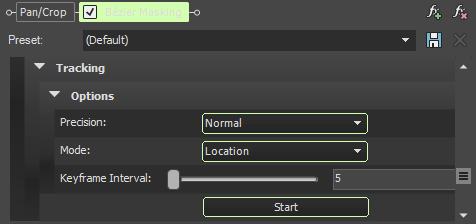
Expand the Mask 1 section, expand the Tracking sub-section
-
Place the timeline cursor at the point in the event where you want to start the tracking.
-
Click Start. A progress box will appear showing the processing time and percent remaining if tracking were to proceed to the end of the video event. Use the Cancel button to stop tracking when desired.
If the object being tracked moves out of view, is obscured, or becomes confused with other elements of the scene, tracking may stop automatically. Tracking can be continued by manually advancing the video to a point where the object is visible again, manually moving the mask to the proper position and then clicking Start again.
- The result of the tracking is a keyframe animation of the Width/Height/Angle/Location parameters of the mask. These animation keyframes can be manually revised or deleted to adjust tracking as desired.
Refine the tracking in the Options section:
- Precision: Choose either Normal or High from the drop-down menu to specify whether you want to concentrate on faster or more accurate analysis.
-
Mode: Specify, if you want to track just the Location of the object, Rotation & Location or even Size, Rotation & Location. The latter options create Angle or Angle and Width/Height keyframes in addition to Location X/Y keyframes. This can help to improve the accuracy of the tracking but could also introduce mistakes so just experiment with these settings to get the optimum result.
-
Direction: Here you define the time direction in which the movement is tracked. In addition to the preset direction Forward, tracking can also be performed Backwards or in Both directions. The advantage is that the reference frame on which you draw the mask does not have to be at the beginning of the movement to be tracked, but can be freely selected. So you can choose the frame where the object to be tracked is best visible, draw the mask there and then select Both to capture the entire motion sequence.
- Keyframe Interval: This is the number of frames between two keyframes. The lower the number is set, the more accurate the tracking. However, this also creates more keyframes which could make the editing of the animation curve more complicated.
Animation control over individual Bézier mask points
*new since VEGAS Pro 20 update 2*
You can set keyframes to control the shape and position of a Bézier mask at various times. As with other keyframes, VEGAS then animates the settings from one point to the next. With this, you can animate the shape and position of your masks over time.
1 Set up the Bézier Mask
- Add a video clip with a moving object to your timeline.
- Open the Video FX window and select "Bézier Masking" from the list of plug-ins.
- Drag the "Default" preset onto the video event that requires masking.
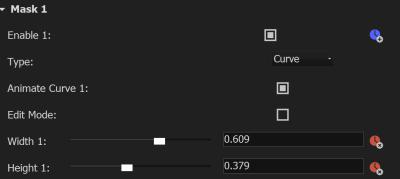
- In the Video Event FX window, access the Mask 1 controls by clicking the Mask 1 drop-down arrow.
- Choose "Curve" from the Type drop-down list.
- Expand the General Options section and adjust the Blend slider for better visibility of the object to be masked.
2 Create and edit the Mask
- Enable Edit Mode by selecting the Edit Mode checkbox.
- Use the Edit Tool drop-down list to create a mask by manipulating the points over the object in the video.
- Once the mask is completed, disable Edit Mode by deselecting the Edit Mode check box.
3 Animate the Mask
- Enable the Animate Curve 1 checkbox to enable animation for the mask.
- In the animation timeline, ensure the Sync Cursor to Media Timeline option is activated.
- Navigate to a later point in the animation timeline where you want to modify the mask.
- Enter Edit Mode by clicking the Edit Mode button.
- Adjust the points and shape of the mask to match the object's movement.
- Deselect the Edit Mode checkbox when the modifications are complete.
5 Finalize the Mask Animation
- Adjust the Blend slider to fully mask out the material outside of the Bézier mask.
- Close the Video Event FX window and play your project from the beginning of the masked event.
- Observe the dynamic mask that changes position and shape to align with the object's movement.
- If necessary, add additional keyframes to further refine the mask's animation and improve the alignment with the object's movement.