File Drop
*new since VEGAS Pro 20*
The File Drop feature enables you to quickly gather media for your project from collaborators no matter where you or they are located. It makes transferring files to the project’s editor very easy. With File Drop, you can invite anyone to upload files to your VEGAS Hub storage space and quickly download those files to your local drives for use in your projects.
Manage your File Drop
How to initiate a file drop
-
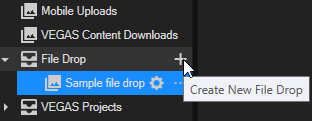
Click the Hub Explorer tab to bring that window forward.
-
In the list at the left, click the + button at the File Drop collection set.
-
In the Create New File Drop dialog box, enter a name for your file drop and click OK. Your new file drop collection appears in the list.
Configure your File Drop
-
Point to the name of your File Drop in the Hub Explorer window.
-
Click the Manage File Drop button
 to open the File Drop dialog. If you are not yet logged into your VEGAS Hub account, you’ll be prompted to do so before you can continue.
-
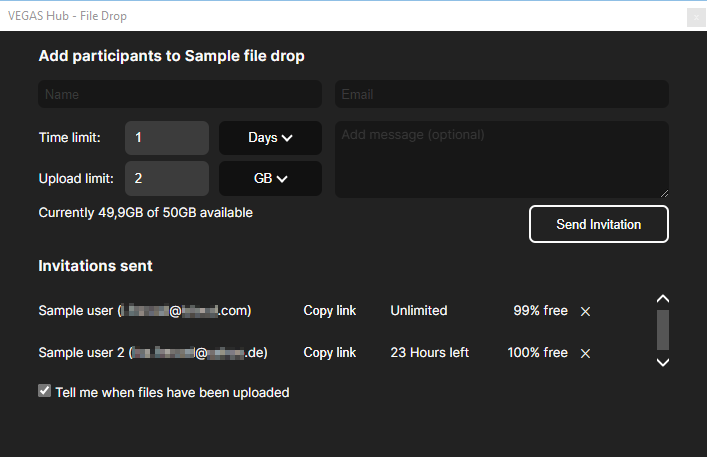
Enter name and mail address of the participant you want to invite to your File Drop session.
NOTE It’s important to note that the users you invite do not have to have access to their own VEGAS Hub account. In fact, they don’t even need to be users of VEGAS Pro at all. All they need is an internet connection and a connected device that holds their files. That device can be a computer, a tablet, a mobile device, and so on. And that device can be running on any operating system, so you can collect files from collaborators on a Mac just as easily as on a Windows machine or an Android mobile device. All that matters is that the device is connected and has access to the files they want to upload.
-
When you’ve specified your limits, click the Send Invitation button.
File Drop automatically sends an email message to the address you entered. That email message includes a link to your File Drop. Once the collaborator follows that link, they will have the opportunity to upload files.
You can add as many collaborators to the File Drop event as you want to.
| Time limit fields |
Use the Time limit fields to specify the duration that the File Drop event will be open to this user. |
| Upload limit fields |
Use the Upload limit fields to put an upper limit on the size of files you’ll accept from this collaborator. |
| Tell me when files have been uploaded checkbox |
If you want to receive an automatically generated email when files have been uploaded to your File Drop. |
Remove a participant
-
Click the cross button
 in the File Drop dialog.
Delete a File Drop
-
Point to the name of your File Drop in the Hub Explorer window.
-
Click the More
 button | Remove.
Manage your File Drop Collection
Uploaded files

Once your collaborators have uploaded files through the File Drop system, those files are automatically added to your File Drop collection.
Click the  Refresh Collection View button to see all of the files that have been uploaded to the file drop.
The uploaded files have ![]() cloud icons before their names. As usual, this indicates that the files are stored only in your VEGAS Hub storage. To bring them to your local drives, right click a thumbnail and choose Sync from the context menu. After a few moments, the file download completes and the blue checkmark icon
cloud icons before their names. As usual, this indicates that the files are stored only in your VEGAS Hub storage. To bring them to your local drives, right click a thumbnail and choose Sync from the context menu. After a few moments, the file download completes and the blue checkmark icon ![]() shows that the file now resides both locally and on your VEGAS Hub storage.
shows that the file now resides both locally and on your VEGAS Hub storage.
Delete files
-
To delete a file from either your local collection or your VEGAS Hub storage, right-click the thumbnail and choose the appropriate remove option from the context menu.
NOTE Keep in mind that this removes the actual file itself from your hard drive, not just the reference in the File Drop collection, so be careful with this option.
-
To delete a File Drop collection completely, right-click the collection’s name and choose Remove from the context menu.
Quick Upload
*new since VEGAS Pro 21*
The Quick Upload function enables you to upload files from your computer or other device to your VEGAS Hub File Drop collections. This makes it possible to quickly upload files to your Hub storage that you can then download to another computer for adding to the VEGAS Pro timeline or for a cloud back up of your media files.
Using Quick Upload
-
Click the Hub Explorer tab to bring that window forward. If you already have an existing File Drop collection, you can upload files to that. If you don’t have a File Drop collection already, click the point to the File Drop collection set and then click the Create New File Drop button.
-
In the Create New File Drop dialog box, give the File Drop collection a name and click OK. Of course, you can invite someone to upload files to your new File Drop collection, but you don’t need to. Just make sure you set the File Drop session to a long enough duration to
-
Click the Close button to close the File Drop dialog.Now your new File Drop collection appears in the Hub Explorer window.
Uploading files
-
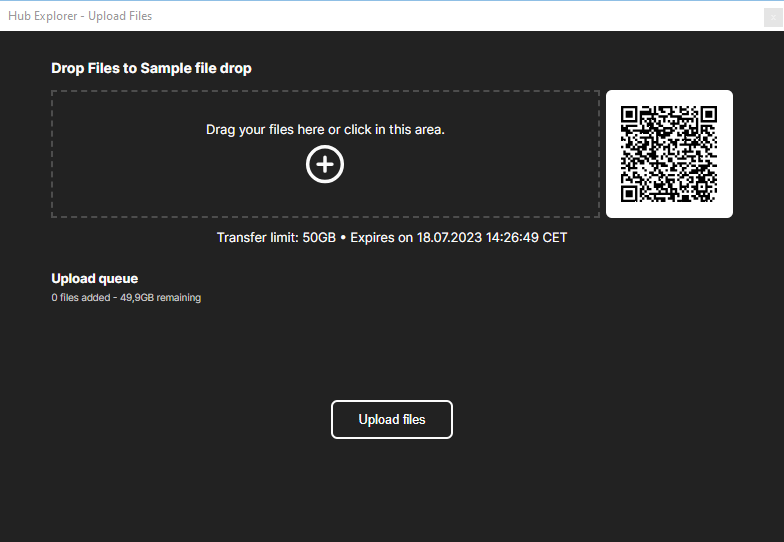
Point to your collection and then click the Upload File to Cloud button. The Upload Files dialog box gives you a few different ways to upload your files to the collection from your computer.
-
Switch to Windows Explorer and navigate to a file that contains the media you want to upload.
-
Drag a file from your Windows Explorer folder onto the Drop Files target area. Notice that the file has been added to the Upload queue.
-
Click inside the file target area.
-
In the Open dialog, browse to the folder that holds your media, select the media file, and click Open. This file has also been added to the Upload queue.
-
When you’ve added all the files you want to upload from your computer, click the Upload Files button.
Upload files from your mobile devices
-
In the Hub Explorer window, click the Upload Files to Cloud button for your target collection again.
-
Open the camera app on your mobile device and point the camera at the QR code in the Upload Files dialog box.
-
Follow the instructions on your mobile device to go to the URL supplied by the QR code.
This opens your device’s Internet browser and points to a page that enables you to add files to your upload queue just as you did on your computer.
-
Tab the Drag Files area and navigate to the location on your device that holds the media you want to upload.
-
Tap the media to add it to the Upload queue.
-
When you’re finished, tap the Upload Files button.
Once you’re files are uploaded to your VEGAS Hub, you will see the files in your Hub Explorer window inside VEGAS Pro.
Synchronizing your local collection files to your hub collection files
Before you can add them to your VEGAS Pro project, you’ll need to bring them down locally (unless, of course, they were on your local drive to begin with!)
-
Right-click the file in the Hub Explorer window and choose Sync from the context menu.