Motion Tracking
With Motion Tracking it is possible to select a screen area and detect the motion in this area in the scene. The detected motion can be used in various ways. So, for example you could use it to let a masked pixelate effect follow someones face to anonymize it or attach a hat on someones head.
![]()
To track motion in a video event:
-
Select the event and open the Motion Tracking dialog window. You can open it from the Tools menu | Video | Motion tracking, the event's context menu, More
 button or with the keyboard shortcut Alt + M.
The Motion Tracking Panel control elements 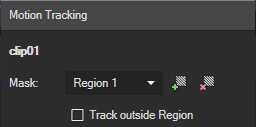
Clip name: The Motion Tracking panel can stay open all the time, so it is important to see, what event is actually being tracked.
Mask: In the list box, you can select from all regions that are to be tracked or contain motion tracks.
To add a region, click the + button
 .
.To remove the currently selected region, click the - button
 .
.  The motion track import menu is only shown if a Bézier Mask or Picture-In-Picture FX is applied to the clip from which motion can be imported.
Track outside mask: Inverts the mask so the non-masked area of the frame is processed. (When the mask is outside the frame, the whole frame is processed then)
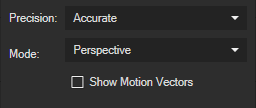
Precision:Choose from three different precision options - Fast, Balanced or Accurate - which represent different trade-offs between processing time and precision.
Mode: Select the type of movement to be determined
-
Location: x/y position Shift detection
-
Rotation & Location: detection of position Shift and rotation
-
Scale & Location: detection of position Shift and scale changes
-
Shape & Location: detection of affine transformation (all of the above + shearing)
-
Perspective: detection of perspective transformation.
Show Motion Vectors: This shows detected motion vectors. This is particularly helpful when the tracked motion goes wrong because it shows which motion the algorithm is actually detecting (and which not)
NOTE The motion vectors are not persistent and will not be stored in the project file.
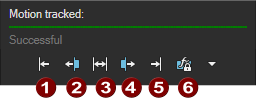
Motion track indicator: Green segments indicate frames with motion data.
Status bar: Below the Motion track indicator is a status bar, that gives information about the success of the tracking or how and why thetracking had to stop.
Track buttons: You control the tracking process with the track buttons. Starting from the play cursor position you can track forward (5), in both directions (3) or backwards (1). Then the tracking goes in the specified direction until the clip border was reached or the mask was lost. You can also manually track frame-by-frame with the track one frame forward (4) or backward (2) button.
Motion transfer menu: (6) This button opens a multi-level menu in which you can select a target Event FX to which the mask motion is to be transferred. The top level contains all suitable target events, these are the event itself and any other event that shares time positions with the tracked event. On the second level all suitable FX on these events are shown and you can also add a Bézier Mask FX there. The third level contains all FX parameters that represent location data.
-
-
Click the Add mask button
. On the Preview window, a rectangle is displayed. It defines the area of the screen where the algorithm tries to detect movement. -
Place the play cursor at a time position where the object to be tracked is clearly visible and adjust the corners of the mask to ensure that the moving object is enclosed by the mask as completely as possible, with as little background as possible.
-
Click the Track both directions button (3) to start the tracking. If everything went fine, the movement is tracked from the start to the end of the object. Quite often however, the tracking will stop at some point in the video, if for some reason the mask can no longer track the movement.
-
Then you could adjust the mask frame and track the motion frame-by frame with the Track one frame forward (4) or backward (2) button. Or you could move the play cursor to some other point in the video, adjust the mask there and start the tracking again.
-
When the tracking was successful (the motion track indicator is mostly or complete green) you can transfer the motion data to an effect on another event. Click the Motion transfer menu button (6) and select the event, the effect and the parameter that should use the motion data.
Remarks:
- The tracking data are event envelopes. When they are transmitted from the tracked event, their timing is relative to the event. For example, if you track the movement in a clip and transfer it to a graphic on the track above with a picture-in-picture effect so that the graphic follows the moving object, the event with the graphic must not be moved in time afterwards, otherwise the tracking data will not be correct.
- The Motion Tracking feature is no longer part of the Bézier Masking FX. To use Bézier Masking with Motion Tracking, track the motion data and create the Bézier masking FX from the Transfer Motion Data Menu
- You can track different moving objects in the same event by using several masks.
Import Mocha Tracking Data
-
To import the motion tracking data from Mocha into VEGAS Pro, first export the data from Mocha in the Silhouette Corner Pin format, if you’re exporting tracking data, and the Mocha shape for AE format if you’re exporting shape data.
-
In VEGAS Pro, click the More
button on the event to which you want to apply motion tracking. Choose Motion Tracking from the menu.
-
In the Motion Tracking window, click the Mask drop-down arrow and choose Import from Mocha from the list. Navigate to the location where you saved the Mocha tracking data you exported, select that file, and click Open.
The Mocha tracking data is now imported into the VEGAS Pro motion tracker and you can use it just as if you had generated that data inside VEGAS Pro.