Post-edit ripple
You can ripple the contents of the timeline following an edit after performing the following tasks:
-
Adjusting an event's length by trimming, slip-trimming, sliding, or time stretching.
-
Moving events.
-
Cutting events.
-
Pasting events.
-
Deleting events.
FIGURE Auto ripple disabled / enabled
|
Ripple Type |
Description |
|---|---|
|
Affected Tracks |
Ripples events, keyframes, and envelopes on tracks where you performed the edit. |
|
Affected Tracks, Bus Tracks, Markers, and Regions |
Ripples events, keyframes, and envelopes on tracks where you performed the edit. This command also ripples the following:
|
|
All Tracks, Markers, and Regions |
Ripples events, keyframes, and envelopes on all tracks in your project. This command also ripples the following:
|
Applying a post-edit ripple manually
-
Perform one of edits listed above. In the following example, the second event is being trimmed, and the arrow above the timeline indicates where the post-edit ripple will occur and the direction the affected events will move.

The selected event contains a bright yellow border to indicate that it has been selected and the timeline cursor flashes between white and black.
-
In the main menu, click Edit | Post Edit Ripple, and choose a ripple type (see table Ripple types).
The contents of the timeline are rippled after the edit according to the option you choose. In the following example, the post-edit ripple has closed the space between the second and third events.

TIP Press F after an edit to ripple the affected tracks, press Ctrl+F to also ripple markers, keyframes, and envelopes. To ripple everything after an edit, press Ctrl+Shift+F.
Applying a post-edit ripples automatically
-
In the editing toolbar, select the Auto Ripple button
 (or press Ctrl+L).
 -
Click the down arrow
 next to the Auto Ripple button and choose a ripple type (see table Ripple types).
 -
Perform one of edits listed above. In the following example, the second event is being trimmed, and the arrow above the timeline indicates where the post-edit ripple will occur and the direction the affected events move.
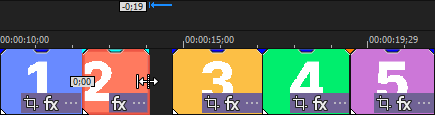
NOTE When you engage Auto Ripple mode, the event boarder that highlights a selected event turns from yellow to red. The timeline cursor also changes to red. These indicators will help you avoid accidentally making ripple edits when you’ve forgotten that you are in Auto Ripple mode.
The contents of the timeline are rippled after the edit according to the option you choose. The post-edit ripple has closed the space between the second and third events.
Adjust the appearance if you don't want to use these indicators.
-
Choose Options | Preferences | Editing tab.
-
Deselect the Change cursor and selected event color when in Auto Ripple mode check box.