Using the Project Media window
Choose View | Window | Project Media to toggle the display of the Project Media window.
You can use the Project Media window to collect and arrange all the media you will use in your project. You can add media, preview it, view and change file properties, and add effects to a file.
Adding media files to the Project Media window
Files are added to the Project Media window when you open media files, import media, or add media files to the timeline using the Explorer.
You can also drag the files to the Project Media window from the VEGAS Pro Explorer or Windows Explorer.
To add media files from external sources, use the buttons in the Project Media toolbar:
|
Item |
Description |
|---|---|
|
|
Import Media: click to add a media file to your project. Besides the button there is an arrow to open a menu to change the function of the button, providing you access to other import functions like importing audio from a CD or capturing video from a DV tape. |
|
|
Capture Video: click to start the video capture application specified on the Video tab of the Preferences dialog.
|
|
|
Extract Audio from CD: click to extract a track from an audio CD.
IMPORTANT VEGAS Pro is not intended, and should not be used for, illegal or infringing purposes, such as the illegal copying or sharing of copyrighted materials. Using VEGAS Pro for such purposes is, among other things, against United States and international copyright laws and contrary to the terms and conditions of the End User License Agreement. Such activity may be punishable by law and may also subject you to the breach remedies set forth in the End User License Agreement. |
|
|
Get Media from the Web: click to open the Get Media from the Web dialog, where you can download files to use in your project. |


Project Media Hover Scrubbing
When the Project Media list is in Thumbnail Mode (see below under Changing the appearance of the Project Media window) you can hover with your mouse pointer over the thumbnail picture of a video to scrub thru it. This is like a simplified version of the Trimmer window. As with the big trimmer window, you can click into the picture and drag to select a part of the video. And you can import just this selection into the time line, offering you a way to roughly edit of your movie directly from the project media window.
To make a selection in the thumbnail, you can:
- Click and drag over the thumbnail to select the part of the item you want to load.
- Select the item with a left-click.
- While hovering over the item at the desired location, press I to set the In Point and O to set the Out Point.
To edit the In- and Out-Points:
-
Drag the selection borders with the mouse.

TIP You can dynamically re-size the thumbnails by using Ctrl+Mouse Wheel.
To load an item from the Project Media window into the project, you can:
- Drag it into the time line to the desired position. If there is a selection in the thumbnail, only this part will be used for the new created event.
IMPORTANT Because media selection is also performed by dragging it is important that you start dragging vertically to not accidentally destroy your selection.
- Select the track and place the cursor at the position where the item should be inserted.
- Double-click the item or press the Enter key to load.
Bypass Hover Scrub
The Bypass Hover Scrub feature enables you to bypass the default hover scrub behavior in the Project Media window. With hover scrub bypassed, you can move your mouse across the thumbnail without scrubbing through the file and thus seeing the thumbnail change.
If you don’t want the thumbnail to change as you move across the thumbnail:
-
Click the Bypass Hover Scrub button
 .
. -
With this button active, point again to the clip.
-
Without holding the mouse button, move the mouse right and left over the thumbnail.
The thumbnail doesn’t change and you are not scrubbing through the video.
To reenable the Hover Scrub feature, click the Bypass Hover Scrub button again.

NOTE If you click and drag right and left, you can still set the in and out points. However, without hover scrub active, you won’t see the target frame. So, this means you can still make a general selection of in and out points in order to add just a portion of a file. This could still be quite useful when you work with a long file and know generally the area that holds the frames you want. Remember, you can always trim to your exact frames directly on the timeline once you add your clip.
Cleaning the Project Media list
Click the Remove All Unused Media from Project button ![]() to remove any files that have not been used on the timeline.
to remove any files that have not been used on the timeline.
Removing a media file from the project
Click the Remove Selected Media from Project button  to remove all selected media files from the Project Media window and project.
If a file is in use by an event on the timeline, you will be prompted to delete the event.
Swapping video files
Click the Swap Media button  to replace video files in the project with alternative files with the same file name. You will need to select a folder where the exchange files are stored. Any reference to a video file in the project will be changed to refer to the new file in the specified folder if there is a file with the same name in that folder. The file extension is not relevant.
TIP You can also perform this exchange at render time.
Viewing or editing file properties
Click the Properties button  to display the Properties dialog for the selected media file.
  For more information, see Viewing or changing media file properties
In most cases, you will not need to edit file properties. However, adjusting the Field Order setting for video files can help correct jitter when you output your project to a television monitor.
Tagging media files
Use the Media Tags panel in the Project Media window to add tags to your media files. To show or hide the Media Tags panel, click the down arrow next to the Views button  and choose Media Tags.
When you add tags to media files, media bins are created for each tag under the "Tags" folder. For more information, see Sorting your media with bins
Adding tags
-
Select one or more media files in the Project Media window.
-
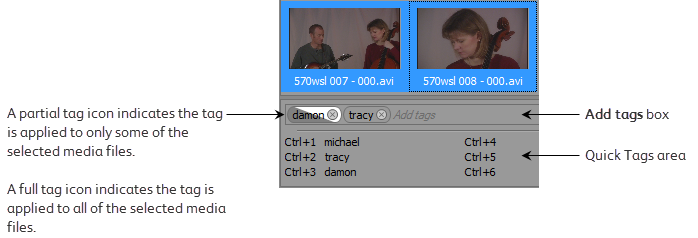
Type the tag text in the Add tags box.
-
Press Enter to add the tag to the media files.
TIP You can also add tags using keyboard shortcuts. For more information, see Creating Quick Tags
Removing tags
-
Select one or more media files in the Project Media window.
-
Press Backspace in the Add tags box to remove tags from the media files.
You can also click the "x" in the tag icon to remove a tag from a media file:

Creating Quick Tags
Quick Tags allow you to assign tags to keyboard shortcuts that you can use to quickly add tags to media files.
-
Select one or more media files in the Project Media window.
-
Type the tag text in the Add tags box.
-
Press Ctrl+Shift and the number you want to assign for the shortcut. For example, press Ctrl+Shift+1 to assign the tag text to the Ctrl+1 shortcut.
-
Press Enter to add the tag to the media files.
Editing Quick Tags
Right-click the Quick Tags area and choose Edit Quick Tags to display the Edit Quick Tags dialog. You can use this dialog to edit the text of existing Quick Tags or create new Quick Tags.
Configuring 24p pulldown removal
Right-click a DV AVI file in the Project Media window and choose File Format Properties from the shortcut menu to edit file settings from the file format plug-in associated with the media file type.
For 24p NTSC DV AVI files with 2-3 pulldown, you can use this dialog to configure removal of pulldown fields.
In most cases, you will not need to edit pulldown removal settings. However, if the settings were not properly set in the DV header when your video was captured, you can fine-tune pulldown removal without recapturing your video.
-
Right-click an AVI file in the Project Media window and choose File Format Properties from the shortcut menu. The AVI/DV Media Properties dialog is displayed.
This command is not available for clips that are not AVI or DV or those that use 2-3-3-2 pulldown.
-
Select the Enable 2-3 pulldown removal check box.
NOTE You can clear this checkbox if you want to override pulldown removal for individual files when the Allow pulldown removal when opening 24p DV checkbox is selected on the General tab of the Preferences dialog.
-
Choose a setting from the Starting frame timecode offset drop-down list to indicate what timecode numbers represent which frame in the video sequence.
For example, if you have an NTSC DV file with 2-3 pulldown created on a Sony JH3 HDCAM deck, the default settings for timecode offset use 0 for the Starting frame timecode offset.
If you have changed the timecode offsets on the deck (or if you have material with pulldown from another source) you will have to experiment with the settings to determine the correct offset.
-
Check for interlacing:
-
In the Project Properties dialog, choose a NTSC DV 24p template from the Template drop-down list.
For more information, see Setting project properties -
Choose the Best (Full) setting in the Video Preview window to show full frames.
-
Step though the clip and look for interlace lines in moving objects or backgrounds.
-
If you see interlace lines, repeat from step 3 and choose a different offset value.
-
When no interlace lines appear, the offset is set correctly.
Adding effects to a media file
Click the Media FX button  to add an effect to every occurrence of the selected media file in your project (the source media file is not affected).
Media FX are used for video files only. For more information about adding video effects, see Adding video effects
Previewing a media file
Select the media file you want to preview.
-
Click the Start Preview button
 to begin previewing the media file.
 -
Click the Stop Preview button
 to stop previewing the media file.
 -
Select the Auto Preview button
 to automatically preview a media file when you click it.
Select the Auto Preview button  to automatically preview a media file when you click it.
Pairing two media files as a stereoscopic 3D subclip
If you have two files that have synchronized timecode — such as video shot on a 3D camera that creates separate left- and right-eye clips — you don't need to align the audio and video. Just select the clips in the Project Media window and choose Pair as Stereoscopic 3D Subclip from the shortcut menu.
If you view the clip properties for the new subclip, you'll see that the Stereoscopic 3D Mode is set to Pair with next stream.
For more information, see Stereoscopic 3D editing
Changing the appearance of the Project Media window
Click the Views button and choose a setting from the menu to change the display of the Project Media window:
|
Item |
Description |
|---|---|
|
List |
Displays a simple list of the file name of each file in the Project Media window. |
|
Details |
Displays a list of each file in the Project Media window and a spreadsheet that displays information about the media file: You can control the information that is displayed by right-clicking the Project Media window and choosing View from the shortcut menu. A list of the available fields is displayed in the shortcut menu. Specific fields can be hidden by dragging them off of the Project Media window. The data fields are listed along the top of the Project Media window and can be reordered by dragging them. Click on the tabs along the top to sort the data in ascending or descending order. The Comments field can be used to add notes about a file in the Project Media window. Double-click the field to enter text. This information is saved with the project and is not saved with the media file itself. NOTE Depending on your current time ruler format, you may see inconsistencies in the timecode values for clips that you captured. Video Capture uses SMPTE drop time (29.97 fps). If you switch the time format to SMPTE drop time in the VEGAS Pro window, the same timecode information will be displayed in the Video Capture and VEGAS Pro windows. |
|
Thumbnail |
Displays the first frame of a video file. |
|
Media Tags |
Shows or hides the Media Tags panel. |
Recapturing video
If you've captured video files from a DV device using Video Capture, you can recapture your clips from the VEGAS Pro window if the media files are deleted.
If a media file cannot be found, any events that refer to the file will display Media Offline, and the clip will be displayed with a generic icon in the Project Media window (if you're using the Thumbnail view).
Select the clips that you want to recapture. Right-click a clip and choose Recapture from the shortcut menu. Video Capture starts in batch capture mode to recapture the clips.
NOTE Depending on your current time ruler format, you may see inconsistencies in the timecode values for clips that you captured. Video Capture uses SMPTE drop time (29.97 fps). If you switch the time to SMPTE drop time in the VEGAS Pro window, the same timecode information will be displayed in the Video Capture and VEGAS Pro windows.
Replacing a media file
You can replace a file in the Project Media window with a different file. Replacing a media file updates every occurrence of the event to use the new media file contents.
-
Right-click a file in the Project Media window, and choose Replace from the shortcut menu. The Replace Media File dialog is displayed.
-
In the Replace Media File dialog, select the file that you want to use in place of the current file.
-
Click the Open button. The file is replaced in the Project Media window, and every occurrence of the event is updated to use the new media file contents.
Creating video proxy files
Right-click a video file and choose Create Video Proxy to create a proxy file (.sfvp0) alongside the original video file. Proxy files are smaller and faster to work with on the timeline. For more information, see Creating proxy files for high-definition editing
Using bins to sort your media
Media bins are folders within projects that you can use to organize your media files. For more information, see Sorting your media with bins
Selecting all events that refer to a specific media file
Right-click a file in the Project Media window and choose Select Timeline Events from the shortcut menu. The cursor moves to the first event that uses the media, the timeline scrolls to the cursor, and all events that use the selected media file in the active take are selected. For more information, see Using takes as alternate versions of events
Hold Ctrl or Shift while choosing Select Timeline Events from the shortcut menu to add the events to the current selection.
-
When multiple events are selected, press Ctrl to move the edge of the previous or next selected event.
-
When multiple events are selected, press Ctrl+Shift to create a time selection from the previous or next selected event.
Add a high-frame-rate clip to the timeline and adjust its playback rate
Right-click a clip in the Project Media window and choose Add At Project Frame Rate to create an event at the cursor position and set the event's Playback rate value to allow the event to play back using the project frame rate.
For more information, see Working with high-frame-rate (HFR) clips
Matching project video settings to a media file
Right-click a file in the Project Media window and choose Match Project Video Settings to update your project video settings to match the selected file.
NOTE If you choose a VEGAS Pro project (.veg) file, VEGAS Pro will match the settings of the project, not the media within the project.
For more information, see Setting project properties