S-Log and ACES workflow
VEGAS® Pro supports the expanded dynamic range of cameras using S-Log encoding, such as the Sony PMW-F3 camera. S-Log is a technique for recording the full dynamic range of the camera, and is not restricted to the limited number of stops available in display-referenced Rec. 709 encoding. S-Log encoding is not intended for direct viewing or broadcast, and requires that the shots be graded in post-production to create pleasing output for video or cinema (digital or film).
To support this higher dynamic range, VEGAS Pro supports the Academy Color Encoding System (ACES) created by the Academy of Motion Picture Arts and Sciences technology committee. The ACES color space can encode any color that can be seen and supports high dynamic range cameras and output devices made today and in the future. Various input devices (such as cameras) are transformed into the ACES color space using device-specific Input Device Transforms (IDTs).
Once transformed into the ACES color space, supported cameras can be intercut with each other and mixed with Computer Generated Imagery (CGI) in a scene-linear color space ideal for compositing and color grading. A standard Reference Rendering Transform (RRT) is applied to the final image and then various device-specific Output Device Transforms (ODTs) are applied for viewing and file output.
VEGAS Pro uses the OpenColorIO technology developed by Sony Pictures Imageworks. OpenColorIO is a complete color-management solution geared towards motion picture production with an emphasis on visual effects and computer animation. OpenColorIO provides a straightforward and consistent user experience across all supporting applications while allowing for sophisticated back-end configuration options suitable for high-end production usage.
Using OpenColorIO ensures that the results seen in (and output created by) VEGAS Pro are consistent with other applications supporting OpenColorIO, including Nuke, Mari, Katana, and Silhouette. Furthermore, if a particular project or editing house wants to work in a different color space, VEGAS Pro supports switching the color space, input transforms, viewing transforms, and rendering transforms simply by changing the active OpenColorIO configuration. Sample configurations for the Sony Pictures Imageworks VFX and animation pipelines, for example, can be found on the OpenColorIO Web site. For more information about OpenColorIO, see http://opencolorio.org/.
In order to capture the full dynamic range that the camera is capable of, Sony developed the S-Log encoding system, which reproportions the pixel encoding values using a logarithmic curve to capture greater dynamic range. As seen in the chart below, S-Log captures many more stops than typical video encoding:

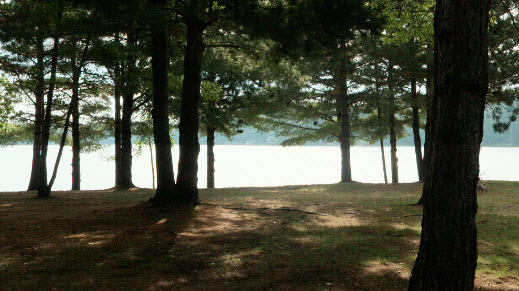
Here is a scene shot with a Sony PMW-F3 camera without S-Log enabled:
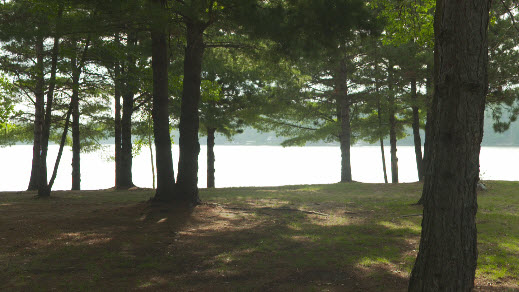
While the foreground is exposed nicely, the background is washed out. With conventional Rec. 709 video, these levels are all lost, clipped at full white, which you can see in the Video Scopes window:
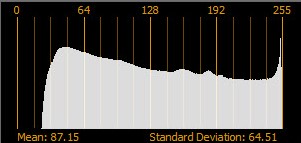
You could use the image as-is, but if you wanted to do any color grading, the clipped levels would quickly become a problem. For example, if we bring the levels down in post, the water just gets darker:

This is because traditional video is "display referenced," which means it is made to be shown directly on a display. No levels outside the monitor's range are captured.
Capturing a wider dynamic range in the scene would provide more levels to work with when we're doing color grading. That's exactly what S-Log is designed to do.
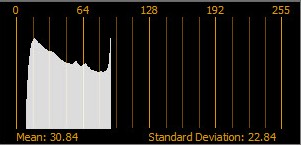
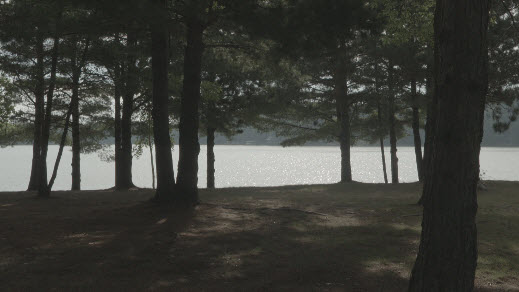
Here is the same scene shot with the same PMW-F3 camera, but this time using the Sony S-Log1 (F35/F3) color space (viewed here in 8-bit mode):
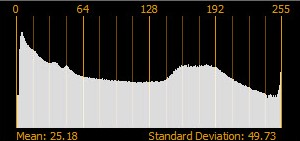
You can see that it doesn't have any clipping in the histogram (no telltale spike at the right):
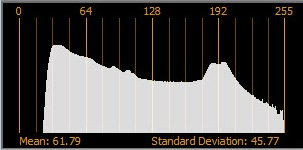
However, the picture is very low contrast and is not ready for delivery. When you shoot with S-Log, you aren't supposed to deliver that image as your final picture. You can view the image in VEGAS Pro but you must also do post-production work to create the final image for delivery.
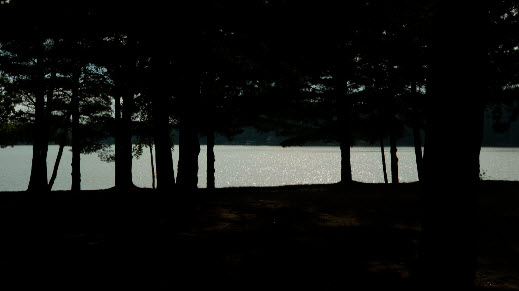
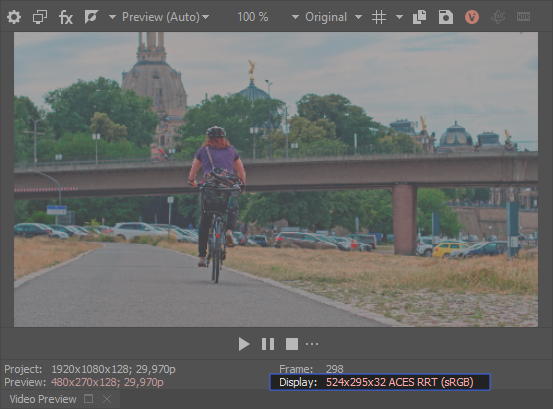
When you unwrap the S-Log encoding into what's called a scene linear color space, you can't directly view it on a standard display. You need to run it through a reference rendering transform (RRT) that compresses the dynamic range and rolls off the highs and lows. The ACES RRT has been designed to be very film-like. When we set this source media to the Sony S-Log1 (F35/F3) color space and view it using the ACES RRT, it initially looks like this, which is quite a bit darker than the regular video:

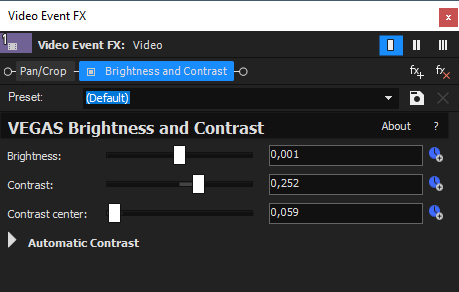
If we apply some gain to the image using the Brightness and Contrast plug-in, it starts to look like the regular video again, with a little more high-contrast film look:
In the previous image, whites are clipped. However, when we bring down the level on the shot, all of the original dynamic range is still there. In fact, if we take the level down low enough, we can even see the sun glinting off the waves, which would have been impossible with the first shot:
All of the level detail is present for color grading, film-like crossfades, fades to black, and so on. This is the beauty of S-Log and the ACES scene-linear color space.
Enabling color management in your VEGAS Pro project
VEGAS Pro supports two ACES versions
- ACES version 0.7
- ACES version 1.2
Enabling color management in your project.
-
From the File menu, choose Properties to display the Project Properties window.
-
In the Pixel format list, choose 32-bit floating point (full range) to make the View transform setting available.
-
ACES 1.2 is selected by default. Click the drop down arrow in the ACES version field to switch back to version 0.7 if desired.
-
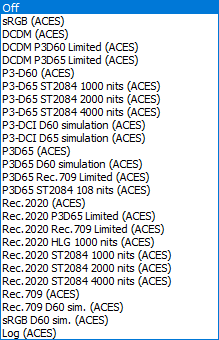
In the View transform list, choose the transform best suited for your display output.
ACES version 0.7 ACES version 1.2 
-
Click OK.
When color management is active, the selected view transform is displayed in the Video Preview window.
Specifying the color space for individual shots
The color space setting for media files is used only when color management is enabled for your project.
-
Select one or more shots in the Project Media window and click the Media Properties button
 to display the Properties window.
 -
On the Media tab, choose a setting in the Color space list.
Color Space Description ACES2065-1 (default 1.2) This is the original ACES color space, linear light, very wide primaries, very high dynamic range (0.0 – 65504.0). This core ACES color space is used for interchange and archival format Recommended for ACES OpenEXR files conforming to SMPTE 2065-4.. Uses AP0 primaries. ACEScc Wide color gamut log color space, for use in color correction (“cc” for “color correction”). Also useful for any image processing which cannot handle HDR values (>>1). Uses AP1 primaries, logarithmic, can go slightly negative and a little above 1.0. Uses AP1 primaries. ACEScct This working color space is very similar to ACEScc , except that it adds a "toe" to make it closer to traditional "log" curves. The addition of a "toe" results in a more distinct "milking" or "fogging" of shadows when a lift operation is applied. Uses AP1 primaries. ACEScg A Working Space for CGI Render and Compositing”. Uses AP1 primaries. ACESproxy An integer log encoding for on-set preview and on-set look management. Uses AP1 primaries, logarithmic, range-limited (clipped to 0.0-1.0 code value legal range) ACES (default 0.7) Use ACES for OpenEXR files in the ACES color space. -
Click OK.
Specifying the color space in a custom rendering template
The color space setting for custom rendering templates is used only when color management is enabled for your project.
-
From the File menu, choose Render As to display the Render As window.
-
Specify a location and name for the file you want to save.
-
Select a format from the Formats box and a Template from the Templates box.
-
Click the Customize Template button to display the Custom Template window.
-
Type a name for the template in the Template box.
-
On the Project tab, choose a setting in the Color space list.
-
Click the Save Template button
 .
. -
Click OK to return to the Render As window.