Scene/Edit Detection
When you need to re-edit a video that has already been rendered into a single file, you can use the VEGAS Pro Scene Detection tool to simplify the process. Through the power of AI, Scene Detection automatically detects cuts, fades, and crossfades in your video, then cuts the video into separate timeline clip events or subclips in your Project Media window.
Use the Scene Detection tool
-
Add a video to your timeline.
-
Option 1:
Click the event’s More
 button and choose Detect Scenes and Split from the menu.
 The tool analyzes the media in the event and detects scene changes. It then automatically splits the event into separate events, each of which holds a distinct detected scene.
- or -
Option 2:
-
Click the Video FX tab to open that window.
-
Select Scene Detection from the list of effects.
-
Drag the Default preset onto the event in your timeline.
-
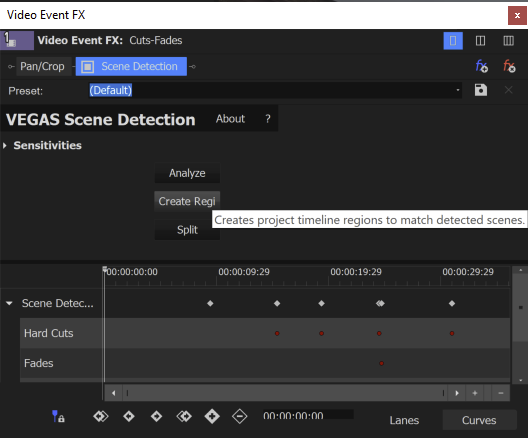
In the Video Event FX window, click the Analyze button.
After the analysis is complete, a keyframe timeline appears and contains keyframes at the location of each cut, fade, or dissolve. You may manually edit these keyframes to fine tune your results.
-
Use the tool at the project media level
Click the Project Media tab if necessary to view that window.
Here you can either add the detected scenes to your timeline, or create subclips for each individual detected scene.
Detect scenes and add them as separate events to your timeline:
Right-click the clip in the Project Media list and choose Detect Scenes and Add to Timeline from the context menu.
The tool adds the file to your timeline at the current cursor location, detects the separate scenes, and splits the event up into multiple events according to the detected scenes.
Create individual subclips in the Project Media bin without adding anything to your timeline:
Right-click the clip in the Project Media list and choose Detect Scenes and Create Subclips from the context menu.
After analysis completes, the tool adds a new subclip to your bin for each individual scene it detects.
Detect scenes from your Trimmer window:
Right-click your clip in the Project Media window and choose Open in Trimmer from the context menu (or use one of the other methods for adding a clip to your Trimmer window).
Click the Trimmer window’s More button and choose Detect Scenes and Add to Timeline from Cursor from the context menu.
Again, this results in individual events on the timeline for each detected scene.
Add the tool as an effect to a timeline clip event:
This can be extremely useful if you want to break a nested timeline or project event on your main timeline into individual events. It can also help when the more automatic methods discussed above don’t yield the results you need and you want to have a bit more control over the process.
If you don’t get satisfactory results on the first analysis, Click the Sensitivities drop-down arrow to reveal the sensitivity controls. Adjust these controls and re-analyze the clip. Experiment with different sensitivities until you get the result you want.
After you have successfully detected the edits in your video, click the Split button to apply the detected edits to the clip on your timeline.
*new since VEGAS Pro 20*
You can automatically create regions that correspond to the detected scenes. There may be a number of reasons that you’ll want to create regions, but one example is that you can then use those regions with the Batch Render script to render out new files for each detected scene.
-
Run the Scene Detection Analyze function on a selected event.
-
When analysis is complete, click the Create Regions button. Regions are instantly added in the timeline.
If you want separate events for each scene:
Click the Split button.
- or-
If you want to render out individual files:
-
Choose Tools | Scripting | Batch Render.
-
In the Batch Render script dialog box, select the Render Regions radio button, specify your other options, and click OK.