Synchronizing video in multicamera projects
In order to effectively edit multicamera footage within VEGAS Pro, you must have your video clips synchronized. The best place to do this is the timeline, using the same VEGAS Pro editing tools as you would for any video project.
Laying out clips using timecode or data/time stamps
-
Start a new project or open an existing project to which you want to add the multicamera video.
-
From the Options menu, choose Quantize to Frames if it is not already selected.
 For more information, see Quantize to frames
 -
From the Options menu, choose Ignore Event Grouping to turn it off.
-
Select your clips in the Project Media window.
-
Add your clips to the timeline:
-
For clips with synchronized timecode, choose Multicamera from the Tools menu, and then choose Lay Out Tracks Using Media Timecode from the submenu.
-
For clips without synchronized timecode, choose Multicamera from the Tools menu, and then choose Lay Out Tracks Using Media Date/Time Stamp from the submenu.
The result is a pair of tracks for each camera, with events aligned based on the timecode or date/time stamp of each clip. If your scenes were captured with synchronized timecode, your clips should be in perfect alignment. Otherwise, you'll need to adjust the alignment to synchronize the clips. The goal is to align the clips in time so the synchronization points you recorded occur at the same timeline position for all clips.
Adjusting alignment using audio
If you can assume that all cameras involved have recorded the same audio, you can also use these audio tracks to synchronize the events.
-
Select all events.
-
Choose Menu Tools | Multicamera | Synchronize Audio to Align Events
-
The events below the topmost one are moved forward or backward so that they are synchronized.
NOTE In this process the whole audio data is analyzed to find similarities so this can take a while with longer recordings.
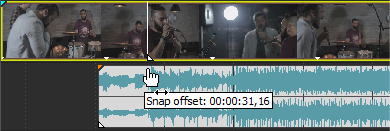
Adjusting alignment using video
You can also align your events using the video.
NOTE These steps require snapping to be enabled, so if you have not already done so, turn snapping on by clicking the Enable Snapping button  . For more information, see Enable snapping
-
Solo the video track.
-
Position the cursor at the synchronization point and drag the event’s snap offset so it snaps to the cursor.
-
Repeat these steps for each clip.
-
Drag the cursor to a snap point, and then snap the other clips to the cursor.