Effect curves
NOTE This feature is available in the Plus/Premium version of Movie Studio.
Effects curves are an option for controlling how effects change over time. The parameters of the effect are plotted along a curve that runs over time. By placing keyframes on the curve, you can change the settings of the effect over time to create animated effects. Effect curves can be used to control brightness, contrast, and hue, for example.
Activate effects curve
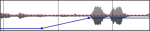
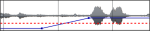
For each animated effects parameter, a curve is created and placed over the object.
NOTE Effect curves will be displayed only after a first keyframe is set.
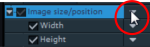
In the Effects overview, click on the  button to display the effects curve on the object in the timeline.

Edit curve points: The curve point can either be edited with the individual curve points (in "Standard" mouse mode) or by freely drawing the effect curve (in Curve mouse mode).

New curve points can be added to the curve in "Standard" mode via Ctrl + Shift and clicking; existing ones can be deleted in the same way. Every curve point can be moved with the mouse horizontally and vertically.
Effects curves – additional functions
 The context menu can also be opened via the small arrow beside the effects indicator.
Delete effects: Removes the selected effect completely.
Delete effects curve: Removes the effects curve to be created again.
Copy effects curve: The effects curve is copied to the clipboard to be used at other positions.
Insert effects curve: A previously copied effects curve can be inserted elsewhere with this function at any time. This may be in the same object or in another object.
NOTE If you would like to insert the curve into a longer or shorter object, then think about setting the option "Connect curve length with object length" correctly before copying.
Connect curve length with object length: If this option is set, then changes to object length will affect the effects curve accordingly.
Load effects curve: A previously saved effects curve may be loaded via this menu item. This is useful, for example, if you have added your own default animations.
NOTE The current effects curve will be overwritten as another one is loaded.
Save effects curves: Effects curves can be saved as a separate file. This is useful if you want to add your own default animations and load them again at other positions.
TIP Be aware that during saving the setting "Connect curve length with object length" is saved as well and applied during loading.
Edit effect curve
This dialog serves to stretch, compress and move effect curves within an object. The info bar of the dialog will display the effect, whose automation curve is currently being edited.
Move position
Timeline: With each click on the arrow, you can move the effects curve forward or back by the displayed time value.
Effect: Every click on the arrow up or down moves the effect curve by the entered value. Depending on the effect, it is possible to enter exact or percent values.
Stretching & compressing
Timeline: The effects curve will be stretched or compressed by the entered time value. Invert reverses the curve on the time axis and reinserts it in "reverse". The entire object duration will be considered.
Effect: The effect curve is stretched or compressed in its values, no time-related editing takes place. The selected option (see table) is decisive in editing.
Mirror: The entire curve is mirrored along the X-axis, whose position is determined by the following option (see table).
 ... around the object center: The X-axis lies exactly at the center of the object.
 ... at the center of the curve: The X-axis lies between the upper and lower automation point.
 ... at the curve minimum: The X-axis lies at the level of the lowest automation point.
 ... at the curve maximum: The X-axis lies at the level of the highest automation point.