Recording
Movie Studio offers you the ability to record videos and audio files directly using connected cameras or microphones. Furthermore, you can import existing media files from your computer or external storage devices into a project. The recording dialog also enables you to record content directly from your screen, which is particularly useful if you want to create tutorials or demonstrations.
To start a recording:
-
Click on the red
 in the transport controls of the in the
 This opens the recording dialog
AlternativeIn the main menu, click File Record audio/images/video.
-
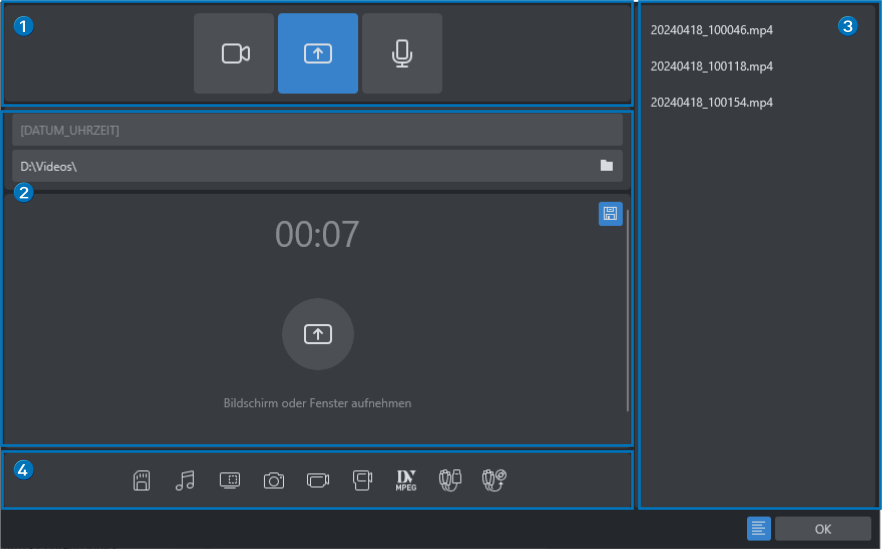
Select the desired mode in the upper area 1.
-
Click the Record button in the middle area 2.
1 Record mode
|
Camera |
Record videos or pictures from a webcam or video recording device. |
|
Screen |
Record your entire screen or a selected window. |
|
Audio |
Record audio using the default Windows audio recording device. |


2 Recording
If you have selected record mode, you can start and stop your recording here. You can also specify the location and name under which you want to save your recordings. Change the recording path and file name as follows:
Click the ![]() icon. By default, the file name of the recording consists of the date and time, unless you manually change it.
icon. By default, the file name of the recording consists of the date and time, unless you manually change it.
3 Available recordings
All recordings that you have created while the dialog is open are listed here. As soon as you close the recording dialog, the recordings are transferred to the project.
Click the  button to show or hide the list of recordings.
4 Previous recording options
The functions you are already familiar with from previous versions of Movie Studio can be used here. Additionally, you can specify further settings before recording.

|
AVCHD import |

|
Audio recording |

|
Screen recording |

|
Single frame capture |

|
Transferring recordings from an HDV camera with Firewire |

|
Transferring recordings from an DV camera with Firewire |

|
Record DV as MPEG |

|
analog recording |

|
Burn directly onto DVD |