Analog video recording
The description in this section refers to the recording function before the updates in version
Click the corresponding button in lower area of the record dialog to access this function.

More information about Recording dialog
This option allows a video recording to be made from analog sources.
Connect analog video source
Connect the video out of your video camera, DVD player or VCR to the video in (TV, video, or video-in graphics card) of your computer, and the audio out to the line in of your sound card.
Due to the variety of device configurations, it is difficult to say which cable will function best with your setup. If you’re not sure, check the manual of your VCR or your TV, video or graphics cards.
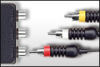
Example: Many VCRs have a SCART output and most DVD players have three RCA outputs (two for the stereo track, one for the image). In such cases, you will need a SCART to RCA adapter, a cable with 3 RCA plugs at each end.

|
|
|
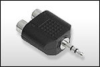
| SCART/RCA adapter | SCART/RCA adapter with 3 RCA jacks | Stereo RCA/mini phone jack adapter |
Most sound card inputs are mini stereo jacks. To connect the audio out of your VHS recorder to the sound card audio in, you will need a stereo RCA to 3.5 mm mini jack adapter.
You will have to purchase a cable with three RCA plugs and a stereo RCA/mini phone plug adapter.
Recording dialog
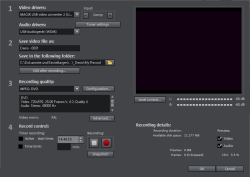
Video/audio drivers: Set the video card or sound card for recording here. In practically every case the driver software supplied with the hardware must be installed.
Input/tuner settings: If your video capture card supports multiple sources, i.e. your card also has a TV tuner or multiple inputs (SVHS, composite, etc.), then you can select the proper recording source and the TV channel to be recorded here.
Save video file as/save in following folder: Enter the name of the movie to be recorded. You can also select the folder where you wish to store your video file. The standard recording folder is set as default. The location of this folder may be changed via "Path settings" under "File > Program settings > Folders".
Edit after recording: Use this to access the automatic editing options.
Recording quality: The list box enables you to select various predefined levels of recording quality, e.g. depending on the purpose of the image material and computer performance. These are sorted according to picture quality. Use the configuration tool to fine-tune the quality for the preset. Presets you have created yourself appear in this list as long as you use the default folder provided as the save location.
-
Presets displayed with MPEG record directly in MPEG format.
-
The preset "AVI: user-defined" enables AVI videos to be recorded via the codecs included with Video deluxe. There are several codecs for various applications, e.g. "MSU Screencapture Lossless Codec", which is used for screen capturing. Please also see the general information provided on AVI video.
NOTE Tip: Use the presets marked MPEG if you want to burn your recordings straight away, since smart encoding helps omit laborious encoding after recording.
Erweitert...: Öffnet den Einstellungsdialog des Videotreibers.
Capture controls: This provides access to the "Red" record and "Stop" buttons. These start and stop recording.
Timer recordings active/time limit: Specify the recording start time and length to turn your PC into a fully functioning VCR.
Snapshot!: This will create a still shot directly from the program monitor. The images are saved in the recordings folder as graphics files in the resolution you have set.
Recording information: This shows statistical information such as the recording time, available space on the hard drive, the recorded frames, and the "dropped" frames. Dropped frames are frames that have been left out because the computer is too slow for the selected image format and recording quality and cannot accept all incoming frames.
Preview: Some graphics adapters allow you to reduce the system load by deactivating the video preview. If you hear an "echo", deactivate the audio preview.
Advanced configurations in the video capturing dialog
These dialog boxes, so-called "property sheets", come with the video card drivers. These driver-specific performance properties may deviate depending on the cards. We also have a very limited influence on the behavior of these drivers. If you encounter any difficulties, please contact the video card manufacturer and ask for the latest driver updates.
Input: Sets up the video card's so-called "crossbar".
The crossbar determines which video and audio input signal will be recorded. The crossbars are connected in series to the video recording chip itself. In the output field, the video output (for the crossbars) is the input for the recording chip (video or audio decoder-in) of the video card. In the "Input" field, select the signal source that will be used by the video card to capture for this input. Many video cards have separate crossbars for audio and video. If you have a problem, try out the different configurations until the right sound matches the right image.
-
Composite in = the regular video input (i.e. RCA jack)
-
S-video = S-video input (mini-din jack)
-
SVHS-in = SVHS input (special cable)
-
Tuner-in = TV signal of the integrated tuner
Image settings
Video decoder: If the picture only appears in black & white or it flickers, the video standard may be set incorrectly. In mainland Europe, PAL_B is used.
VideoProcAmp: Feineinstellungen für Farben, Helligkeit, Kontrast usw. Es empfiehlt sich, die Herstellereinstellungen nicht zu ändern.
Format: Please do not change anything here. The recording format is set in the "Recording quality" option in the video recording dialog.
Station selection
This option is only available if a TV tuner is integrated into your video card.
Last time changed: October 27, 2025