Audio cleaning
In the context menu for an audio object, open the "audio cleaning" editor for correcting noise, distortion or other audio discrepancies.
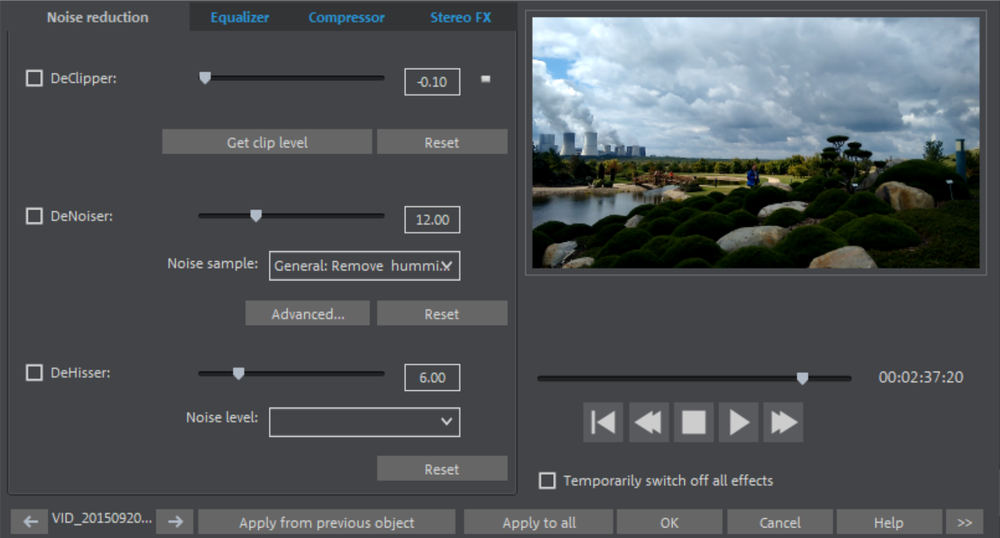
Select the cleaning function you desire from the upper part of the dialog:
- The equalizer allows you to manipulate the frequency spectrum – perfect for cleaning-up muffled dialog.
- The compressor is a dynamic volume control that lends a deeper, richer quality to the overall sound.
- The Stereo FX processor controls the position of the sound within the stereo panorama.
- DeClipper, DeNoiser and DeHisser are professional noise reduction tools for removing noise and hiss.
Preset: You can find the right presets for your project in the preset menu.
Temporarily switch off all effects: With this option, you can temporarily deactivate all effects.
Apply to all: Applies the selected cleaning settings of all effects to every scene of the movie.
DeClipper
If the input level of an audio recording is too high, distortion may result at the louder parts (the signal peaks). This digital distortion is also called "clipping": At the overmodulated area, the values that are too high are simply cut off, and typical, quite unpleasant-sounding crackling and distortion appear.
Movie Studio includes a special function for dealing with digital clipping and analog distortions. This only works to a certain degree, of course. It's better to avoid clipping during recording in the first place.
Using the fader you can set at what level the DeClipper should register a signal as being overmodulated and, if required, correct it (Clip level). This is important, as different sound cards show different clipping methods. The more the fader is turned up, the lower the level recognized by the program as overmodulated. If the clip level is set too high, unwanted sound modification may occur.
Get clip level: The clip level is gauged from the current position of the playback marker.
How to get clip level:
- Set the playback position just before the loudest section.
- Press "Get clip level".
- For more precision, you can adjust the clip level control.
DeNoiser
The DeNoiser removes persistent background noise like computer humming, hissing, noises from sound cards, disturbance from ground wires, interference from audio-equipment with high-impedance outputs (e.g. turntables), footsteps or rumbling sounds from LPs.
The DeNoiser requires a noise sample. Some typical noise sounds are included in the "Preset" selection menu.
Set the degree to which the noise should be reduced with the fader. It is often better to reduce interference signals by 3 to 6 dB rather than as much as is possible so as to keep the sound "natural".
A different option consists of creating a noise sample yourself. A short section from the audio track in which the distortion can be found is all that's needed. To get it, switch to the DeNoiser dialog by clicking "Advanced".
Advanced settings
Step 1: Choose noise sample
First of all, a sample of the distortion you wish to remove must be selected, a so-called "Noise sample".
You have two options to choose from:
- Pick out typical background noise: You can select and use a number of typical background noises from the flip menu. Select one and listen to it by pressing the "Play" button. If it's similar to the background noise in your audio track, go ahead and use it (see "Step 2: Removing background noise").
- Extract a new noise sample from an audio track: You can also pick out a short passage (from the existing sound track) in which you can hear the background noise.
Automatic search: Searches especially quiet passages in which background noise is most noticeable.
Previous/play/next: This button allows you to play all of the passages found for easy comparison.
Save as: Once found, you can save noise samples to the hard drive. They then appear as entries in the "Typical background noises" flip menu to be used in other projects.
If you only wish to use the noise sample in the current project, you don't have to save. Instead just go to the "Remove noise" category.
Step 2: Remove noise
Noise level: The level of the noise reduction function should be set as precisely as possible. Values that are too low are expressed in too low a distortion dampening level and in artefacts, like noises or "twittering" (see below). Values that are too high give rise to dull sounding results – the highs of the sound signal are also filtered out. Take your time to find the best setting for an individual case.
Reducer: This sets the balance between the original signal and the signal with the applied noise reduction. It's often better to reduce interference signals by 3 to 6 dB rather than as much as is possible to keep the sound "natural". For buzzing, it’s best to apply complete removal.
DeHisser
The DeHisser eliminates regular "white" noise typically produced by analog tape recordings, microphone preamplifiers, or AD transformers. Noise reduction can be adjusted in decibel increments with the fader. It is often better to reduce interference signals by 3 to 6 dB rather than as much as is possible so as to keep the sound "natural".
Noise level: You can choose from different noise levels. You should set the selection as precisely as possible. Setting the value too low will result in only partial removal of the hissing. Settings that are too high lead to dull results – noise-like signal components (such as the blow-off of wind instruments) are also removed.
Equalizer FX rack
The 10-band equalizer subdivides the frequency spectrum into ten areas (‘bands’) and equips them with separate volume controls. This makes it possible to create many impressive effects, from a simple boosting of the bass to complete distortion. If low frequencies are boosted too much, the overall sound level is heavily increased which may lead to distortion.
Slider control: Each of the ten frequency ranges can be separately boosted or turned down with the ten volume controls.
Link frequency bands: The frequency fields can be bundled together flexibly in order to avoid artificial-sounding overemphasis in individual frequency fields.
Compressor
The compressor is an automated, dynamic volume controller. Loud passages become quieter and the total value is raised. This makes the volume more consistent and speech easier to understand. A compressor is mainly useful in case background noise or music interferes with speech and simply increasing the volume of the individual objects or tracks does not result in any significant improvement.
Ratio: Regulates the amount of compression applied.
Function: Defines the way compressor operates according to the audio material.
Stereo FX
With the Stereo FX processor, you can determine the positioning of the audio material in the stereo panorama. If stereo recordings sound unfocused and undifferentiated, an extension of the stereo base width can often provide better transparency.
Bandwidth control: This adjusts bandwidth between mono (all the way to the left), unchanged base-width (center) and maximum band-width (“wide”, all the way to the right).
Reducing the base width can produce an increase in the level. In extreme cases – when the left and right channels include identical material and the base width control is pushed to the extreme left on ”mono” – the result can be a level rise of 3 decibels.
Raising the base width (values over 100) diminishes the mono compatibility; this means that some frequency ranges may cancel each other out if the stereo signal is played on a mono device.