Edit volume curve
You can use volume curves to easily edit the audio track of an object as you wish.
-
In a project, select an object whose volume you would like to adjust.
-
Open the volume curve by going to "Effects" > "Audio object effects" > "Volume curve".
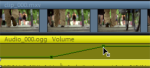
You will now see an additional line in the audio track; this is the volume curve. -
When you touch this line with your mouse cursor, the cursor is transformed from a hand symbol to an arrow. Now if you click on the line, you will create a point (keyframe), which you can grab with the mouse cursor and drag to a lower position. This lowers the volume of the overall object.
-
Create another point. Move this point down too and make sure you don't lower the entire volume curve, but simply a section of it.
You can create as many keyframes a you wish, adjusting the volume curve section by section, untill all segments play at the appropriate volume. Check whether the keyframe are positioned right by playing back the track (spacebar starts and stops playback) and listening to hear the effect of the keyframes.
If you would like to move a keyframe to the left or right, grab it with the mouse cursor and move it to the right position.
If you would like to delete keyframes, use the effect overview in Media Pool under "Effects" > "Audio effects" > "General" as described under "Animate objects, effect curves". Select the keyframe that you wish to delete and click on the Delete button. 