Multicam Editing
NOTE This feature is available in the Plus/Premium version of Movie Studio.
Multicam editing enables easy cutting of various recordings of the same scene from different camera perspectives.
The program monitor shows the image material from up to 4 sources next to each other, from which the "program" can be cut in real time using your mouse – just like in a real studio.
Preparation
Multicam editing is a special mode in the project window. The top two tracks serve as target tracks for copying sound and video from two different source tracks. The two most upper tracks need to therefore be empty when changing into multicam mode, if required the objects will be moved onto another track.
First you can load various video recordings of the same scene one under the other starting on track 3 in the arranger.
It is important that the individual sources are synchronized to each other exactly. It is best to find a noticeable movement, or some kind of audio cue if sound was recorded.
NOTE To localize the sound in the audio track exactly, you may have to create a wave display of the track. To do this, right-click on the audio track and select "Waveform display".
If you have one, you can use a clapper to signal the start of a scene. If not, simply having one of the "actors" clap their hands can have the same effect. Set a snap marker in each source object, with to-the-frame precision. You can now move the source objects over each other, so that the grid points are aligned.
In each case two video sources with audio tracks can be automatically synchronized using their audio material. To do this, use the "Align with other audio objects" function in the audio object context menu.
It is also important that you carry out all output material effect processing (e.g. video or audio cleaning) on the objects on the source tracks and master audio track before the multicam cut. These object effects are transferred to the object in the target track when editing. Otherwise, you will have to apply the effects from every single object to the target track.
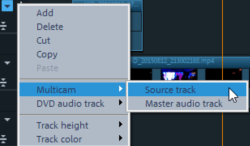
 You can activate "Multicam" mode with this button or with the "Multicam" command in the "Edit" menu.
Source tracks and preview images
The source tracks for multicam editing will be selected automatically. When the multicam mode is activated, the source tracks will be assigned to all tracks containing video objects starting from track 3.
You can also conduct or change the assignment manually. To do so, right click on the trackbox of the corresponding track to active or deactivate a track as a source track.
The source tracks are marked using color.
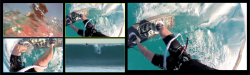
A preview appears in
If the objects created using multicam cut are located on the target track, a preview image of the corresponding source track highlighted with a yellow frame will be shown for length of playback.
Multicam edit functions
You can edit various sources in the the target track during playback in real time or during stopped playback.
Real-time multicam editing
You can edit various sources together during playback in real time:
-
Start playback.
-
Click the desired source in the program monitor. The corresponding video is added into the target track starting from this time point.
-
To switch the source, click in the
-
You can repeat this process as often as you like.
For precise editing in the target track, use the usual edit functions or the Trimmer. Bear in mind only to move the object borders and not the objects themselves as long as you are in Multicam Cut Mode. Gaps or jumps can arise if you use the Multicam Cut functions again afterwards.
Replacing an object's source
Replacing the video material of an object in the target track with another source:
-
Select the object in the target track for which the source is to be replaced.
-
Click on the source in the
The video material will now be replaced by the new source. The object length is not changed.
Insert cut
Insert material from one of the sources between any position on the target track and the next object.
-
Place the playback marker on the desired position.
-
Click the desired source in the program monitor.
The material from this source will now be inserted into the target track. The new object ends at the next object. The portion below an existing object is overwritten in the process.
Overwrite range
You can overwrite a selected area of the target track with one of the source videos.
-
At the upper edge of the project window, select an area to edit by determining the in point by clicking with the left mouse button and the out point by right-clicking. Or use the corresponding buttons in the transport control.
-
Click the desired source in the
-
The target track will be overwritten with the video material from the selected source in the selected area.
Master audio track
Normally, videos in the source track are edited together with their audio tracks. Since the original sound can differentiate from camera to camera due to different camera positions, you will probably prefer using either the soundtrack from only one camera for all settings, or to replace the soundtrack completely. (For music videos, for example, you will use the studio version of the original track).
Right-click on the track box of one of the source audio tracks or a different audio track and select "Multicam: master audio track" from the context menu to assign a master audio track for multicam editing. The master audio track will be appear in a dark color.
Now, during every multicam cut, material from the master audio track will be inserted on track 2, independent of the source track used.
Synchronize video objects using the audio track
Video objects can be synchronized using their audio tracks. This is done by comparing the audio tracks for similarities. If videos come from the same recording environment, the same acoustic events will be found on their audio tracks (e.g. the sound of the clapper board).
Synchronization of multiple objects on one track is possible.
-
First, on the reference track, select all audio objects that are to act as reference positions.
-
Then, on another track, select all audio objects that should be moved.
-
Choose the "Align with other audio objects on this track" function from the audio object context menu.
NOTE If the desired audio track is located in a combination object, you will find the "Align other audio objects to this track" option in the "Audio functions" submenu.
Movie Studio attempts to locate the acoustic events in the reference objects of the second track and to move these to the corresponding position. Because the audio objects are grouped with their corresponding video objects or comprise a common object, videos are synchronized in the process.