Screen Recording
NOTE This feature is available in the Plus/Premium version of Movie Studio.
Use screen capturing to record everything that moves on your monitor. This process is called "screen capturing".
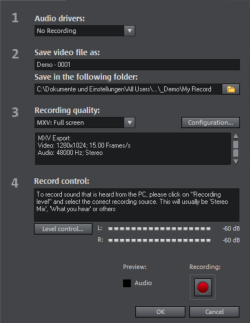
Under Recording quality, you will find various presets for different applications. You can either record the entire monitor ("fullscreen"), a frame of variable size (e.g. to film the Windows Media Player display), or a different video player. Click "Configuration" to make custom size adjustments.
NOTE Since many video players work with overlay, it is recommended to open each player before you start recording. This way switching into "Overlay" mode can be prevented.
TIP Use the fullscreen presets under "Recording quality". This will use MXV format, a codec which is particularly suitable for screen capture.
-
Click the "Record" button in the recording dialog. An additional dialog with a red record button, a black stop button as well as a frame with dashed bordering appears.
-
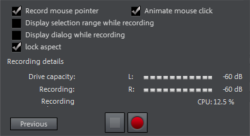
Activate "Record mouse pointer" to record the movements of the mouse pointer.
-
If desired, deactivate "Animate mouse click" if this should not be visually recorded.
-
Now select the screen area you wish to record, i.e. the screen of the video player in which the video is playing. Drag the frame over the area you wish to record and adjust its size as required by dragging the edges and corners.
NOTE If you selected "fullscreen", the frame will appear outside the visible area.
-
The actual recording process can be started by pressing the red record button. The recording starts; the record symbol appears in the task bar (tray).
-
Once the video you wanted to record has come to an end, click on the "Record/Stop" button to stop the recording. Recording ends and the recording dialog is visible once again.