Transitions
When importing video files into the project window, individual objects usually follow directly after one another. This is called a "hard cut". However, you can make scenes blend or “transition” into each other.
This means that for the duration of a transition, two objects are shown at once and can be mixed "faded" together in different ways. You'll find a wide range of transitions in the Media Pool's transition folder.
Simple crossfade
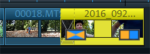
A simple transition can be created in the project window by dragging one object over another. A crossfade will be created automatically. During this standard transition, the brightness of both objects are added together; the first clip fades out while the second clip fades in. The duration of the crossfade is displayed in the project window by white crossing lines. You can adjust the length of the crossfade by dragging the upper handle of the second object to the left or to the right.
Transitions from the Media Pool
NOTE Use transitions sparingly. Look closely when you are watching movies in the theater or on TV. You will notice that hard cuts are used as a rule and transitions are used less frequently. Videos appear unprofessional and too ornate if transition effects are added to every change of scene.
-
To open the transition folder, click on the "Transitions" button in the template folder located in the Media Pool.
-
Double clicking on an entry provides a preview of the transition.
-
Drag the transition you want onto the border between the two objects. Only when the mouse pointer is placed over a scene change will it turn from a lock icon into an object icon, i.e. you can place the transition at that position. The object at the back will be shifted to the front to accommodate the duration of the transition.
Most transitions can have any length, and if a transition is shortened, it means that the resulting effect is speeded up.
Some transitions can be set even more exactly. To do so, click on the transition icon again and select "Settings..." at the bottom of the menu. Thus, a transition icon in the Media Pool can represent an entire group of different effects.
The so-called alpha transitions (in the subfolders "Mold and Objects" "Iris", "Random", etc.) are actually pre-produced black and white videos that are combined with the alpha keying effect to be used as transitions.
Other transitions use sound effects. Look around at all the contents to form an idea of what you can use in future projects.
Custom transitions with alpha keying
Alpha keying extends the range of transition effects used in Movie Studio to produce black & white movie transitions or selected color fade-ins and fade-outs. You can create such a video from any video material (also color) by exporting it as a transition (File > Export movie > Export as transition).
The loaded movie is then exported as a black and white video in mxv format and stored in the fade directory. Afterwards, it will be available on the Media Pool and in the fade menu.
3D transitions
3D effects offer exciting and varied opportunities to create transitions between two videos.
The following transition settings are available:
Anti-aliasing: An undesirable step effect is usually created at the borders of 3D objects. Anti-aliasing reduces this effect, but also requires more computer power. The setting applies globally to all 3D fades, switching on anti-aliasing during 3D fades has the effect that all other 3D fades are also affected by this setting.
Horizontal/Vertical mirror: Use these options to influence the path of the 3D objects within the fades. "Horizontal" mirrors the movement of the object horizontally, i.e. along the X-axis. "Vertical" mirrors the movement of the object vertically, i.e. along the Y-axis.
3D series
The 3D series are a further development of 3D transitions, where the transitions are thematically sorted. For instance, you can let photos appear on a notice board or make it look as if the photos were hung on the walls of a gallery.
-
Click on "Templates" > "Transitions" > "3D series" in the Media Pool. Select the desired 3D series and drag it onto the first scene or image transition where the 3D series should start.
You can select how many of the subsequent fades should be replaced by the 3D series in the dialog.