Trim objects
Trimming refers to the precise adjustment of object borders or transitions. Movie Studio has two different trimmers, which can be opened using the context menu of a video or image object.
General advice for operating both trim editors
Play functions: The trim window contains its own play functions that allow the object to be played individually or in relation to the projects.
The right play button plays the project normally. Replays can sometimes appear shaky because the processor may be over-worked. Those frames that the processor cannot calculate quickly enough are left out.
The middle play button plays the arrangement “frame by frame”, which means no frames are left out. Depending on the processor load, playback may thus be slower, but still smooth.
The left play button renders material before playing, i.e. the current settings are calculated first and then exported. This method ensures a smoother playback.
With the fast forward and rewind functions you can change the range start in the timeline. This allows for complete control of transitions between two videos.
Increments: A click on the arrow buttons in both trim editors moves the handle or the material within an object exactly by one frame. Using the Ctrl key you can increase the frame rate gradually to 5 frames per mouse click.
Edit trimmer
A schematic display of the selected transition and its handles can be found at the center of the trimming window.
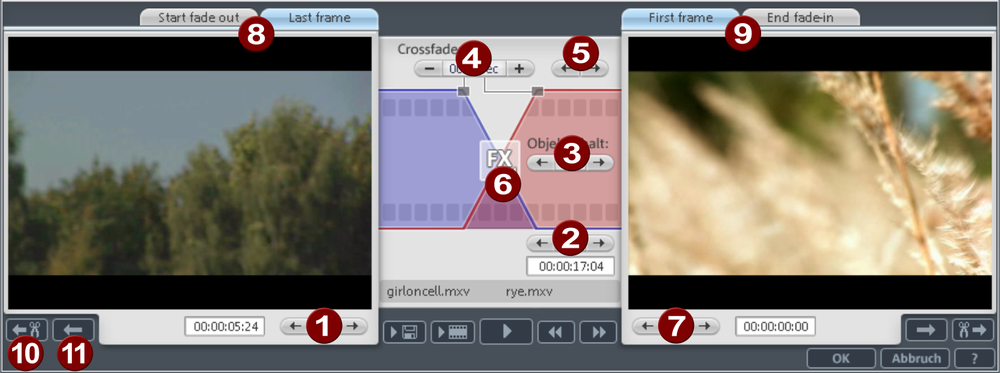
Left arrow button (1): This button moves the last frame of the first object while adjusting the second. The length of the transition remains. The display indicates the relative change in comparison with the starting situation when the trimmer was opened.
Position (2): Moves the second object. The length of the transition is changed. This corresponds to moving the object in the project window.
Object content (3): This moves the movie “underneath” the second object. The length of the object and the transition themselves are not changed.
Crossfade (4): Changes the transition's length between both objects. The objects remain of equal length. The length can be numerically entered.
Middle arrow buttons (5): Shifts the existing transition. Both objects remain in their positions, only the transition's center point moves.
Transition (6): Displays the type of transition. Click the mouse to open a pop-up window from which you can select a transition.
Right arrow buttons (7): Move the first frame of the second object. The first object and the transition remain. Only the length of the second object changes.
Start fade out/last frame (8): Switches the left monitor between the start of the transition and the last frame of the object.
First frame/end fade in (9): Switches the right monitor between the first frame of the following object and the end of the transition.
Next cut (10)/next object (11): These buttons skip to the next/previous object and/or cut in the project window. They make it easy to move and trim cuts in the project without having to leave the trimmer area.
Object trimmer
A schematic display of the selected object and its handles can be found in the center of the trimming window.
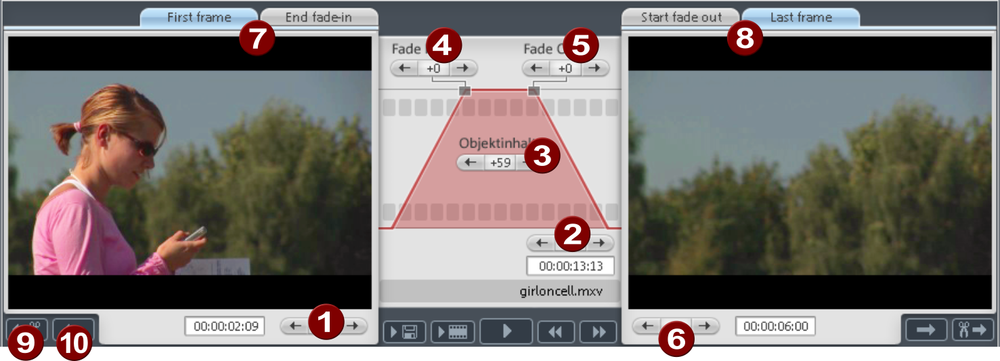
Fade in/out (4, 5): These buttons adjust the upper fade handles of an object.
Object content (3): Here you can move the video material that is to be played without changing the object length.
Position (2): Moves the object on the track.
First frame/End fade in (7): Toggles the left monitor between the first frame of the object and the end of the transition.
Start fade out/last frame (8): Toggles the right monitor between the start of the transition and the last frame of the object.
Left/Right arrow buttons (1, 6): Adjusts the lower object handles.
Next object/cut (9, 10): The buttons below and to the right skip to the next/previous object and/or cut in the project window. These buttons make it easy to move in the project and trim objects without having to leave the trimmer.
Move the contents of trimmed objects
Use the "Move object content" mouse mode to move the content of a trimmed object within the object borders.
This function is particularly helpful when you don't want to mix around the arrangement of objects, but want to have an object begin with a different first frame.
-
Select the trimmed video object.
If the video has not been trimmed, the video object contents cannot be moved, because the entire video will be shown. -
Use the "Move object content" mouse mode and drag the video object content to the left or right in order to move it.
Alternatively, you can use the object trimmer for frame-accurate positioning of content.