MAGIX Mastering Suite
MAGIX Mastering Suite is a special effects rack for use with the mixer master channel. The effects in the Mastering Suite are used as part of the mastering process, in which the mixed music piece is given a final polishing.
 The on/off switches switch the effects on and off individually. Each effect has a range of presets that can be selected from a list along the lower border of the effect.
Each effect can be reset by pressing the Reset button.
 Auto Mastering
The Auto Mastering feature enables you to automatically apply the sound of typical musical styles from the past and present (e.g. 70s disco, 90s club, jazz etc.). The sound of the source material is analyzed and appropriate equalizer and dynamic effects are applied.
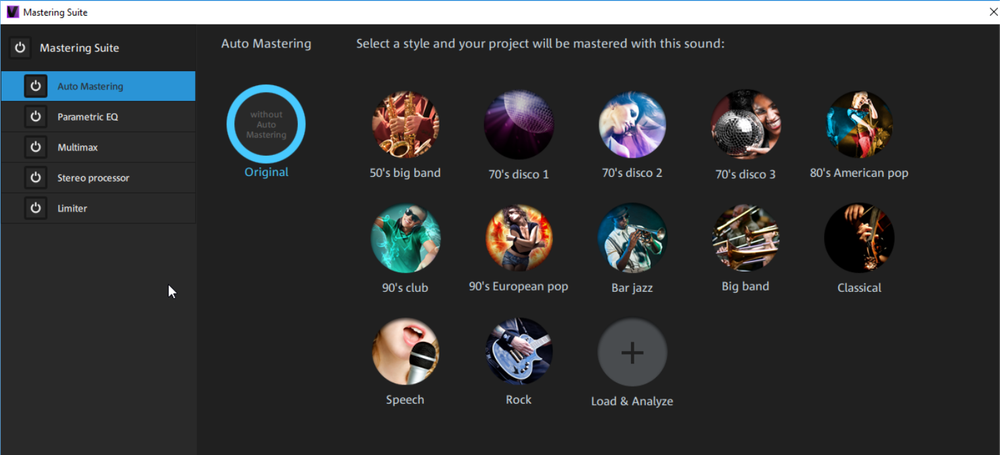
- Activate the Auto Mastering Wizard.

- Now choose the musical style. Video Pro X will analyze the audio material in the project. The settings that are used to achieve the optimal sound for a particular musical style depend on the audio properties of the source material.
Use the Original interface in order to compare the original with the edited version.
Parametric 6-band equalizer
The parametric equalizer has six filter bands that you can use to shape the sound of the music track. Each band is a filter with a typical "bell shape". You can increase or reduce the signal level gain within a specific frequency range around an adjustable middle frequency . The width of this frequency range is called bandwidth. The bandwidth is defined by the Q value. The higher the Q value, the narrower and steeper the filter curve.
You can influence the basic sound of the mix by boosting or cutting specific frequency ranges (low Q value) to give it more "depth" (lower mids 200-600 Hz) or more "air" (highs 10 kHz). You can also decrease very specific frequencies (high Q-value) to remove unwanted noise.
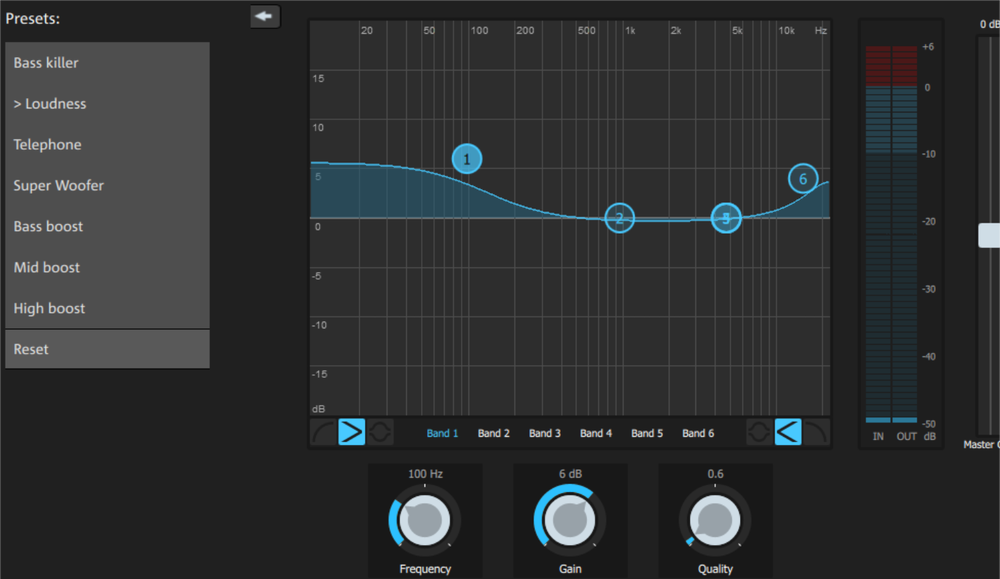
Sensor field: The sensor field displays the resulting frequency response of the equalizer. The frequency is displayed horizontally and the increase or decrease of the respective frequency is displayed vertically.
The blue bullets 1-6 symbolize the six frequency bands. You can move them around with the mouse until you find the frequency response you want. The bandwidth (Q value) can be adjusted using the mouse wheel.
The faders under the filter graphic display the parameters of the currently selected band.
You can use the knobs to set the values for each band more precisely. There is also a numeric field for each parameter where values can be entered.
Gain: This controller allows you to raise or lower the filter. Setting the controller to 0 deactivates the filter so it does not use any processing time.
Freq: The center frequency of the individual filters can be set between 10 Hz and 24 kHz with the frequency controller. The freedom to select frequency enables you to set multiple filters to the same frequency in order to have a greater effect.
Q (Bandwidth): Here you can set the bandwidth of the individual filters to between 10 Hz and 10 kHz.
Bands 1 and 6 are special: Their Filter Curves can be edited in three different modes. The four editing points in the graphic have different functions in each mode.
 Peaking: Here the effect curve is brought closer to the working point (which represents the peak of the curve) from both sides simultaneously.
 Shelving (Basic setting): Here the working point displays the beginning of the filter curve. From this point on there is a gentle increase or decrease in the frequency.
 High-pass and low-pass:In Band 1 the working point displays the frequency which is filtered out of particularly high or low frequencies.
You can control the output level of the equalizer with the Peak Meter. The output amplification beside it lets you offset the level changes resulting from EQ adjustments.
Peak meter: You can control the output level of the equalizer with the Peak meter. The output amplification beside it lets you offset the level changes resulting from EQ adjustments.
Multimax
Multimax is a compressor with three independent frequency bands. The dynamics are edited separately for each band. The advantage of a multi-band compressor versus a "normal" compressor is that the "pumping" tendency and other unwanted side effects are dramatically reduced while editing the dynamics. For instance, it can prevent a peak in the bass range from suppressing the entire signal. Multiband technology also lets you specifically edit individual frequency ranges.

Setting the frequency bands: The settings of the frequency bands are changed directly in the graphic. Simply click on the separator lines and move them.
Lows/mids/highs: These knobs control the level of compression for each frequency band.
Link: When this button is activated and a fader is adjusted, all other faders are changed proportionally. However, the way the dynamics are edited is not affected.
Presets:In MultiMax, you can use Presets 2 to open further special features:
- Cassette NR-B decoder: Video Pro X simulates decoding of Dolby B + C noise suppression if a Dolby player is not available. Cassettes recorded with Dolby B or C sound more muffled and dull if played back without the corresponding Dolby.
- De-esser: These special presets help to remove overstressed hissing sounds from speech recordings.
Stereo processor
With the stereo enhancer you can determine the positioning of the audio material in the stereo balance. If the stereo recordings sound unfocused and undifferentiated, an extension of the stereo base-width can often provide better transparency.
Use the maximize feature to move the echo (e.g. into the foreground) and improve the stereo picture.
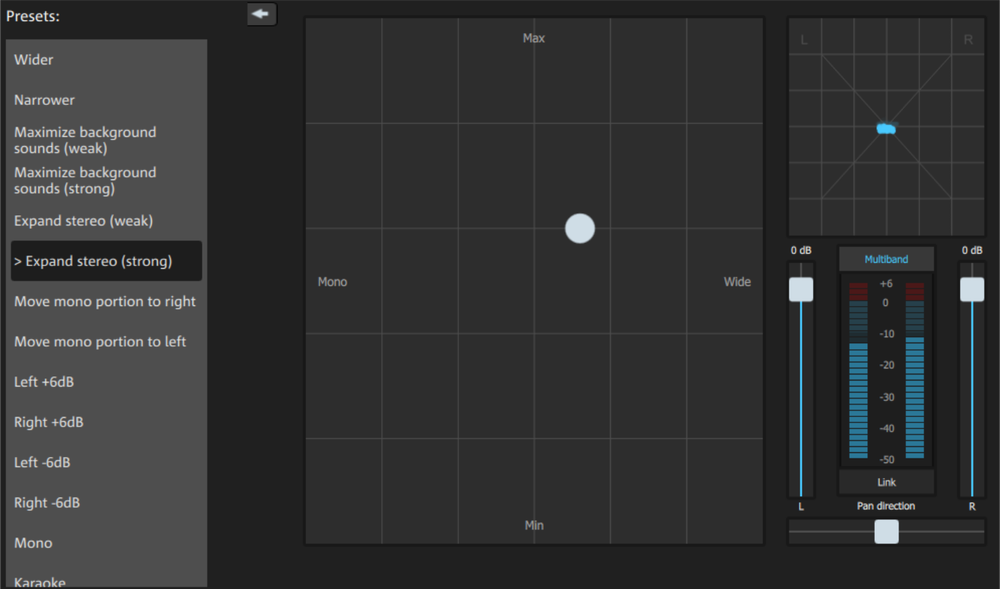
Volume controller: Adjusts the volume of every single channel, thereby adjusting the entire panorama. The reduction of left and right levels is displayed under the control buttons.
Pan direction: Use this controller to move the sound source from the middle into stereo panorama. The signals at the outer edges of the sound picture remain unchanged.
Multiband: This can be used to switch Stereo FX to Multiband mode. Stereo editing only applies to the middle frequency, the bass and highs remain unchanged.
Bandwidth/maximize sensor field: Adjusts the base width between mono (extreme left), unchanged base width (normal stereo), and maximum base width (wide, extreme right). Raising the bandwidth (values over 100) diminishes the mono compatibility. This means that recordings edited this way sound hollow when listened to in mono.
Maximize strengthens the spatial component of the recording, which also increases the stereo transparency without influencing the mono compatibility.
Stereo meter (correlation gauge): This provides a graphical display of the phasing of the audio signal. You can use it to check the alignment of the signal in the stereo panorama and the effect of the stereo enhancer. To maintain mono-compatibility, the "cloud" shown should always be higher than it is wide.
Limiter

The limiter prevents clipping by automatically lowering the level if it is too high. Quiet parts remain unaffected. In contrast to the compressor it tries to leave the basic sound as unaffected as possible.