Burning

Click here to switch to the "Burn" interface.
The Burn area enables you to create a selection menu to burn the entire project including all movies and the selection menu to disc later on.
All movies loaded into the project will be included. If you want to remove some of the films you've loaded, switch to the "Edit" screen again and delete the unwanted movies from the project there. To do this, switch to the movie, open the "File" menu and select Manage project > Remove movie from project.
Note
NOTE When you try to burn your first Blu-ray Disc a notice will appear to inform you that a free audio expansion package must first be downloaded and installed. Click on OK to proceed and wait until the audio encoder for Blu-ray Discs is installed.
NOTE If the current project contains data in the BDMV/MVC (Stereo 3D) format, the burn process cannot proceed. Due to licensing stipulations of the Blu-ray Disc Association, files in BDMV/MVC (Stereo 3D) format cannot be burned to blank optical media.
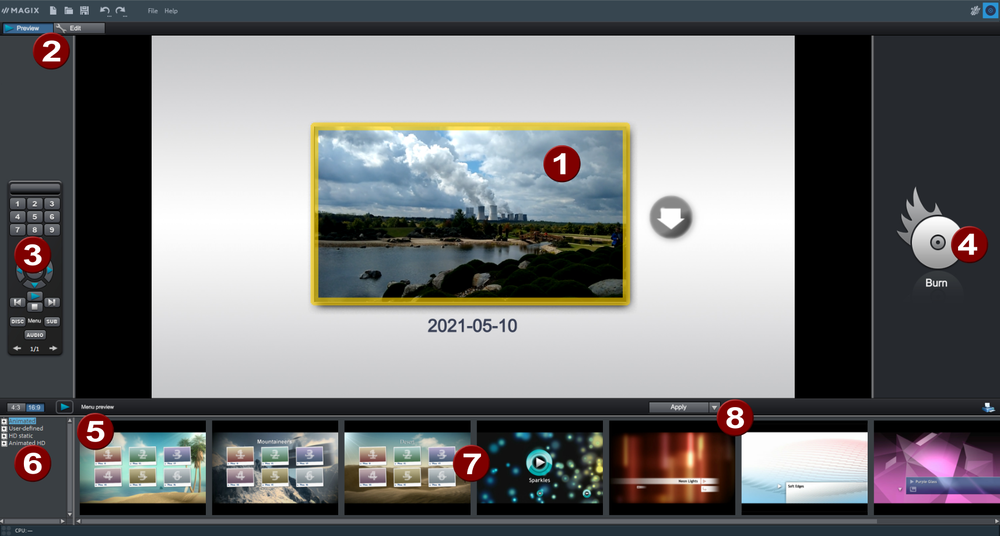
Overview
|
1 |
Menu preview: Here you can see a selection menu preview. |
|
2 |
Change view:Here you can swap between the preview and edit view. |
|
3 |
Remote control: Check how your disc will react later when you press a button on your player's remote control. |
|
4 |
Output:Before burning the project, select the desired format. The Burning wizard will open. |
|
5 |
Play preview: Play the preview menu and test how it works with the remote control. |
|
6 |
Template category: Select the desired section from various categories with different menus. |
|
7 |
Menu templates: Switch between different templates for designing your menus. |
|
8 |
Apply templates: Choose whether you want to use a template for the page, the menu or all menus on the disc. |
Preview
Video Pro X provides two different modes for designing and previewing the disc menu.
Preview mode simulates the behavior of a playback device, e.g. DVD player or Blu-ray player. You can select a template for the menu and burn the disc.
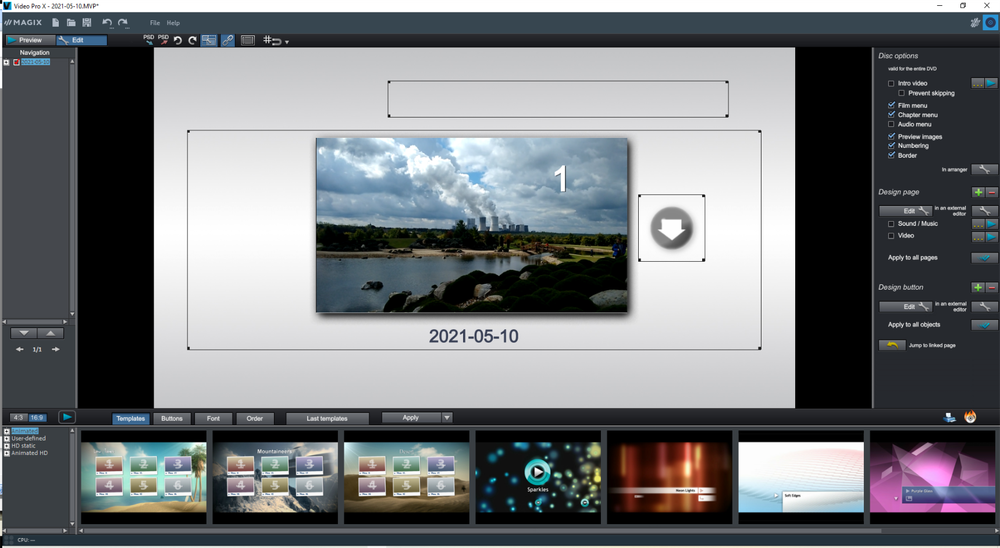
In Editing mode, you may adjust many features of the disc menu. You can choose from a range of templates and customize them to suit your needs.
Remote control
The virtual remote control is an important helper when it comes to checking how the disc will perform later. When the disc featuring the project is inserted into the player, this remote control will control the preview picture just like a "real" remote control controls the picture on a monitor or TV. The menu navigation may be activated via the arrow keys or the "OK" button. Activated buttons are highlighted.
The number keys select the corresponding entry on the menu page. All menu entries are marked with a corresponding number. Within a chapter menu, playback is started from the particular chapter. In the movie menu, the corresponding chapter menu (if available) is changed or movie playback is started.
Navigation buttons: These buttons can be used to navigate through the menu of the disc to be burned. The entries can be changed and confirmed by clicking "OK". The remote control works just like the remote control for your home DVD/Blu-ray player.
Skip/move forward/back: This allows you to skip to the next or previous scene while playing back your movie. In the menu, you can skip forward or back from one menu page to another.
Play: Starts the first entry in the menu. In case chapter menus are available, the chapter menu will be displayed first. Pressing the play button again starts playback with the first scene of the movie.
Stop: Pressing stop halts playback.
Disc: Switches to the first page of the film menu.
Sub: Switches to the chapter menu (if available) for the currently selected film.
Menu
The menu is also burned to disc and appears when inserted into the player. Just like with a store-bought DVD or Blu-ray Disc, you may easily select your movies with the help of preview pictures, or access particular chapters within a movie.
Templates
You will find the menu templates below.
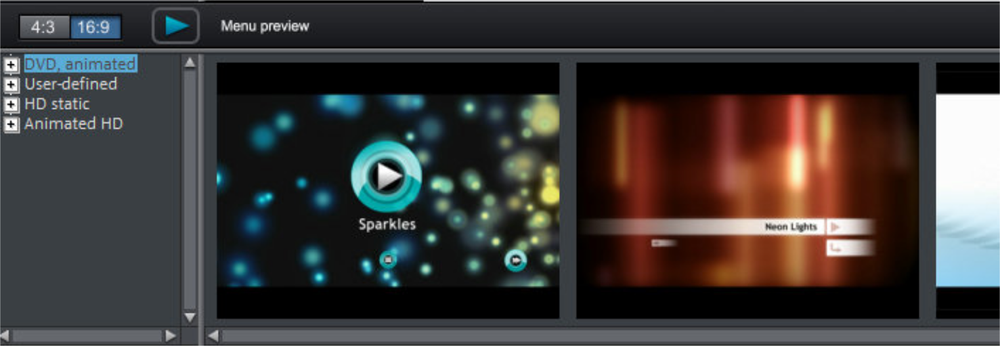
To the left you will see a tree structure for selecting various menu templates. At the top, you should first select whether you would like to use templates in ratio "16"9" or "4:3".
-
Animated (DVD): These templates contain background and introductory videos as well as music. The control elements are displayed in various modes. The templates can be used only for mini DVDs, DVDs and AVCHD discs.
-
Static (4:3 only, DVD): Here you will find templates made up of regular background pictures and control elements.
-
Custom: These templates adjust to your disc project; the movies and scenes you use are integrated directly into the menu.
-
HD static (16:9 only, DVD, Blu-ray, AVCHD, WMV HD): These templates contain super-sharp, high-res background images that are particularly noticeable on HD TV devices.
-
Movie templates (only 16:9): Here you will find menu templates that are specially made for movie templates found in the Media Pool.
NOTE These menus require "Film menu" and "Chapter menu" to be activated in the "Edit" screen under "Disc options".
If you've selected one of the menu templates, you can use the horizontal scroll bar to view all the others available. There are lots of options when using the templates:
-
To apply a template to all menu pages, double-click the template. The complete template will then be applied.
-
You can also combine various elements from different templates with each other. To do so, you must first switch into Editing mode. If, for example, you wish to combine the text format of a template with the background of another one, double-click on the template containing the background first. Then click on the "Font" tab and select a template for the font.
-
You can load the layout (or individual layout elements) for the current menu (movie or scenes) as well as for all menus.
Edit view
To edit individual menu elements and the menu structure, activate the "Edit" button.
Hold down the left mouse button and drag text boxes or graphical elements to the desired position. You can adjust the size by dragging out the corners and edges of the frame.

|
Undo: This command allows you to undo the last changes made. |

|
Redo: This function undoes the previous "Undo" function. |

|
Set aspect ratio: To avoid distortion, use this button to set the aspect ratio for the menu elements. |

|
Group: Menu elements are moved or resized simultaneously as a group, including the description text and number. |

|
Fade in TV display area in the program monitor: This option displays the image borders of the television as lines in the program monitor. |

|
Grid: This button activates a grid to help position frames exactly next to each other as required. Using the small arrow next to the button you can open a dialog to fine tune the grid settings. |

|
Import PSD: Use this option to import a personal menu template in the PSD format (e.g. from Photoshop, etc.) |

|
Export PSD: Use this option to export the menu as a PSD file (e.g. Photoshop, etc.) |
NOTE These options make it easy to customize menus quickly to suit your needs. Simply export the menu, edit it in a graphics program, save it, and import the same file again.
Navigation
Using the navigation links above you can reach the menu structure.
-
All movies are listed as first entries. The corresponding menu level is the film menu.
-
All scenes are listed as second entries next to it to the right The corresponding menu level is the chapter menu.
Removing the red check deactivates the corresponding entry in the chapter menu. The scenes are still displayed of course, but you can no longer select them directly from the menu.
-
You can open the movie menu for further editing by clicking on the movie above it.
-
If you click on one of the chapters, the chapter menu in the preview will be opened for editing.
Disc options
Here you can activate or deactivate certain elements or even complete menus.
NOTE To create a variety of templates, not every template contains all the elements that may be turned off.
Intro video: Press this button to load videos to be used as introductions to your discs. The following formats are supported: "*.avi", "*.mpg", "*.mxv", "*.vob". The intro is played immediately after the DVD has been inserted into the player. The DVD menu will then appear. A check mark "Do not skip" ensures that the intro video must be played completely each time the disc is inserted and that it may not be skipped with the remote control or otherwise.
The disc menu essentially consists of two layers:
Film menu: The upper layer includes the film menu, which is only used if a project contains multiple movies.
Chapter menu: This is the lower layer of the disc menu, which utilizes the chapter markers in a movie as menu entries. More information about this is available in Chapter markers.
NOTE Note: A chapter menu cannot contain more than 99 entries. If your movie should have more chapters, either burn it without a chapter menu or split your movie into multiple parts.
Audio menu: If your project features multiple DVD audio tracks, then a menu will be added to the disc for the user to select an audio track. This allows you, for example, to burn audio tracks in both English and German onto the disc and later select one of the tracks for playback.
NOTE Audio tracks can be defined in the editing interface. Open the context menu of a track header of the audio track and select "DVD audio track". Choose a unique name for the audio track. Repeat this process with every other audio track that you would like to have as a DVD audio track.
Preview pictures: Shows/hides the preview pictures in the disc menu.
Numbering: The numbers beside the menu entries can be selected directly using the remote control. Use this option to fade them in and out.
Frame: A frame borders the preview pictures. If you don't want a frame, it can be easily removed using this option.
You can edit the existing menu background or create a new one from scratch.
A click on this button switches to the "Edit" interface and loads the selected menu background as video.
Here you can change and design the background as you please. The background movie will be set as the menu background automatically after pressing "Save".
TIP If you'd like to design a new menu background, simply delete all existing objects from the menu project and load new ones.
Designing a page
Edit: You have three options to edit the background of a menu page. You can either set a certain "color value" for the background or select an image file from your hard drive. You may also select a certain frame from a video in your project.
In external editor: A PSD file is sent directly to the program that has been selected in the program settings as the menu editor.
New menu pages may also be added or unnecessary pages may be removed.
Adds a new menu page.
Removes the selected menu page.
Animated selection menus
You can also add audiovisual animations to the disc menus. As required, background videos are played as endless loops while the menu is shown on the screen. You can also set up background music in various formats or any background picture for each menu.
Sound/music: Load an audio file and use it as an animation in the menu background.
Video: Load a video or graphics file and use it as an animation in the menu background. In addition to the options for the background graphic (see above), you can also use a sequence from a loaded slideshow or from a different video file.
Background video options:
-
Create animated menu buttons: The preview images for individual movies in the movie menu are shown as small movie samples. Set the start point and length of the animation using the sequence options faders.
-
Use the audio track of the video: The audio track of the background video is used with the menu.
-
Play menu animation as a loop: The background video (audio and/or video) is played back as a loop.
-
Length of the menu view is set by: Audio/video or whichever medium is longer. You can specify how long the background video should be here. The other medium will be played as a loop.
Designing buttons
Video Pro X enables easy editing of all buttons together with their menu entries.
Pressing this button or double-clicking the menu entries allows menu entries you have created to be edited. The dialog with the properties of the menu entries will open.
 Über diese Schaltflächen können Sie ein externes Programm zum weiteren Bearbeiten des ausgewählten Menüelements öffnen.
Apply to all objects: Applies the properties of the selected button to all remaining buttons.
New menu entries may also be added or undesired entries may be removed.
Adds a new menu entry.
Removes the selected menu entry.
TIP If you would simply like to deactivate unused menu entries, this may be done via the Navigation.
Jump to linked page: To test the targets of menu entries, select the desired menu entry and click the button.
Menu entry properties
Double-clicking the preview picture or a menu entry opens an editor for you to adjust the preview picture or menu entry.
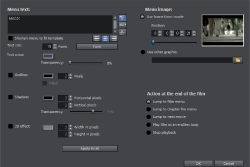
Menu text
In the text input field, you can enter any text to match the chosen menu entry.
Set the vertical direction of the text (upwards, centered or downward).
Set the horizontal direction of the text (left, centered or right).
Font size: Set the height of the text in points.
Font color: Define the foreground color of the text.
Font: Here you can set which font and which style (bold, italic, etc.) should be used.
Border: Here you can set a colored border for your text. You can choose the color from the color field. The size of the border is set in pixels.
Shadow: Here you can set the color and size of the shadow that will appear underneath the text.
3D effect: If you would like to make your text appear three-dimensional, you can set the width, height and color of the 3D effect.
Apply to all: Except for the text, all settings are applied to all entries in the current menu.
Menu image
Use frame from movie: Use the fader to set which frame should be used in the video as a preview picture. The numerical input fields are sorted as follows: Hours:Minutes:Seconds:Frames.
Use different graphic: Here you can also load your own bitmaps to be used as menu pictures.
NOTE Some menu templates may not provide menu images. That means changing the menu image won't have any noticeable effect.
Action at the end of the film
Here, you can enter which action should be carried out once the film has finished playing. The following options are available:
-
Stop playback: This option depends on the DVD player being used. Most DVD players show the DVD player's own menu (or background picture) after playback.
-
Jump to movie menu/chapter menu: Jumps back to the previously shown menu.
TIP If one of these two options is not available, check which menu mode is set.
-
Jump to next movie: The next movie will be played without any additional action.
-
Play movie as endless loop: Any movie may be burned onto a disc as a loop. This means that the movie will be played as a endless loop until the next menu entry is accessed using the remote control or playback is stopped. This way, you can transform your TV into an aquarium, a train journey, a fireplace, or anything you want, ready to watch over and over again.
NOTE This option works only with DVDs, mini DVDs, and Blu-ray Discs.
Edit your own menu entries
There is another view in this dialog to edit menu entries you have created. Menu links can be edited here. This makes it possible to link a menu entry with a certain action, menu page, or a certain position in the movie.
No link: The menu item cannot be selected and has no other function than showing the menu text.
Link to page in current menu: Jumps to a menu page in the current movie or chapter menu in the current film.
Link to another menu: Opens another movie or chapter menu.
Link to chapter in a movie: If this option is selected, enter the movie and chapter marker where playback should start.
NOTE For DVDs, only chapters within the current movie may be jumped to.
Link to movie start: The selected movie is played from the beginning.
Burning wizard
Click "Burn" to open the dialog for creating DVDs, Blu-ray Discs, AVCHD and other video media including a menu.

Select what kind of disc you would like to create.
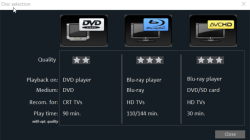
NOTE If you intend to watch your movie project on an HD TV, but there is only a DVD player connected, you will need to burn a DVD.
Burn dialog for DVD player
Here you can select your burner, the type of disc, the encoder settings. MPEG-2 is used for DVDs. Blu-ray Discs also use MPEG-2, and higher bit rates are employed in order to reach the higher HD resolutions. AVCHD discs use a much more complex MPEG-4/H.264 codec, which is documented in detail in the "MPEG-4 encoder settings section of the PDF manual and in Help (F1 key).
Proceed as follows to burn a disc:
-
Set up burner and burn speed: If you have multiple burners installed, you can select which device you wish to use in this menu.
-
Encoder settings: Use the "Encoder settings" button to access the selection dialog to specify settings for the MPEG encoder (memory requirements, quality, and duration of the MPEG conversion). "Advanced settings" accesses a dialog featuring additional options. Here you can adjust all the fine settings of the MPEG encoder.
-
Burning disc/starting video encoding: The button "Burn disc" starts the disc burning process. Every time you burn and every time a simulation is carried out, the disc project is encoded. Please note that the MPEG file is not deleted from the hard disk after the burn process has finished. Depending on the length of the project, encoding and burning may take some time. The time remaining can be seen in the dialog.
The simplest way to create an ISO image is to select "Image Recorder" under "Burner". When starting the "Burning process", you have to specify a name for the image file you wish to create.
Options
Simulate first: If you are not sure about the write speed or memory requirements of the selected disc, you can simulate the write process before burning.
Activate buffer underrun protection: Many disc drives support technology that prevents the dreaded "buffer underrun". Use this option to activate this protective feature and burn your files at higher speeds without risking making a coaster out of your blank disc.
Completely format DVD/CD-RW media: This option reformats the RW media and deletes all existing file material.
Shutdown computer after burning: Activate this option to automatically turn off the computer after encoding and burning has been completed. You could, for instance, start the encoding and burning process in the evening, and then you don't have to wait for the process to finish to switch off your computer.
Burn standard video DVD onto same disc: You can use this option with a WMV HD disc to burn an additional normal DVD video. This ensures that your discs can also be played back on standalone DVD players. See Multi disc.
Activate the burner's defect management option: If a certain section of the disc is defective, this will be recognized by the burner and labeled. No content will be saved there as a result.
Check data after burning disc: The finished disc will be checked for any mistakes after burning.
CD/DVD title: This is the title of the DVD which is displayed as the disc name on the PC. The disc project name is displayed here by default.
Memory
| Disc type | Storage medium | Menu | Quality | Length (optimal quality) |
|---|---|---|---|---|
| DVD | DVD | Yes | *** | 98 minutes |
| Blu-ray Disc | Blu-ray Disc | Yes | ***** | 110 minutes |
| AVCHD | DVD/Blu-ray Disc | Yes | ***** |
30 min./DVD 160 min./Blu-ray Disc |
NOTE You can set display duration for some DVD players in this menu. The amount of image material that can be put onto a CD or DVD depends on the sizes of the files.
Especially with the MPEG 2 encoder, is difficult to get reliable information about the storage space needed. If the “variable bit rate” of the MPEG-2 encoder is activated, encoding will occur according to the movements in the picture. The required memory depends on the film material; an action film would need more memory than a drama, for instance.
The Video Pro X burn dialog contains a capacity indicator, which estimates directly how much space remains on the selected disc type with current settings. As soon as you change encoder settings, the capacity display will be updated.
TIP The capacity display is only an estimate. For this reason, always make sure that you never completely fill the disc space. Instead, leave a buffer in case the files end up being larger than estimated.
If you can't save your disc project on a single blank CD, you will have to divide it up into various parts.
Separate project onto multiple discs
Automatic: If the disc project requires more memory than is available on the disc, a dialog will appear before burning asking whether the disc project should be automatically segmented for multiple discs. Confirm this by clicking “Yes”. The disc project will then be automatically divided into individual disc projects and burned sequentially onto multiple discs. This is the easiest method as everything is automatic and all you have to do is insert a new blank CD when required.
Manual:
Case 1: If several movies do not fit on a single disc:
In this case, switch back to the “Edit” interface and delete as many movies as necessary until the remaining movies fit onto the disc. You can create a new disc project and load and burn the other movies afterwards.
Case 2: If a long movie doesn't fit on a disc:
In this case, the movie has to be split into two or more parts that will be burned separately to disc.
-
Switch back to the "Edit" view and place the playback marker to the position where you want to divide the movie. In the "Edit" menu, select "Cut > Split movie".
-
All passages behind the playback marker will be removed from the overly long movie and made into a separate movie. Both movies can be controlled in the movie tab in the project window. Save both of them separately to your hard disk (“File > Manage project > Export movie file” menu option, for example, as “Part 1” and “Part 2”).
-
Remove one of the two movies (for example, "Part 2") from the disc project ("File" > "Manage project" > "Remove movie from project" menu option).
-
Switch to the "Burn" interface and burn the first film ("Part 1") to CD or DVD.
-
Create a new disc project (“New” button), switch to the “Edit” view and load it into the second film (“Part 2”).
-
Switch to the "Burn" interface and burn the second movie to ("Part 2") CD or DVD.
Encoder settings
Use the “Encoder settings...” button to access the selection dialog to specify the properties of the MPEG encoder (memory requirements, quality, and duration of the MPEG conversion).
Preset: This features useful presets for the selected disc type. Here are several sample DVD presets:
| Long play DVD video | DVD with extra-long playing time. The bit rate is reduced, which compromises image quality. |
| Long play music DVD | DVD with extra-long playing time for music. The bit rate for the soundtrack remains at the highest quality level. |
| Standard DVD | Normal DVD |
| Widescreen DVD | Normal DVD in 16:9 widescreen format |
NOTE For all settings, you can choose NTSC (USA and Japan) or PAL (Europe).
Bit rate: The bit rate determines the memory requirement of the completed video. The greater the bit rate, the larger the file, and the shorter the maximum playing time of the movie that fits on a disc.
Adjust bit rate: The expected file size of the finished video is estimated, depending on the set bit rate. If the movie does not fit onto the disc, the bit rate is corrected accordingly.
Quality: Specifies the quality of the encoding process. The higher the quality, the better the finished video will look; however, encoding will take considerably longer.
Smart rendering: Smart rendering considerably reduces encoding processing strain for MPEG files. During the production of MPEG files, only those parts of the movie that were changed in the program are re-encoded. Please note: The MPEG files contained in the movie must have the same format, i.e. the bit rates (variable or constant), audio formats, image resolutions and video formats must match.
Anti-interlace filter: This option should only be activated for playback on a TV screen, since it is intended to reduce line flickering.
Calculate effects on your GPU: To accelerate the export, video effects can be calculated on the graphics card. Effects for brightness, gamma, contrast, color, saturation, image size, cropping and position effects as well as various fades and mixes can currently be calculated. Please note that if using external effect plug-ins and elaborate artistic effects, these must be processed on the CPU and for this reason, using the function will not yield any advantage in terms of speed.
NOTE This function is optimized specifically for NVIDIA graphics cards. You can, however, experience acceleration with other types of graphics cards, too.
3D mode: In case your project features 3D material that has been edited with Stereo 3D, a mode may be selected here for burning the material to disc. 3D is switched off by default.
To return to the standard settings, press the Reset button.
The "Advanced" button opens the "Advanced settings" dialog. Here you can adjust all the fine settings of the MPEG encoder. Read more about the "MPEG-1/2 encoder settings" and "MPEG-4 encoder settings".
Create label and CD cover
Video Pro X contains an easy-to-use printing tool.

Here, you can design and print track listings, CD covers, CD booklets, and circular CD labels. For additional information, open the internal program help via F1.
