Effects
Video Pro X offer a huge palette of diverse video effects. The video effects used most frequently can be found directly in the Media Pool, while others can be accessed in the context menu for an object or in the Effects menu.
Apply effects to objects
There are various methods for applying effects.
-
Video and audio effect templates are loaded into the corresponding object from the Media Pool using drag and drop.
-
Effects that can be animated (in Media Pool under "Effects" > "Video effects/movement effects") will be applied directly to the objects selected earlier, as soon as changes are made in Media Pool.
 This button resets all of the current effects settings.
NOTE Note: If you animated the effect using keyframes, resetting will affect the entire animation. Click on a specific keyframe to select it and then delete it by pressing the Del key.
Transfer effects settings
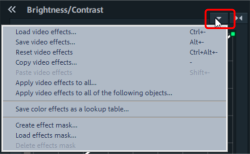
The items video effects, movement effects, and Stereo 3D on all effects pages provide the option to transfer the current effects settings to other objects or to load previously saved settings. Use the above right arrow button to open the video effects menu.

Save/load video effects: The current effects settings may be saved for use later in other projects or previously saved settings may be loaded. A dialog allows the effects to be selected.
Reset video effects: Resets the effects settings for the selected object.
Copy/paste video effects: Copies (likewise pastes) the current settings to a new object. Use the dialog to select which settings should be copied.
Apply video effects to all: Copies the current effects settings to all objects in the project. Use the dialog to specify which settings should be copied.
Apply video effects to all following objects: Copies the current effects settings to all of the following objects in the project. Use the dialog to specify which settings should be copied.
Load effects mask (additional in the Plus version): An effects mask may be loaded for a selected object.
Comparison image in the source monitor
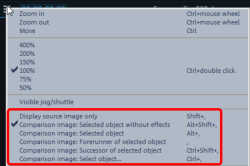
When editing effects in video and image objects, Video Pro X offers a comparison mode which lets you compare the before and after state directly.

Selected object without effects: Outside of effects pages, the object is displayed completely without effects; inside effects pages, the object is displayed without effects from the current effects page. The "Color" effects page remains open and all of the effects except "Color" are applied. This options synchronizes the playback marker between the program and the source monitor.
Selected object: The selected object is displayed with all of the applied effects. The playback marker may be moved through the project, for example to compare the beginning with the end of an edited object. This option synchronizes the playback marker between the program and source monitor.
Before selected object: Displays the object before the selected object in the same track. This enables edited effects on sequential objects to be compared more easily.
Following the selected object: The object located on the same track after the selected object is displayed for comparison in the source monitor. This enables edited effects on sequential objects to be compared more easily.
Select object...: Clicking selects the desired object. An object may therefore be edited and then used as a reference for the following effects processes, for example.
Remove comparison image: The comparison image is removed from the source monitor.
NOTE The option "Comparison image in source monitor for editing effects in the Media Pool" can be activated in the program settings. If this option is activated, the "Selected objects without effects" comparison mode will be automatically activated when switching into the Media Pool effects, and will be automatically deactivated when the mode is exited. This serves to compare the original and edited image. This automation will be suppressed if the option is deactivated.
Customized templates in the Media Pool
Your custom effects configurations in the Media Pool can be saved and used again later. You can access your custom configurations in the Media Pool effect dialogs by clicking on the arrow. This folder will be empty at first because you still have to create your own configurations.