Single frame
Single frame recording may be used to record snapshots from the connected video source. This requires a DirectShow compatible video recording or TV card or a corresponding USB device (e.g. a webcam).
The time control function allows you to automatically take snapshots. Here are just a few examples of where it might used:
-
Create photo stories from videos
-
for animation films (stop-motion recording),
-
for video surveillance,
-
or in time-lapse photography.
The recorded images are added to the opened project.
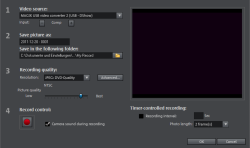
Video source: You may set the video card used to take pictures here.
Save image as: Enter the title of the snapshot to be recorded here. Snapshots are saved under this name and numbered consecutively. You can also select the file path for storage.
Recording quality: Set the resolution for the recording here. This corresponds with the resolution options offered on the camera. Use the slider to set the image quality. Using higher resolutions results in larger file sizes for each recording. Simply press "Reset" to return to the preset image quality.
Advanced...: Opens the video driver settings dialog.
Camera noise during recording: This causes the program to play a clicking sound each time a snapshot is taken for monitoring purposes.
Recording controls: The red record button triggers a snapshot or alternatively a series of recordings when using the time control function.
Time Control
Recording interval: When active, starting recording produces a sequence of images. Snapshots are saved according to the selected time interval and numbered sequentially. For example, if snapshots are taken every two seconds and then inserted every five frames into the slideshow, then a ten-times time lapse recording will result.
Photo Length in Frames: Specifies how long the photos appear in the slideshow.
Advanced settings in the single-frame recording dialog
Here you can adjust certain settings for the video recording driver. These dialog boxes, so-called "Property Sheets", come with the video card drivers. The driver-specific features may slightly vary from driver to driver. The MAGIX team has little direct influence on the performance of the various drivers. If you encounter any difficulties, please also contact the video card manufacturer for the latest driver updates.
Input: Sets the crossbar of the video card. This lets you define which video and audio input signal is used in the recording. The crossbars are connected in series to the video recording chip itself, in the output field, the video output (for the crossbars) is the input for the recording chip (Video or Audio Decoder In) of the video card. In the "Input" field, select the signal source that will be used by the video card to capture for this input.
-
Composite in = the regular video input (i.e. RCA jack)
-
SVHS-in = SVHS input (special cable)
-
Tuner In = the TV signal of the built-in tuner
Video Decoder: If the picture only appears in black & white or it flickers, the video standard may be set to the wrong standard. In mainland Europe, PAL_B is used.
VideoProcAmp: Fine-adjustment of colors, brightness, contrast etc. We recommend against changing any of the manufacturer’s settings.
Format: Do not change anything here! The recording format settings can be changed under Resolution in the Recording dialog box.