Creating and editing titles
Titles can be used for many applications: as a running text (ticker), subtitles, speech and thought bubbles, to display date and time, and much more.
Creating titles using a template
There are a wide range of title templates for fonts, opening and closing credits, captions etc. under Title templates in the Media Pool.
- Open one of these folders and select any title template. Start a preview or add a title to a playback marker location using the quick access feature.
NOTE Templates may be applied to an existing title object. Only the text will remain when the template is applied; all other formatting settings will be replaced by the template settings.
Dynamic titles can also be found in the title templates. This category contains standard text animations, such as flying letters which combine to form words and wave animations which move through the individual letters of words.

Create titles without a template
- Select the object you would like to give a title.
- Place the start marker in the project window at the point where you want the title to be inserted.
- NOTE You can adjust this position later at any time by dragging and dropping the title object.
- Open the title editor:
- When working in Storyboard mode: Click on the T (for title editor) in the object that you would like to give a title to.
- When working in the Timeline mode: Click on the T in the lower toolbar.
- A title object will be created and the "Title" area will open in the Media Pool. Simply enter your text or change the text at a later dater by going to "Title".
Texts can be displayed in all kinds of fonts and colors.
If you want to format individual words or letters, select them with the mouse and choose a different format or color.
Without any selection, the entire text in the object will be formatted.
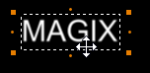
Position titles
- Click on the title in the program monitor to access the positioning frame.
- Simply move the positioning frame using the mouse.
Under the Title object  , you can center the title vertically or horizontally.
Changing size
-
Click on the corners of the positioning frame and drag it to the desired size.
When the Adjust font size to title field function is activated, the text size will be adjusted to fit the size of the positioning frame.
In the Media Pool, switch to Effects → View & animation → Size/position/rotation.
Here, you can make further adjustments to the position and size as well as rotate the title.
Edit titles retroactively
- Double-click on the title in the program monitor or the title object in the project window. Now change the text any way you like.
- You can also go to the Media Pool area "Titles" and enter your text in the input field there.
 Font: Select the font used to display the text.
 Font style: Choose here whether all of the text or parts of it should be shown bold, in italics, or underlined.
 Font size: Set the size of the text here.
 Alignment: Select whether the text should be justified on the left, centered, or on the right within the positioning frame.
Color: Use this button to color the font.
Delete: The whole title object will be deleted.
Other text settings
You can edit titles precisely with different text effects: Font, font size, justification, spacing, etc.
Line spacing: Cannot be applied to only one line. When applied to multiple lines, this alters the spacing between the lines. Line spacing always applies to the entire line.
Tracking: This controls the spacing between characters. Negative values move the characters closer together, positive values move them apart.
Transparency: Controls foreground transparency levels.
Soften: Makes the edge of the shadow harder or softer.
Width: Enter the width of the frame in points.
Filled in: The text will be filled with the color selected in the Title Editor. If the option is deactivated, only the frame will be visible, and the background will appear instead of the color fill.
Outline: A border appears around the letters in the text.
Shadow: The position of the shadow may be set on the horizontal and vertical axes.
3D: The text appears with a 3D-style outline. The width and thickness of the 3D contour (height) can be set in points.
Color: Clicking on this button opens a color selection dialog, where you can set the frame color.
Animation: Make your credits scroll down the screen or select one of the many other text movements from the menu. You can also set the display duration for the title here.
Automatic text break: When activated a break will be inserted automatically after each line.
IMPORTANT The result will be seen once you have confirmed the entered text by ticking next to the selection box or by pressing the Enter key.
Adjust font size to title field: The text size will be adjusted to fit the size of the positioning frame.
Only apply visible TV area: The text will be zoomed so that it will always be within the TV's screen area, which is specified in the Movie effect settings.