The Automation Controller/Timeline
The automation controller/timeline is displayed at the bottom of the Video Media Generators dialog and is used to add and remove keyframes and control the parameters for animated titles.
Automate a parameter
You can use keyframes to automate text block and character properties to create dynamic effects and animate text.
-
Navigate to the parameter you want to automate in the Properties pane.
-
Select the Toggle Automation button
 .
. -
Click in the timeline to position the cursor where you want to create a keyframe.
-
Adjust the control to create a keyframe at the cursor position.
-
Create and edit keyframes as needed.
Add a keyframe
In the automation controller/timeline, double-click the position where you want to add a keyframe.
The new keyframe’s attributes are copied from the previous keyframe to allow you to make subtle changes without recreating all your settings.
To keep the automation controller/timeline from becoming cluttered, you can expand and collapse keyframe rows using the buttons on the left side of the window:
|
|
Click to expand a keyframe row. |
|
|
Click to collapse an expanded keyframe row. |
|
|
Click to maximize a keyframe row for detailed editing. |
|
|
Click to minimize a keyframe row. |
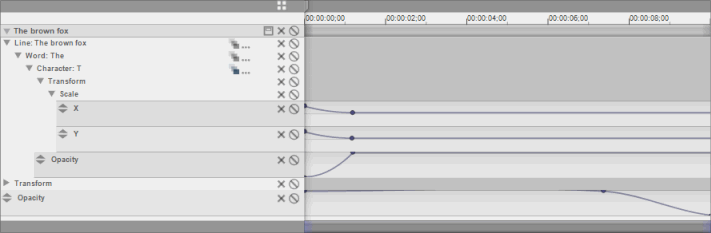
Cascade keyframes
When you animate a character, word, or line of text, you can choose to cascade your keyframe settings to sibling items to simplify creating complex animation.
For example, if you wanted to display a title that appears to drop in from above the screen, you could keyframe the Y offset control to animate the first word, and then select the Toggle Cascade button ![]() to repeat that animation across the rest of the words in the line.
to repeat that animation across the rest of the words in the line.
Click the Cascade Properties button ![]() to display the Cascade Settings dialog, where you can adjust the duration of the cascade, the cascade range (whether you want to cascade keyframes to subsequent lines in a text block, words in a line, or words in a
to display the Cascade Settings dialog, where you can adjust the duration of the cascade, the cascade range (whether you want to cascade keyframes to subsequent lines in a text block, words in a line, or words in a
For an example of how you can use cascading, click here.
Remove a keyframe
To remove a keyframe from an envelope, right-click it and choose Delete from the shortcut menu.
Bypass a keyframe
To bypass a keyframe row, click the ![]() button in the keyframe row. The automation settings are ignored, but the envelope and keyframes are preserved.
button in the keyframe row. The automation settings are ignored, but the envelope and keyframes are preserved.
To remove a row of keyframes, click the ![]() button in the keyframe row. The keyframes and envelope are deleted.
button in the keyframe row. The keyframes and envelope are deleted.
Change the curve between keyframes
To change the curve between keyframes, right-click an envelope point and choose a setting from the shortcut menu:
|
Setting |
Description |
Looks Like |
|
Auto |
Allows the ProType Titler to choose the best curve for the envelope line. |
|
|
Manual |
Displays a handle that you can drag to adjust the tension on the envelope line. |
|
|
Split Manual |
Displays a handle that you can drag to adjust the tension on each side of the envelope line. |
|
|
Linear |
Parameters are interpolated in a linear path. |
|
|
Fast |
Parameters are interpolated in a fast logarithmic path. |
|
|
Slow |
Parameters are interpolated in a slow logarithmic path. |
|
|
Smooth |
Parameters are interpolated along a smooth, natural curve. |
|

Apply a preset curve
You can use the Add Curve shortcut menu to add a curve quickly without creating envelope points manually.
-
Automate a parameter.
-
Click in the timeline to position the cursor where you want the curve to begin.
-
Right-click and choose Add Curve from the shortcut menu. You can click a preset name to see an animated example of the curve at the bottom of the menu.
-
Double-click a preset name to add it to the timeline.
-
Click to position the end of the curve. An event is placed on the timeline:
-
If you want to change the curve's settings, click the button at the right edge of the event

-
If you want to delete a curve, right-click the event and choose Delete from the shortcut menu.
-
If you want to save a curve to the Curves menu, right-click the event and choose Save as Custom Curve from the shortcut menu.
Edit a curve
If you want to save a curve to the Curves menu, right-click the event and choose Properties from the shortcut menu, or click the button on the event:
![]()
Move keyframes
After you've set your keyframes/envelope points, you may need to adjust their positions along the timeline. Drag a keyframe to a new position to move it.
Hold Ctrl while clicking to select multiple keyframes.
Press and hold Shift before dragging to move an envelope point vertically without changing its horizontal position.
Press and hold Alt before dragging to move an envelope point horizontally without changing its vertical position.
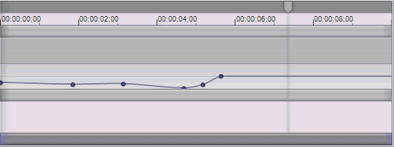
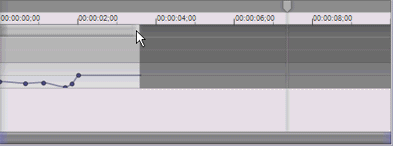
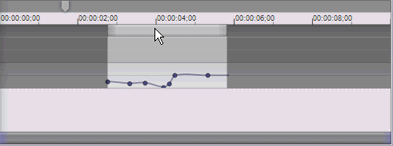
Expand or compress keyframes
If you want to change when animation occurs for a text block or expand/collapse keyframes, you can adjust the text block's event in the automation controller/timeline.
|
|
The original set of keyframes. |
|
|
After dragging in the right edge of the event, the keyframes are compressed together. |
|
|
If you drag the middle of the event, you can change when the keyframes occur in the text block. |
Save a title as a collection
If you create a title you'd like to use again including text and keyframes you can save them to a collection.
Click the Save to Collection button ![]() to save a keyframe row as a preset. The Collection menu is displayed with an edit box so you can type a name for the collection.
to save a keyframe row as a preset. The Collection menu is displayed with an edit box so you can type a name for the collection.
To recall a preset, click the Apply Favorite button ![]() and double-click a preset to add it to the timeline in the automation controller/timeline.
and double-click a preset to add it to the timeline in the automation controller/timeline.
TIP If you want to transfer your collections to another computer or share them with another user, you can copy the XML files from your C:\Users\<username>\AppData\Roaming\Vegas\Titler 1.0\Collection folder and save them to the same folder on the target computer.