Pan/Crop Animations with Keyframes
Pan/Crop animations in VEGAS Pro are based on keyframes. These keyframes store changes to cropping, zoom, rotation, or position over time. You can manually set keyframes or use presets to apply pre-defined animation curves.
- Create smooth zoom-in effects on a still image
- Apply panning across a wide shot to follow action
- Store common framing positions as reusable presets
Panning a video event
Use panning to move the visible area of a video event across the frame. This is useful for still images, widescreen shots, or Pan-and-Scan techniques. The following steps show how to set up and animate panning using the Pan/Crop tool.
- Select a video event on the timeline and open the Pan/Crop window by clicking the Pan/Crop button in the event header – or choose Video > Video Event Pan/Crop from the Tools menu.
- Adjust the size of the selection box by dragging the handles or entering values in the Position section.
- Enable Lock Aspect Ratio to constrain proportions, or Size About Center to scale symmetrically.
- Move the selection box to the desired start position by dragging it or typing coordinates for X Center and Y Center.
- Enable one of the movement modes in the toolbar:
- Move Freely: move on both axes
- Move in X Only: restrict movement to horizontal
- Move in Y Only: restrict movement to vertical
- To animate the motion, add a new keyframe later on the timeline and adjust the position again. VEGAS will interpolate the movement path between keyframes.
- Use the Smoothness slider in the Keyframe interpolation section to adjust the curve of the motion.
This method is commonly used in Pan-and-Scan workflows to convert widescreen content for standard formats. It helps to follow the subject and maintain visual balance.
Editing keyframe interpolation
If you have two or more keyframes, VEGAS interpolates the motion between them. You can change the behavior of that interpolation using the Smoothness setting in the Keyframe interpolation section.
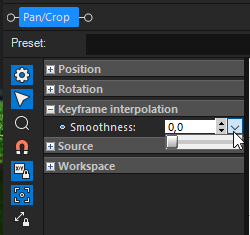
FIGURE Smoothness slider in the Pan/Crop plug-in
| Setting | Description |
|---|---|
| Smoothness = 0 | Linear motion without acceleration (constant speed). |
| Smoothness > 0 | Creates a smooth, curved path between keyframes with ease-in/ease-out behavior. |
Adjusting the smoothness controls how the video moves between keyframes, but not the actual keyframe positions.
Change the interpolation type of a keyframe
- Right-click a keyframe in the timeline at the bottom of the Pan/Crop window.
- From the context menu, choose an interpolation type such as Linear, Fast, Slow, Smooth, Sharp, or Hold.
Interpolation types affect how motion progresses over time between keyframes. For example, Slow eases into the keyframe, while Hold freezes the state until the next keyframe.
Saving and recalling keyframe presets
VEGAS allows you to save and reuse keyframe animations as presets. This helps you maintain consistency across multiple events or projects.
- Create one or more keyframes in the timeline of the Pan/Crop window.
- Type a name into the Preset field.
- Click the Save Preset button to store the animation.

FIGURE Preset field and save button in the Pan/Crop plug-in
To recall or delete a preset
- Select a keyframe row (Position or Mask) in the Pan/Crop window.
- Choose a saved preset from the Preset drop-down list.
- To delete the current preset, click the Delete Preset button.
Presets are saved per keyframe row. For example, Position and Mask presets are stored independently.
Further information
Last modified on December 08, 2025