Adjusting envelopes
When the Normal Edit  or Envelope
  , tool is selected, you can add, remove, or adjust envelope points.
NOTE Events cannot be moved or edited when the Envelope tool is selected.
Adjusting an envelope
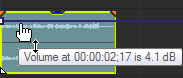
By default, a new envelope will contain a single envelope point. If you want to adjust the overall level of an envelope, drag the envelope up or down. A floating ToolTip will show you the envelope's current setting:
If an envelope has multiple points, you can drag each point, or you can drag envelope segments up or down.
-
If snapping is enabled, envelope points will snap to snap points. Hold Shift to temporarily suspend snapping.
 For more information, see Enable snapping
 -
Hold Ctrl while dragging an envelope point or segment to adjust the value in fine increments without changing the envelope points' timeline positions.
-
Hold Ctrl+Alt while dragging an envelope point or segment to adjust the value in normal increments without changing the envelope points' timeline positions.
-
Hold Alt while dragging an envelope point to move the point's timeline position without changing its value.
-
With the Envelope tool
, you can drag along the timeline to select multiple envelope points in the selected track.
Adjusting envelope points within a time selection
When you drag envelope points within a time selection, all envelope points within the selection are adjusted, and a fade can be applied to the beginning and end of the selection to smooth the transition.
-
Create a time selection.
For more information, see Creating selections and positioning the cursor -
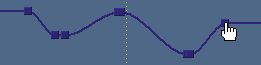
Drag an envelope point or segment within the selection. All envelope points within the selection are adjusted as you drag, and fades are applied to the beginning and end of the selection (additional envelope points are created as necessary):

You can use the Editing page of the Preferences dialog to set the default length and alignment for these fades.
Clear the Time selection envelope fades checkbox on the Editing page of the Preferences dialog if you want to edit envelope points individually.
For more information, see Preferences - Editing Tab
Adding envelope points
To create more complex envelopes, you will need to add points. To add an envelope point, double-click the envelope. A new envelope point will be added which can be dragged and positioned as necessary.
To delete a point, right-click it and choose Delete from the shortcut menu.
Drawing envelope points (envelope brush)
To create an envelope quickly, you can draw freehand envelope curves in the timeline.
-
With the Normal Edit
or Envelope tool active, hover over an envelope. -
Hold Shift, and then click and drag over the envelope. The cursor is displayed as a
 .
.As you drag, a trail of envelope points is created.
-
Release the mouse button when you're finished drawing.
If the Smooth and thin automation data after recording or drawing checkbox is selected on the External Control & Automation tab of the Preferences dialog, the number of envelope points will be reduced when you release the mouse.
For more information, see Preferences - External Control & Automation Tab
Unthinned envelope
Thinned envelope
Thinning envelope points
Thinning envelope points decreases the number of points on an envelope while retaining its overall settings.
Right-click an envelope and choose Thin All Points from the shortcut menu to thin the entire envelope.
To apply thinning to a section of the envelope, create a time selection, right-click the envelope, and then choose Thin Selected Points from the shortcut menu.
NOTE Thinning is intended to reduce the number of envelope points created through automation recording and will have little or no effect if you create envelopes by adding and editing points manually.
Flipping an envelope
You can flip an envelope to invert the envelope around its center. Volume, panning, bus, and assignable effects envelopes can be flipped.
Flipping all points
-
Right-click an envelope or a point. A shortcut menu is displayed.
-
Choose Flip All Points from the shortcut menu.
Flipping selected points
-
Create a time selection with the Normal Edit
or the Envelope tool . -
Right-click an envelope in the time selection. A shortcut menu is displayed.
-
Choose Flip Selected Points from the shortcut menu.
Setting fade properties
You can adjust the fade curve for each envelope segment individually. To change the fade curve, right-click an envelope segment and choose a command from the shortcut menu.
|
Fade Type |
Fade In/Out Envelope |
|---|---|
|
Linear Fade |
|
|
Fast Fade |
|
|
Slow Fade |
|
|
Smooth Fade |
|
|
Sharp Fade |
|
|
Hold |
|


Cutting, copying, and pasting envelope points
-
Select the Envelope tool
. -
Select the envelope points you want to copy:
-
Create a time selection that contains the envelope points you want to copy.
-
Click the envelope you want to copy.
-
From the Edit menu, choose Copy.
-
Select the envelope where you want to paste the envelope points:
-
Click within a track to select it.
-
Insert an audio or video envelope if needed. For more information, see Audio track automation or Video track automation
-
Click to select the envelope where you want to paste the selected points.
-
Click to position the cursor where you want the envelope to start.
-
From the Edit menu, choose Paste.
TIP If the envelope isn't displayed, you can right-click the track, choose Show Envelopes from the shortcut menu, and then choose an envelope from the submenu.
Copying an envelope to another track
-
Select the Envelope tool
. -
Select the envelope you want to copy:
-
Double-click above the time ruler to create a time selection that matches the length of your project.
-
Click the envelope you want to copy.
-
From the Edit menu, choose Copy.
-
Select the envelope where you want to paste the envelope points:
-
Click within a track to select it.
-
Insert an audio or video envelope if needed. For more information, see Audio track automation or Video track automation
-
Click to select the envelope where you want to paste the selected points.
-
Click Go to Start
 if you want the envelope to appear exactly as it was in the original track, or click to position the cursor where you want the envelope to start.
 -
From the Edit menu, choose Paste.
TIP If the envelope isn't displayed, you can right-click the track, choose Show Envelopes from the shortcut menu, and then choose an envelope from the submenu.