Audio track automation
With audio track automation, you can create fades, apply stereo panning, and add effects with parameters or send levels that change over time.
Track automation will always affect all events on the track. This means that any event envelopes will be calculated after the track automation.
To adjust track automation using the controls in the track header, select the Automation Settings button  . When Automation Settings is not selected, the controls adjust static (trim) levels.
TIP Choose a fade type from the Audio default drop-down list on the Editing tab of the Preferences dialog to set the default fade type that will be used when you add volume and panning automation envelopes. This setting is used only when you create new envelopes—when you add a point to an existing envelope, the new point always uses the same fade type as the preceding envelope point. Also, this setting is not used for event envelopes.  For more information, see Preferences - Editing Tab
Applying mute automation
-
Select an audio track.
-
From the Insert menu, choose Audio Envelopes, or right-click in the track list and choose Insert/Remove Envelope from the shortcut menu.
-
From the submenu, choose Mute. A check mark is displayed next to the command, and an envelope is added to the timeline.
Mute automation is either on or off with no fade between the on and off states. If you want to use fades, apply volume automation.
-
You can adjust the automation by editing the envelope in the timeline or by clicking the Mute Automation button
 in the track header. For more information, see Adjusting envelopes
The button behaves differently depending on the track automation recording mode.
For more information, see Recording track envelope and keyframe automation -
When the track automation mode is set to Off, the button mutes the entire track.
-
When the track has a mute envelope and the track automation mode is set to Read, the button changes state to reflect the envelope setting during playback but cannot be adjusted.
-
When the track has a mute envelope and the track automation mode is set to Touch or Latch, the button edits the envelope setting at the cursor position.
When you apply mute automation to a track, it's possible to have a track that is muted and soloed simultaneously if you use the Mute  and Solo
  buttons in the track header. The mute state overrides the solo state:
-
If a track's Solo button is selected, the track is included in the solo group, but it will be muted whenever the mute automation is set to mute the track.
-
If the track's Mute button is selected, the track is muted regardless of the mute automation settings.
Applying volume or pan automation
-
Select an audio track.
-
From the Insert menu, choose Audio Envelopes, or right-click in the track list and choose Insert/Remove Envelope from the shortcut menu.
-
From the submenu, choose Volume or Pan. A check mark is displayed next to the command, and an envelope is added to the timeline.
-
If you want to change the track's volume or pan setting throughout the track, edit the envelope in the timeline.
For more information, see Adjusting envelopesNOTE Panning envelopes will use the current panning mode for the Pan slider in the track list. For more information about panning modes, see Audio panning modes
-
If you want to change volume or pan settings by recording automation, select the Automation Settings button
in the track header. The Volume fader or Pan slider handle is displayed as a  in automation mode.
 -
Drag the Volume fader or Pan slider to edit automation settings at the cursor position. You can also adjust automation by editing the envelope in the timeline.
For more information, see Adjusting envelopesThe control behaves differently depending on the track's automation recording mode.
For more information, see Recording track envelope and keyframe automation -
When the track automation mode is set to Off, the control adjusts the level of the entire track. In this mode, the automation control acts as a second trim control.
-
When the track has a volume or pan envelope and the track automation mode is set to Read, the control will follow the envelope during playback but cannot be adjusted.
-
When the track automation mode is set to Touch or Latch, the control edits the envelope setting at the cursor position. If the track does not have an envelope, an envelope will be added when you adjust the control.
If multiple tracks are selected, all selected tracks are adjusted.
Applying assignable effects send automation
You can use assignable effects automation to vary the level of a track sent to an assignable effects chain. Before you can add an assignable effects envelope, you'll need to add an assignable effects chain to your project. For more information, see Adding an assignable effects chain
-
Select an audio track.
-
From the Insert menu, choose Audio Envelopes, or right-click in the track list and choose Insert/Remove Envelope from the shortcut menu.
-
From the submenu, choose the effects chain where you want to send the selected track. A check mark is displayed for each assignable effects chain that is automated for the selected track.
-
Select the Automation Settings button
in the track header. The fader thumb is displayed as a in automation mode. You can also edit automation by editing the envelope in the timeline. For more information, see Adjusting envelopes -
Click the label on the multipurpose slider and choose an assignable effects chain from the menu.
-
Drag the FX fader to control the level of the track sent to each of the assignable FX chains that you have created.
The fader behaves differently depending on the track's automation recording mode.
For more information, see Recording track envelope and keyframe automation -
When the track has an assignable effects envelope and the track automation mode is set to Off, the fader adjusts the send level of the entire track. In this mode, the automation control acts as a second trim control.
-
When the track has an assignable effects envelope and the track automation mode is set to Read, the fader will follow the envelope during playback but cannot be adjusted.
-
When the track has an assignable effects envelope and the track automation mode is set to Touch or Latch, the fader edits the envelope setting at the cursor position. If the track does not have an envelope, one will be created when you adjust the fader.
If multiple tracks are selected, all selectedtracks are adjusted.
Applying bus send automation
You can use bus envelopes to vary the level of a track sent to a bus. Before you can add a bus envelope, you'll need to specify the number of busses for your project. For more information, see Adding audio busses
-
Select an audio track.
-
From the Insert menu, choose Audio Envelopes, or right-click in the track list and choose Insert/Remove Envelope from the shortcut menu.
-
From the submenu, choose the bus where you want to send the selected track. A check mark is displayed for each bus send level that is automated for the selected track.
-
Select the Automation Settings button
in the track header. The fader thumb is displayed as a in automation mode. You can also adjust automation by editing the envelope in the timeline. For more information, see Adjusting envelopes -
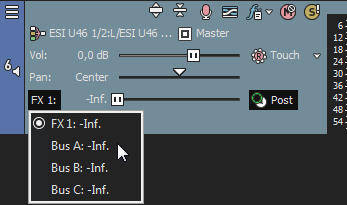
Click the label on the multipurpose slider and choose a bus from the menu.
-
Drag the fader to control the level of the track sent to the selected bus. Dragging the fader to the left cuts the volume; dragging to the right boosts the volume.
The fader behaves differently depending on the track's automation recording mode.
For more information, see Recording track envelope and keyframe automation -
When the track automation mode is set to Off, the fader adjusts the send level of the entire track. In this mode, the automation control acts as a second trim control.
-
When the track has a bus envelope and the track automation mode is set to Read, the fader will follow the envelope during playback but cannot be adjusted.
-
When the track has a bus envelope and the track automation mode is set to Touch orLatch, the fader edits the envelope setting at the cursor position. If the track does not have an envelope, one will be created when you adjust the fader.
If multiple tracks are selected, all selected tracks are adjusted.
Adding or removing track effect automation
If a plug-in supports automation, you can dynamically adjust effect parameters over time. For more information, see Automating audio effect parameters
Hiding envelopes
From the View menu, choose Audio Envelopes, and choose the envelope you want to hide from the submenu. Hiding an envelope simply removes the line from the timeline while it retains the playback properties.
TIP From the View menu, choose Show Envelopes (or press Ctrl+Shift+E) to toggle the display of all envelopes in the timeline.
If you've added effect automation envelopes to a track, the track can get cluttered. Click the down arrow next to the Track FX button  and choose an envelope from the drop-down list to select which envelope you want to display.
Locking envelopes to events
From the Options menu, choose Lock Envelopes to Events if you want envelope points and position to move with an event when it is moved along the timeline.
NOTE This option also locks track-level keyframes to the events on the track. When keyframes are locked, you can move events along the timeline, and their associated keyframes move with them.