Automating audio effect parameters
When you add an effect that supports automation, you can use automation to dynamically adjust effect parameters.
Automation for audio track effects is applied on the audio track. Automation for bus effects and assignable effects is applied on the appropriate bus track.
For more information about audio effects, see Adding audio effectsUsing bus effects and Using assignable effects
Adding effect automation
-
Click the down arrow next to the Track FX button
 and choose FX Automation to display the FX Automation Chooser.
NOTE If no track effects exist, clicking the Track FX button will display the Plug-In Chooser. Effects that can be automated are indicated by the
 icon in the chooser. The first time you select a plug-in, the application will determine whether it can be automated and will update the plug-in's icon and add it to the Automatablefolder in the Plug-In Chooser.
 -
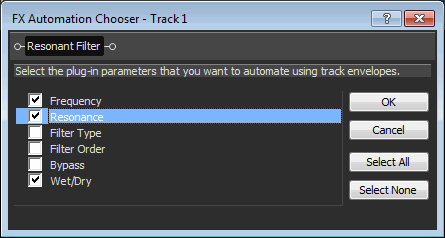
Click an effect button at the top of the FX Automation Chooser. A list of the effect's automatable parameters is displayed:
-
Select the checkbox for each parameter that you want to control with an envelope.
TIP If you're working with a 5.1 surround project, you can select the Enable check boxes to determine which channels will be affected by the plug-in. An automation envelope is added to the timeline for each selected channelso you can enable or bypass the plug-in during the project.
If you want to use distinct plug-in settings for each channel (separate EQ settings for the front and surround speakers, for example), you can add multiple instances of the plug-in to the track effects chain and select the Enable checkboxes for the channels you want each instance of the plug-in to affect.
-
Click OK to close the FX Automation Chooser. An envelope is added to the track for each parameter that you selected in the FX Automation Chooser.
Adjusting effect automation parameters
You can adjust automated effect parameters by editing the envelopes in the timeline or by recording automation with the controls in the effects window. For more information, see Adjusting envelopes and Recording track envelope and keyframe automation
If you've enabled the Bypass parameter for a plug-in, you can click the Bypass button in the plug-in's banner to toggle the Bypass envelope at the cursor position.

NOTE When you automate an effect’s frequency parameter — such as the frequency parameters in the track EQ effect — you may notice that the frequency changes are more apparent when moving through the lower frequencies. This is because frequency scales in track EQ and other plug-ins use a logarithmic scale, but effect automation uses linear interpolation.
To make the automated frequency changes sound more natural, change the fade curve types to change the interpolation rates between envelope points. For high-to-low frequency sweeps, use a fast fade curve; for low-to-high frequency sweeps, use a slow curve. For more information about changing fade curves, see Adjusting envelopes
Bypassing effect automation
Toggle the Bypass FX Automation button  in the effects window to enable or bypass automation envelopes:
-
After you've added effect automation envelopes, the Bypass FX Automation button is deselected, and effect parameters are automated using the envelope settings.
-
When the button is selected, effect automation envelopes are ignored and the effect's initial state is used for the duration of the track.
-
If you delete all automation envelopes from a plug-in, the Bypass FX Automation button is unavailable.
Removing effect automation
-
Click the down arrow next to the Track FX button
and choose FX Automation to display the FX Automation Chooser.
NOTE If no track effects exist, clicking the Track FX button will display the Plug-In Chooser. Effects that can be automated are indicated by the
icon in the chooser. The first time you select a plug-in, the application will determine whether it can be automated and will update the plug-in's icon and add it to the Automatablefolder in the Plug-In Chooser. -
Click an effect button at the top of the FX Automation Chooser. A list of the effect's automatable parameters is displayed:
-
Clear the checkbox for the automation you want to remove.
-
Click OK to close the FX Automation Chooser. The envelope is removed from the timeline for each checkbox that you cleared in the FX Automation Chooser.